


Java Web 开发:MyBatis
学习目标
理解MyBatis的设计思想
MyBatis和JDBC的关系
为何将SQL语句都集中管理在XML映射文件中
熟悉MyBatis的输入映射
- 未使用注解
- 使用注解
- ${}和#{}之间的区别
熟悉MyBatis的输出映射
- 为什么resultType写的是单个结果的类型
- resultType和resultMap的联系和区别
掌握动态SQL的使用
- 能够根据传入的值非空拼接SQL —> 条件插入、条件更新、条件查询
- foreach完成多条数据插入和in语句
- 获得自增的主键
掌握一对一、一对多场景的封装(至少掌握一种)
了解懒加载
了解缓存
前置知识准备
- 常用的SQL语句的编写(CRUD等)
- JDBC对应的SQL完成预编译、提供参数、并且完成结果集的封装
- 懒加载和立即加载
MyBatis介绍
SSM: Spring、Spring MVC、MyBaits
MyBatis本是apache基金会的一个开源项目ibatis ,2010年这个项目有apache迁移到了google code, 并且改名为Mybatis。2013年11月代码迁移到了github. Mybatis是一个基于Java的持久层框架。
Mybatis是一个ORM框架。(对象关系映射)
- 类和表之间的关系(比如User类和cskaoyan_user表)
- 类中的成员变量和表中的列(名称、JavaType和JdbcType)
- 数据库中一条记录和Java中的一个实例(比如一个user对象和cskaoyan_user表中的一条记录)
MyBatis 是一款优秀的持久层框架,它支持自定义 SQL、
存储过程以及高级映射。MyBatis 免除了几乎所有的 JDBC 代码以及设置参数和获取结果集的工作。MyBatis 可以通过简单的 XML 或注解来配置和映射原始类型、接口和 Java POJO(Plain Old Java Objects,普通老式 Java 对象)为数据库中的记录。Mybatis就是一个可以帮助我们在Java代码中更加高效的去操作数据库的这么一个框架。
入门案例(Quick start)
JDBC
//定义了UserDao接口,我们传入id,可以查询user的记录出来public interface UserDao { User selectByPrimaryKey(Integer id) throws Exception;}// 假如我们定义了实现类,那么我们可以这样子来调用获得user记录public class JdbcExecution { // 查询id为2的用户 public static void main(String[] args) throws Exception{ UserDao userDao = new UserDaoImpl(); User user = userDao.selectByPrimaryKey(2); System.out.println("user = " + user); }}接着问题就是我们在实现类中的代码,使用JDBC的方式来完成,我们也把过程中的一些操作做一些分析,可以参考注释
public class UserDaoImpl implements UserDao{ @Override public User selectByPrimaryKey(Integer id) throws Exception { // 1.获得连接,如果后面需要提交事务,则执行connection.commit Connection connection = JdbcUtil.getConnection(); // 2.预编译,预编译过程中传入了SQL语句 PreparedStatement preparedStatement = connection.prepareStatement("select id, username, password, age, birthday, create_date, mobile from cskaoyan_user where id = ?"); // 3.提供占位符位置的值 preparedStatement.setInt(1,id); // 4.执行查询获得结果集 ResultSet resultSet = preparedStatement.executeQuery(); // 5.创建一个接收结果集中的值的实例 User user = new User(); while (resultSet.next()) { // 6.获得结果集中的username列(column)中的值 String username = resultSet.getString("username"); // 获得结果集中的password列(column)中的值 String password = resultSet.getString("password"); int age = resultSet.getInt("age"); Date birthday = resultSet.getDate("birthday"); Date createDate = resultSet.getDate("create_date"); String mobile = resultSet.getString("mobile"); user.setId(id); // 7.通过set方法封装给user实例中的username这个成员变量(property) user.setUsername(username); // 通过set方法封装给user实例中的password这个成员变量(property) user.setPassword(password); user.setAge(age); user.setBirthday(birthday); user.setCreateDate(createDate); user.setMobile(mobile); } return user; }}这个过程比较繁琐,并且存在着很多定制化的内容和耦合
- SQL语句和代码直接耦合在一起
- 设置参数过程比较繁琐,对应的关系只有占位符的序号,如果有多个占位符?的话,容易出错
- 查询结果集的使用比较繁琐
- 手动调用构造方法来获得实例
- 要关注列名从结果集中取出数据
- 要关注列的类型手动调用不同的方法,比如getInt、getString、getDate
- 取出的值需要使用set方法来封装
MyBatis
导包
配置1: 配置一个Mybatis的主配置文件,用来获取SqlSessionFactory
配置2: 配置一个专门用来存放SQL语句的配置文件,Mapper.xml
使用
但是UserDaoImpl中的实现则完全不一样了
其中MyBatisUtil是提供全局共享的SqlSessionFactory实例的
分析
在上面的案例中MyBatis默默的替我们做了什么事情
- connection.preparedStatement需要传入的Sql语句,我们仅仅提供了坐标(映射文件的命名空间+id)
- 参数和占位符的对应关系,自动对应起来
- resultSet获得结果集,并且封装为User实例的过程完全是MyBatis自动完成的
而上面的过程其实是实际开发过程中非常繁琐,而又很通用的事情
动态代理(Dynamic Proxy)
动态代理
一些问题
而Mybatis的动态代理可以帮助我们去生成接口的代理对象。我们可以自己不实现接口。
编译后在同一路径
如何使用动态代理呢?
思考:代理对象做增强,他做了什么增强?
增删改查示例
添加
删除
修改
查找
事务
在使用Mybatis的时候, 自带事务,而且事务默认情况下是不会自动提交的
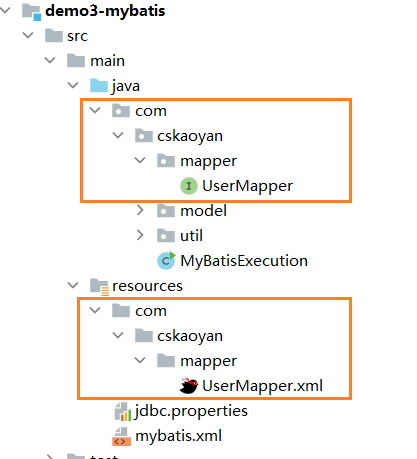
搭建开发环境(MyBatis)
Maven项目
第一步: 导包在pom.xml
第二步: 配置MyBatis的主配置文件(
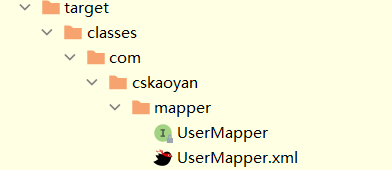
mybatis-config.xml)第三步: 创建一个Java接口Mapper接口文件 (注意路径)
第四步: 创建一个与Java接口文件对应的Mapper.xml配置文件
第五步: 把mapper.xml配置文件引入到主配置文件中(
mybatis-config.xml)第六步: 加载主配置文件(
mybatis-config.xml)第七步: 在对应的Mapper文件和对应的Java接口中, 声明SQL和声明方法
第八步: 获取SqlSession 和 代理的Mapper对象
第九步: 通过代理对象调用方法执行SQL语句
配置(MyBatis)
主要是介绍Mybatis的核心配置文件。
这些标签是有序的
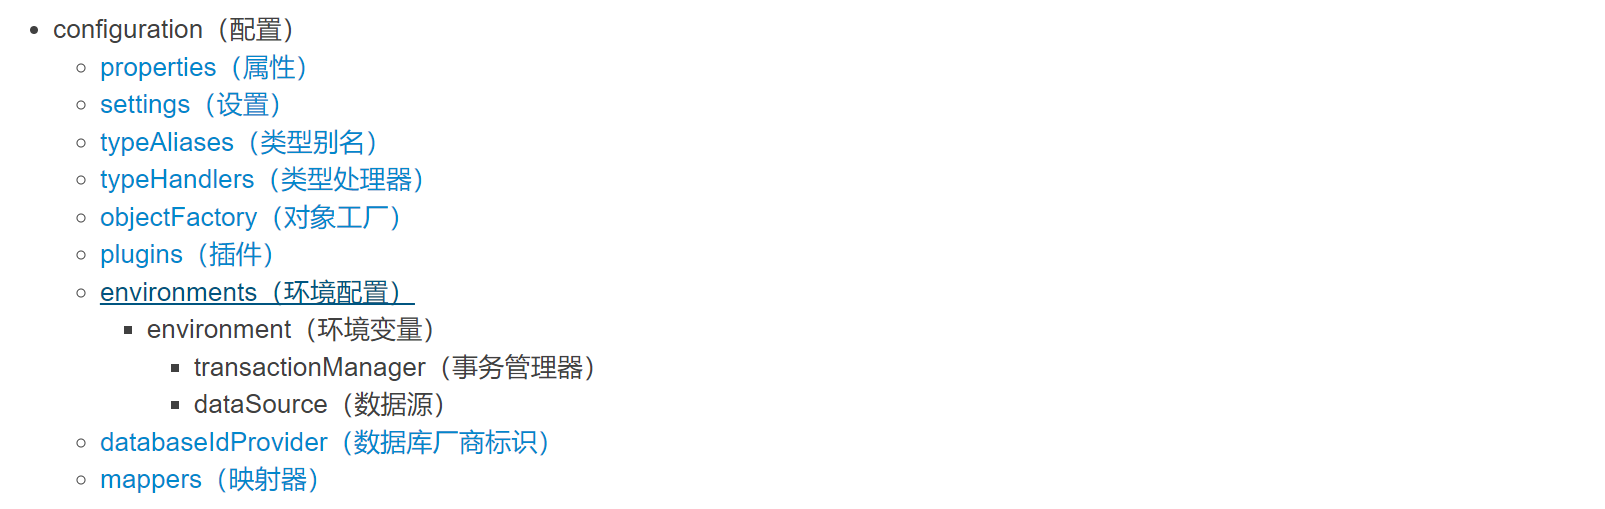
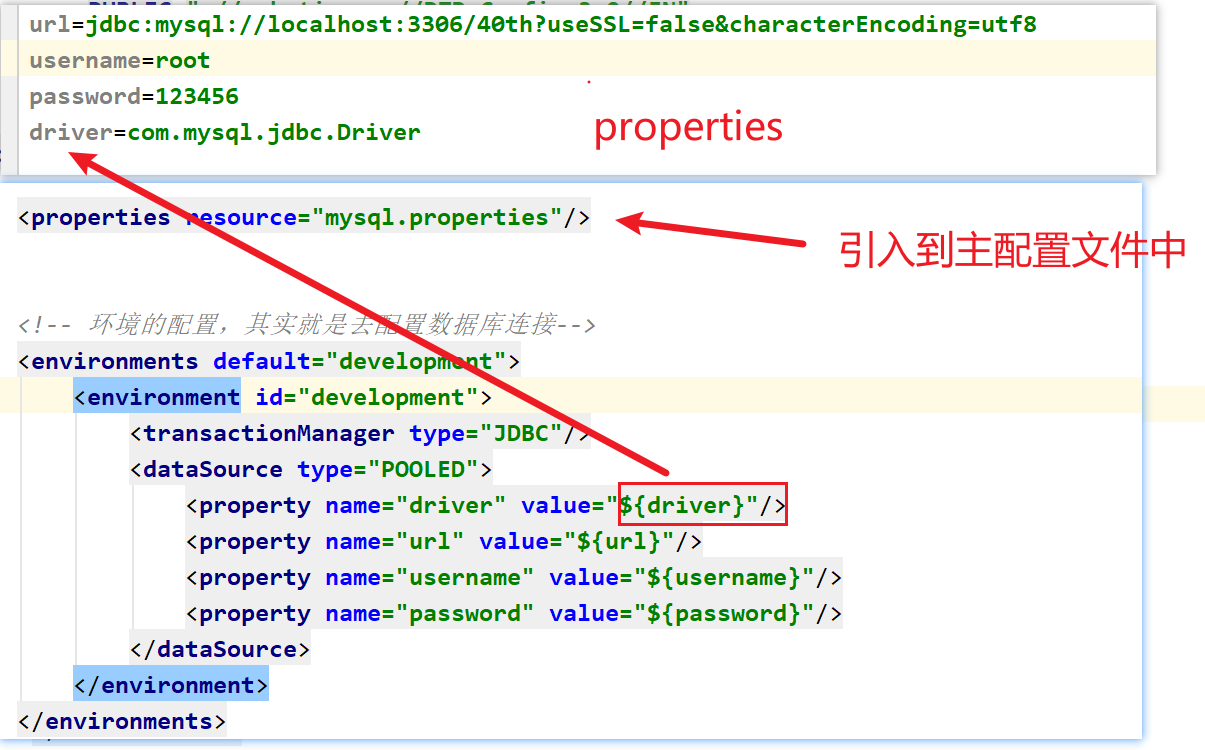
properties
properties表示可以外部配置的属性,并可以进行动态替换。(作为典型的是JDBC配置)
settings
settings是MyBatis的行为配置(类似于idea和settings的关系)
eg: 日志配置
一个完整的settings配置 (暂时没用)
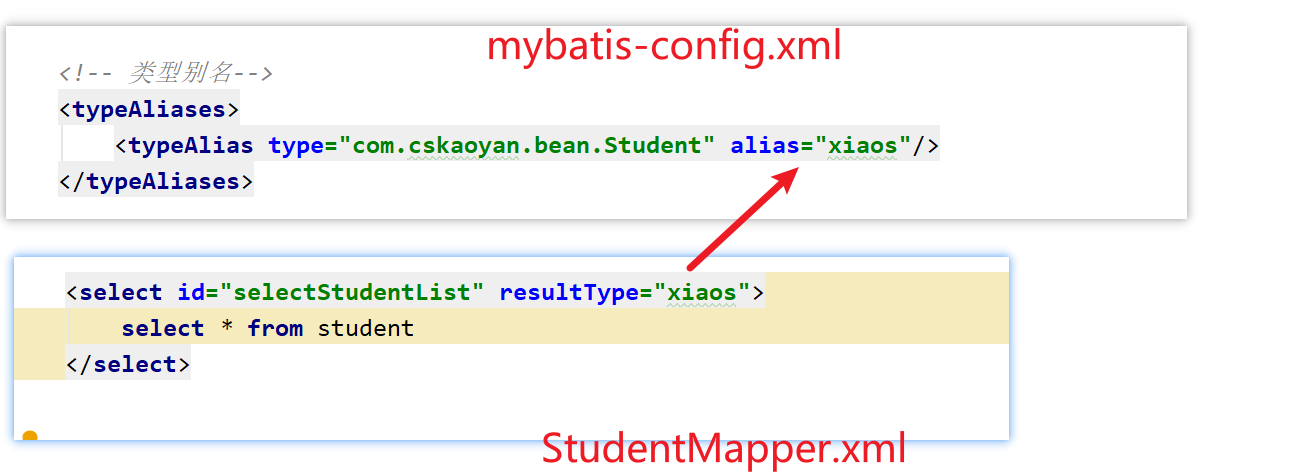
typeAliases
typeAlies类型别名。(也就是我们可以对 类 起别名,简化操作) (暂时不建议使用)
注意: Mybatis对于一些基本类型和包装类型,以及集合类型,有内置的别名。
别名 映射的类型 _byte byte _long long _short short _int int _integer int _double double _float float _boolean boolean string String byte Byte long Long short Short int Integer integer Integer double Double float Float boolean Boolean date Date decimal BigDecimal bigdecimal BigDecimal object Object map Map hashmap HashMap list List arraylist ArrayList collection Collection iterator Iterator
注意:
1, typeHandlers: MyBatis 对我们SQL参数或从结果集中取出一个值时, 都会用类型处理器将获取到的值以合适的方式转换成 Java 类型。(而在我们使用的时候是无法感知这个问题的, 属于MyBatis的底层处理).
2, ObjectFactory: MyBatis 使用一个对象工厂实例来完成实例化工作。 默认的对象工厂要么通过默认无参构造方法,要么通过有参数的构造方法实例化对象。如果想覆盖对象工厂的默认行为,可以通过创建自己的对象工厂来实现。(不要使用)
environments
environments: 可以配置成适应多种环境.比如开发环境、测试环境和生产环境等可能需要有不同的配置.
mappers
这个是映射器的配置。配置mapper.xml配置文件。
配置方式一: 直接以对应mapper文件的相对路径
配置方式二: 配置某个包下的所有的配置文件
输入映射
输入映射其实就是在说Mybatis是如何传值的。
映射文件中的SQL语句中的语法 —> #{}里写什么东西
#{}这个位置 最终在预编译的过程中变为了?
在Mapper接口中 方法的形参写了什么样式(个数、类型、注解),最终在映射文件中该方法对应的sql语句中的#{}应该如何写
一个参数
一个参数: (基本类型、包装类、String)
1, #{任意值} 来取值: 不建议使用(显得不标准), 建议使用注解写法
2, 如果在方法中 的一个参数 加了@Param注解,那么 后面就只能通过 #{注解值} 来取值
多个参数
多个参数: 需要注解指明#{注解值} 来取值
对象传值
对象传值
方式一: SQL使用的参数命名要和对象内部属性保持一致 (#{成员变量名} 来取值)
方式二: 对象有注解, 必须通过 #{注解值 . 成员变量名} 来取值
注意: 对象和多参数混合问题
使用Map传值
Map传值: 不建议使用
方式一: SQL使用的参数命名要和Map中存储数据的key保持一致 (#{key} 来取值)
方式二: Map对象有注解, 必须通过 #{注解值 . key} 来取值
按位置传值
按位传值: 完全不建议(容易因为程序员的记忆和修改导致bug产生, 除非除了按位传值没办法了)
方式一: arg0、arg1、arg2…
方式二: param1、param2、param3…
在Mybatis的输入映射中,我们经常使用前面三种方式(传入一个参数、传入多个参数、传递对象),后面通过map传值和按照位置来传值 一般不使用,也不建议大家使用。
#和$的区别
${}做的就是字符串的拼接,如果你传入的是字符串,需要你手动在${}外围手动增加单引号 ”
核心点: 使用${}有sql注入的风险
SQL注入:在你执行的SQL语句之外额外执行一部分,导致信息泄露或数据库被丢弃;
使用#{}过程是预编译,不会有SQL注入的风险,建议大家使用的方式
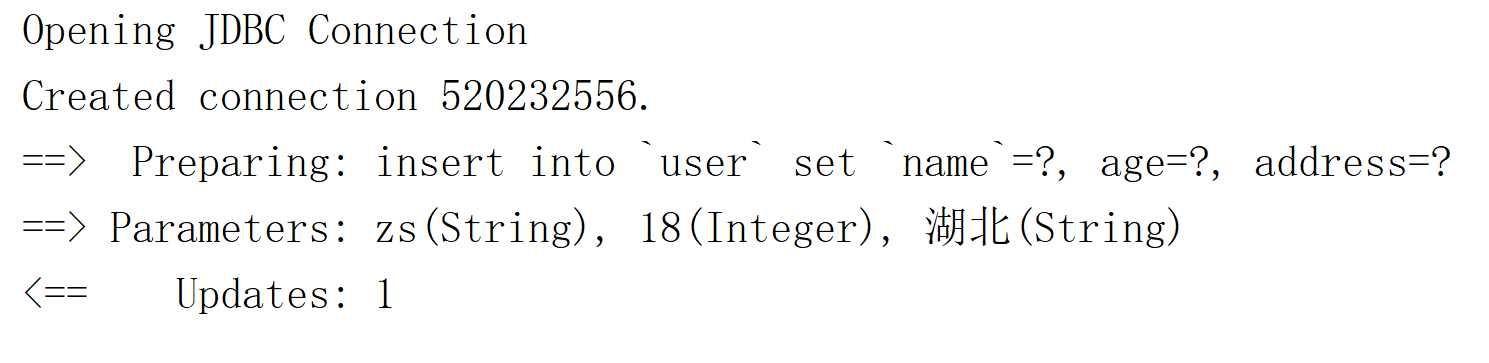
#{参数}使用: 预编译占位 (尽量使用 #{} ) PreparedStatement
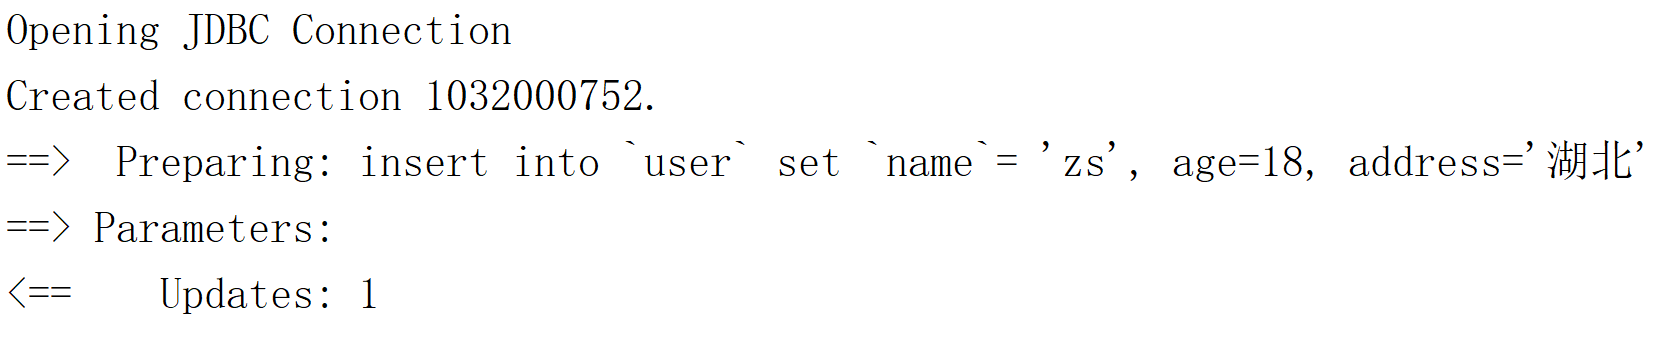
${参数}使用: 字符串拼接, Statement (存在SQL注入问题)
SELECT id,product,money FROM `cskaoyan_product` where id = 3;
-- 如果我们使用#{}的方式-- Preparing:SELECT id,product,money FROM `cskaoyan_product` where id = ?-- Parameters:3
-- 如果我们使用${}的方式-- id提供的值是3-- Preparing:SELECT id,product,money FROM `cskaoyan_product` where id = '3';-- Parameters:
-- 如果有不法分子,提供的参数不是3,在3的基础上额外搞了一些东西-- 3' or '1' = '1SELECT id,product,money FROM `cskaoyan_product` where id = '3' or '1' = '1';注意
分表问题: 动态表名
分列问题: 动态列名
分表的思考.
思考
MyBatis在输入映射过程中有传入对象作为参数,那么这个过程是对JDBC做封装,思考一个问题就是JDBC过程会如何使用我们的对象的
比如这个接口和方法
public interface UserMapper { //对象传值 → 没有使用@Param注解 → 成员变量名 int insert1(User user);}对JDBC过程在分解一下
Connection connection = ConnectionUtil.getConnection();PreparedStatement preparedStatement = connection.preparedStatement("insert into cskaoyan_user (username, password, age, birthday, create_date, mobile) values (?,?,?,?,?,?)");// 传入的是user对象preparedStatement.setString(1,user.getUsername());preparedStatement.setString(2,user.getPassword());...输入映射,MyBatis如何使用的user,通过get方法来使用的
输出映射
一定和查询有关系 → 一定对应的是select标签
使用select标签一定会使用和类型有关系的属性:resultType、resultMap
resultType中可以写别名
resultType写的是单条记录的类型
-- 只有1列,并且记录数为1条 → 查询user表中有多少条记录-- 一个int或Integer类型的值来接收select count(*) from cskaoyan_user ;
-- 只有一列,结果的记录数为多条 → 查询年龄为xxx的用户的名称-- 数组或List、Setselect username from cskaoyan_user where age = 25;
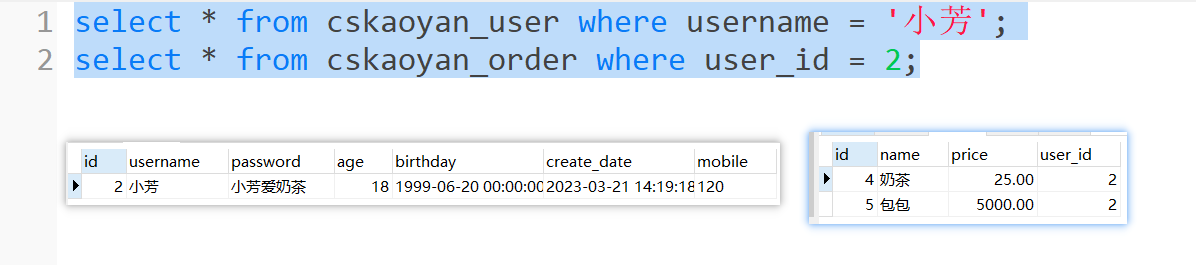
-- 多列,结果的记录数为1条 → 查询id为某个值的用户的全部信息-- 引用类型对象select id,username,password,age,birthday,create_date,mobile from cskaoyan_user where id = 2;
-- 多列,结果的记录数为多条 → 查询年龄为xxx的用户的全部信息-- 引用类型对象的数组或List、Setselect id,username,password,age,birthday,create_date,mobile from cskaoyan_user where age = 25;选择何种封装类型:取决于结果集中的列的个数,以及结果的记录数
封装最终体现在哪里?落脚点在Mapper接口中的方法的返回值类型
输出映射是指Mybatis是如何把SQL语句执行结果映射为 Java对象的。
一个参数
结果列为1且记录数为1(或0)
一个参数: 必须要有resultType(写简单参数的
全限定名称或者是内置的别名)
多个参数
列只有一列,结果集中的记录数有多条(0或1条)
指: 多个参数构成的数组/List/Set
单个对象
核心点:查询结果集中的列名 要和 对象中的成员变量名(set方法)相同
查询结果集中的列名可以通过as起别名的方式做修改
单个对象:
多个对象
如果是采用JDBC会如何写
ResultSet resultSet = prepareStatement.executeQuery();List<User> users = new ArrayList<>();while(resultSet.next()){ User user = new User(); user.setUsername(resultSet.getString("username")); user.setPassword(resultSet.getString("password")); user.setAge(resultSet.getInt("age")); user.setBirthday(resultSet.getDate("birthday")); user.setCreateDate(resultSet.getDate("createDate")); user.setMobile(resultSet.getString("mobile")); users.add(user);}//如果你需要一个Set可以在第2行这里定义为一个set ,也可以将这个List转为一个Set//如果你需要一个数组,也可以将这个List转为一个数组多个对象: 数组/List/Set
resultMap
核心点:查询结果集中的列名 要和 对象中的成员变量名(set方法)对应
存在这样的对应关系,我们才知道从结果集拿那一列的值(resultSet.getString(“列名”)),获得的值要封装给哪一个成员变量
resultMap: 是用来做参数映射的
resultMap是可以复用的
插件
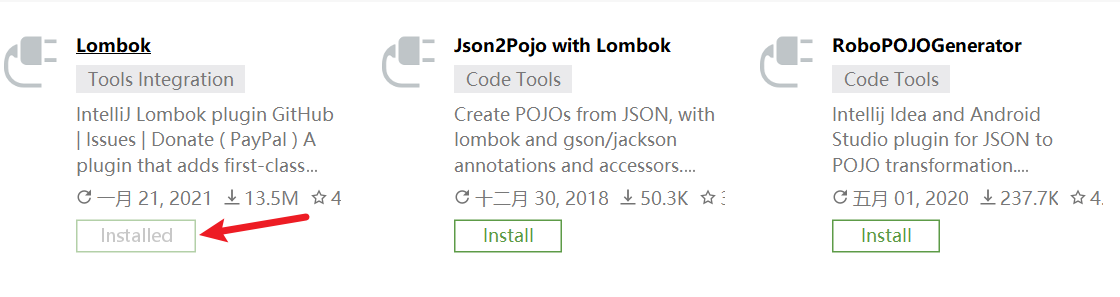
Lombok
Lombok: 可以帮助代码在编译的时候生成对应的方法。
第一步: 安装插件
第二步: 导包
第三步: 使用
Lombok: 好处
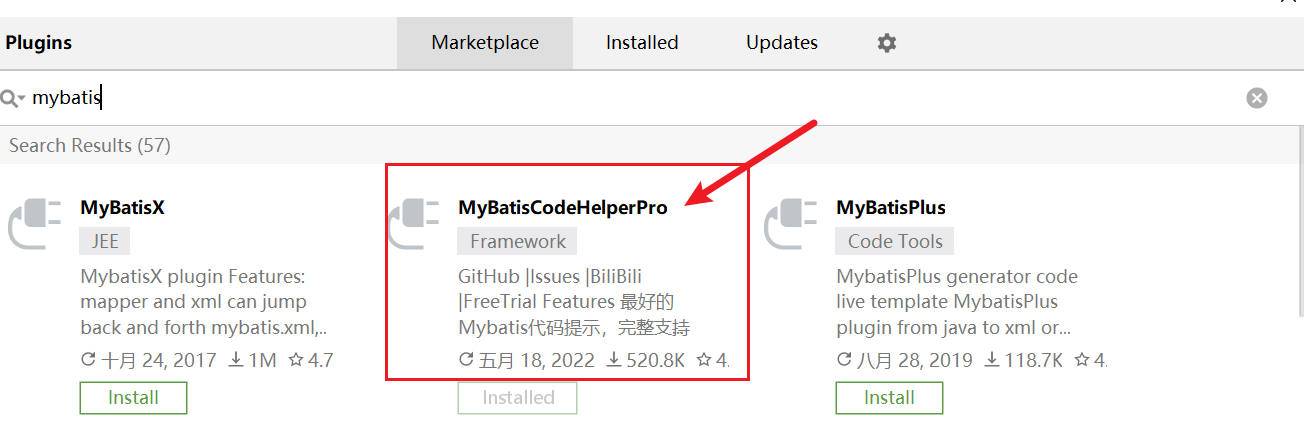
MybatisCodeHelperPro
MybatisCodeHelperPro: 这个是Mybatis的一个插件(提高开发Mybatis应用程序的效率)。
步骤一: 插件安装
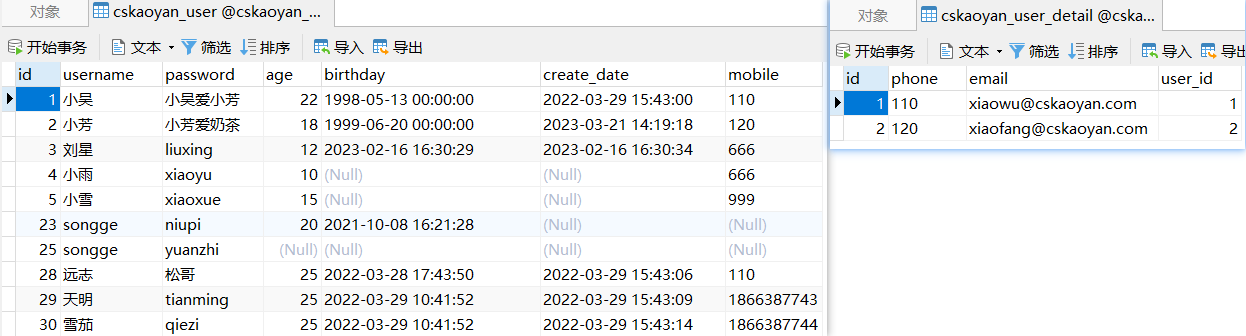
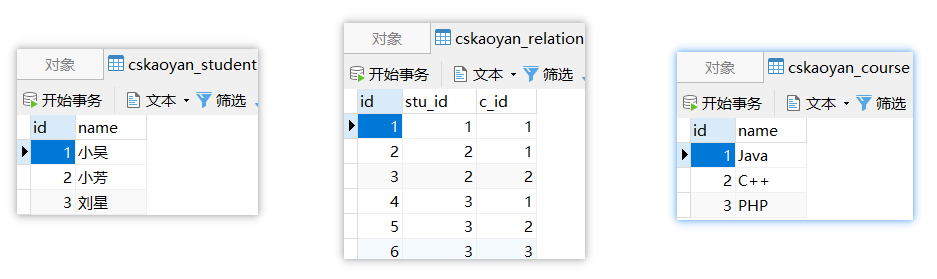
多表查询
一对一结构
结构示例
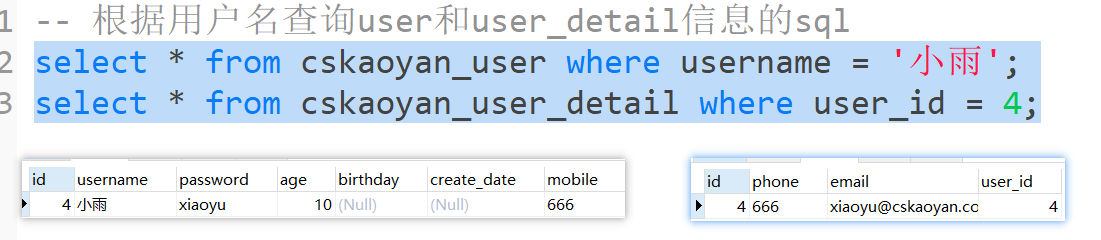
方式一: 分次查询
UserMapper接口
UserMapper.xml文件和UserDetailMapper.xml文件
方式二: 连接查询
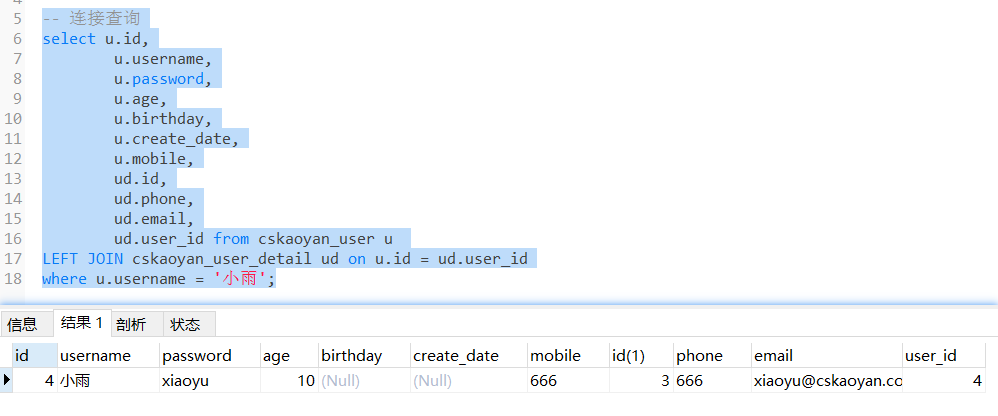
UserMapper接口
UserMapper.xml
一对多结构
结构示例

方式一: 分次查询
UserMapper接口
UserMapper.xml
方式二: 连接查询
UserMapper接口
UserMapper.xml
多对多结构
结构示例
方式一: 分次查询
Mapper接口
Mapper.xml
方式二: 连接查询
Mapper接口
Mapper.xml
动态SQL
动态SQL是Mybatis给我们提供的又一个强大的功能。可以帮助我们根据传入的条件,动态的去改变SQL语句。
通过在映射文件中使用一些不同的标签,会让一个方法对应的SQL语句(主要是insert、delete、update、select标签内的sql语句)产生变化
是为了让你这个标签内的SQL更强大,更通用
业务场景
条件查询
Mapper接口中的方法 可以如何定义
- List<Phone> selectAll();
- List<Phone> selectByStorage(String storage);
- List<Phone> selectByStorageAndCPU(String storage,String cpu);
- List
selectByStorageAndCPUAndMemory(String storage,String cpu,String memory); 是否有可能我根据存储空间和内存这两个条件查询呢
是否有可能我根据CPU内存两个条件查询呢?
如果有4个条件选择其中的两个查询,变成C42 = 6种情况
如果使用条件查询 → 只用Mapper接口中的一个方法就能满足我们的需求
- List/
selectByCondition(String storage,String cpu,String memory,String size) 条件更新(插入)
- 更新对象中成员变量不为空的列
in语句
- — 这样的参数通过输入映射如何传进来 SELECT * FROM
cskaoyan_userwhere id in (1,2,3)批量插入
- 传入User的多条记录(User[]、List<User>、Set<User>等)
- 想要通过一条sql语句一起插入到数据库
- insert into cskaoyan_user (username,password,age,birthday,create_date,mobile) values (?,?,?,?,?,?),(?,?,?,?,?,?),(?,?,?,?,?,?),(?,?,?,?,?,?)
where
where这个标签可以帮助我们在最终执行的SQL中自动生成where关键字
if
Java代码中的if 啥功能,如果if中的条件为true,则执行if中的代码
映射文件中使用if标签,test属性它的值为true,则会拼接if标签内的SQL语句;如果test属性值为false则不会拼接
if标签可以帮助我们去做判断是否满足某个条件
代码示例
choose when otherwise
choose when otherwise就相当于Java中的 if … else…
和where一起使用
@Testpublic void testChooseWhenOtherwise() { PhoneMapper phoneMapper = MyBatisUtil.getSqlSession().getMapper(PhoneMapper.class); //==> Preparing: select id, brand, name, storage, memory, cpu from cskaoyan_phone WHERE memory >= ? //==> Parameters: 8(String) List<Phone> phoneList1 = phoneMapper.selectByMemory("8"); //==> Preparing: select id, brand, name, storage, memory, cpu from cskaoyan_phone WHERE memory = ? //==> Parameters: 12(String) List<Phone> phoneList2 = phoneMapper.selectByMemory("12");}sql-include
映射文件中出现的相同的SQL可以做一个提取
- 把相同的部分放在SQL标签中,并且对外提供一个id,这段SQL也可以称之为SQL片段
- 使用include标签进行引用,refid属性值为sql标签的id属性值
提取
引入
sql-include 标签我们一般用来提取 列名。
提取
引入
好处分析
trim
trim标签里面写的是SQL语句(包含标签),在其内容的最前面和最后面可以增加指定字符,在其内容最前面和最后面也可以去除指定字符
- prefix 前缀
- suffix 后缀
- prefixOverrides
- suffixOverrides
trim标签可以帮助我们动态的去增加指定的字符,或者是删除指定的字符。
set
<set> 就相当于 <trim prefix=“SET” suffixOverrides=”,”> 这个配置,和这个是等价的。
foreach
做的是遍历,在遍历的过程中,拼接foreach标签中的内容
做的是数组和集合类的遍历
Foreach可以帮助我们去循环处理SQL语句。
foreach标签以及里面的属性
<foreach collection="需要遍历的内容,比如数组或集合类list等" item="遍历过程中的单项值" open="在foreach标签最左侧拼接字符" close="foreach标签最右侧拼接值" separator="每两个遍历的内容之间的补充字符" index="下标,没啥用"> 会被遍历拼接的内容</foreach>- collection属性:
- 如果Mapper接口中的方法的形参使用了@Param,用的就是@Param注解的属性值
- 如果没有使用注解:如果是数组,则写array;如果是list就写list
- item属性:自己定义,在foreach标签内可以使用#{}方式使用该值
- open、close属性:最前和最后去拼接字符,拼接一次
- separator属性:每两个遍历的内容之间的补充字符;拼接次数为n-1
批量插入
-- 哪些内容出现了n次 → foreach标签中 → (?,?,?,?,?,?)-- 哪些内容出现了n-1次 → separator属性中 → ,-- 哪些内容出现了1次 → open、close属性中 → 无insert into cskaoyan_user (username,password,age,birthday,create_date,mobile) values (?,?,?,?,?,?),(?,?,?,?,?,?),(?,?,?,?,?,?),(?,?,?,?,?,?)Foreach在插入的使用
List类型参数
没有注解, foreach的循环从插入的时候, 要求foreach标签的 collection参数, 是collection (如果List对象建议写list)
数组类型参数
没有注解, foreach的循环从插入的时候, 要求foreach标签的 collection参数, 必须是array
添加注解
如果在使用foreach的循环从插入的时候, 要求foreach标签的 collection参数, 必须是
注解名
使用in查询
Foreach在查询时候的使用:
注意: foreach collection在不使用注解情况下, 默认集合类使用collection (List建议使用List), 数组使用array
如果参数使用了注解, foreach 标签的collection属性使用注解名
selectkey
额外执行一个查询,并且将查询的结果给到输入映射传入的参数
这个标签可以帮助我们在执行目标SQL语句之前或者是之后执行一条额外的SQL语句。
AFTER操作
BEFORE:操作
useGeneratedKeys
需要使用到两个属性:useGeneratedKeys、keyProperty
useGeneratedKeys: 获取insert/update操作数据的主键
懒加载
懒加载和MyBatis缓存作为了解, 知道是怎么回事, 面试的时候可以谈一谈思想即可, 因为工作中并不会使用(基本不会使用)
懒加载又叫做延迟加载。
注意:
总开关配置: mybatis的主配置文件里面的settings里面
案例
局部开关
注意:idea的Debug模式下不能复现懒加载,因为debug模式会显示出对象中的所有的信息,相当于已经用到了第二次SQL语句查询的内容,所以第二次SQL语句就会立马执行
思考: 懒加载用处
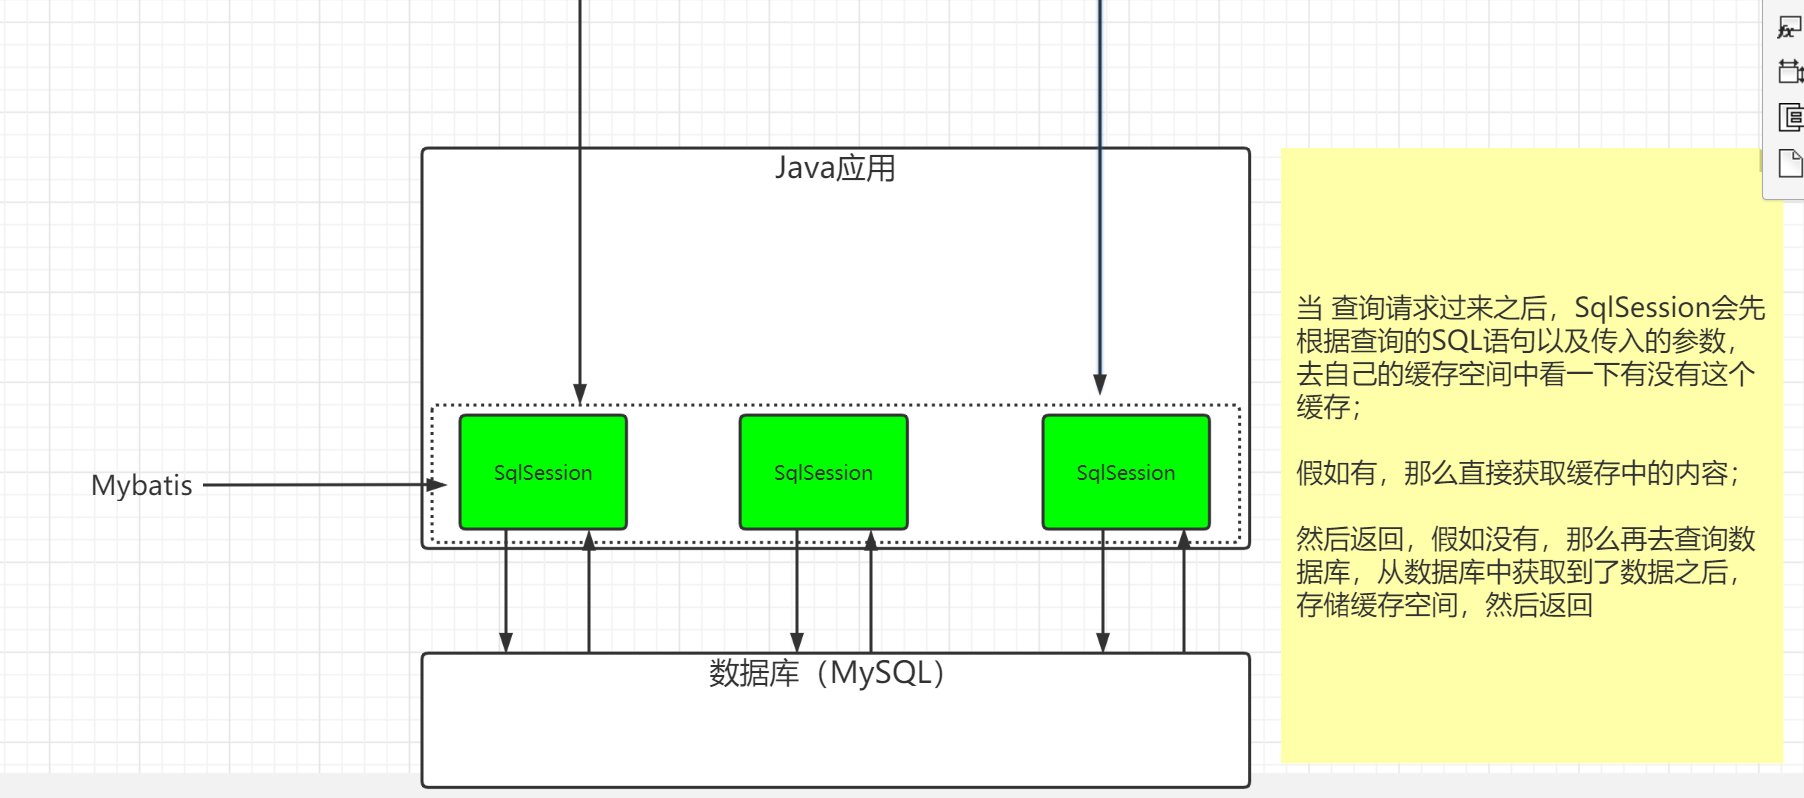
缓存
缓存是指在Mybatis中,单独开辟一块内存空间(map),来存储查询的信息。后续假如再次调用了到了同样的查询,那么就直接查询缓存。
MyBatis默认开启了缓存
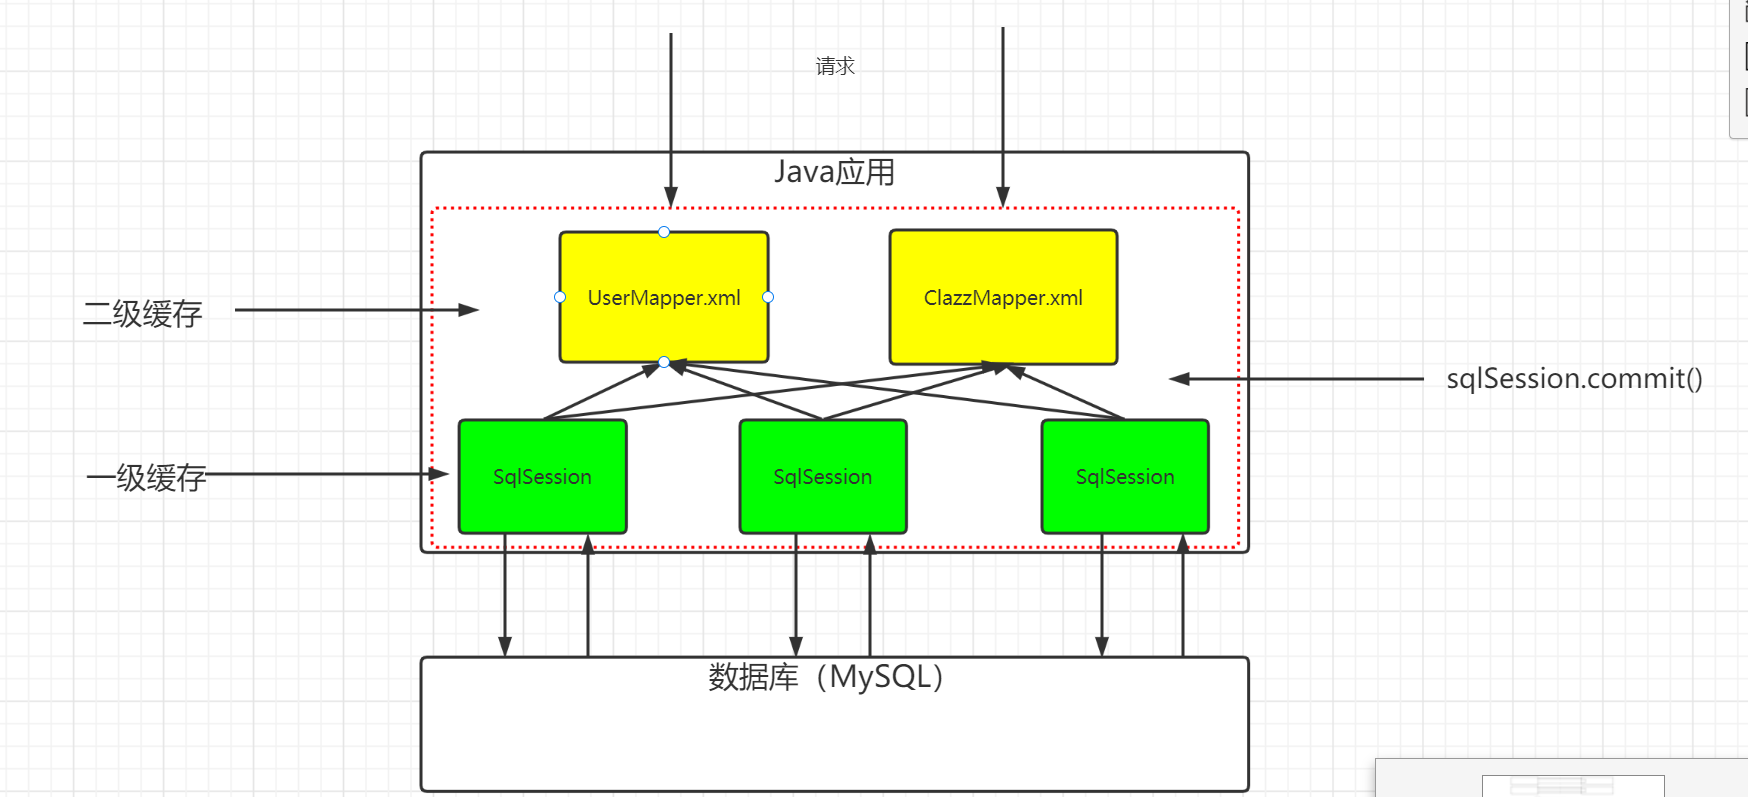
一级缓存
一级缓存是一个以SqlSession管理的Mapper级别的缓存。缓存的内容存储在SQLSession中管理。
配置:一级缓存默认是开启的,并且没有提供开关给用户关闭(不可以关闭)。
测试
同一个SqlSession 获取的同一个Mapper: 走缓存
同一个SQLSession获取不同的mapper: 走缓存
不同SQLSession获取不同的mapper: 不走缓存
二级缓存
二级缓存是一个NameSpace级别(mapper.xml)的缓存,每一个NameSpace都有自己的单独的缓存空间。(要通过两级配置开启)
配置1:总开关
配置2: 局部开关
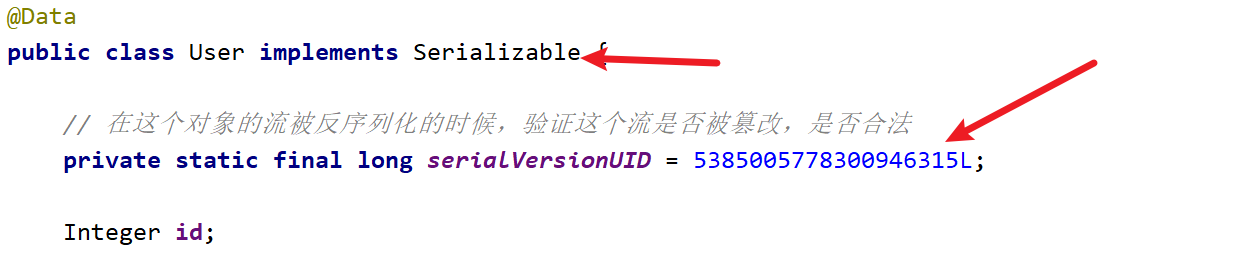
需要对二级缓存的缓存的所有相关对象实现序列化接口
开启自动生成序列化id
实现序列化接口,生成序列化id
测试
测试
二级缓存有没有用呢?
其实有一定的作用,但是也有一定的缺陷
- 确实能够提高Mybatis的性能
- 不能完美的解决脏数据的问题
- 二级缓存空间对于用户来说是完全透明的,我们用户不能够直接的去操作它,也不能够让用户指定去查询数据库还是查询缓存,所以其实使用起来不太方便
在以后的工作中,有一些需要使用缓存的场景,那么这个时候我们不会考虑使用Mybatis给我们提供的缓存,取而代之的是使用我们的NoSQL数据库(Redis)。
文章分享
如果这篇文章对你有帮助,欢迎分享给更多人!