


Java Web 开发:Servlet
前言
学习目标
理解HTTP协议和HTTP请求报文和响应报文
掌握Tomcat的使用,以及IDEA中使用Tomcat应用的方式
掌握Web应用的目录结构
- 标准目录结构(应用部署、编译)
- Maven开发的目录结构
- 使用IDEA来开发Web应用
熟悉Servlet的执行流程和生命周期
- 掌握service方法
- 掌握init、destroy方法执行时机和次数
熟悉Servlet使用和相关配置
熟悉ServletContext的功能
了解XML配置方式
前置知识准备
面向对象编程(对象、类)
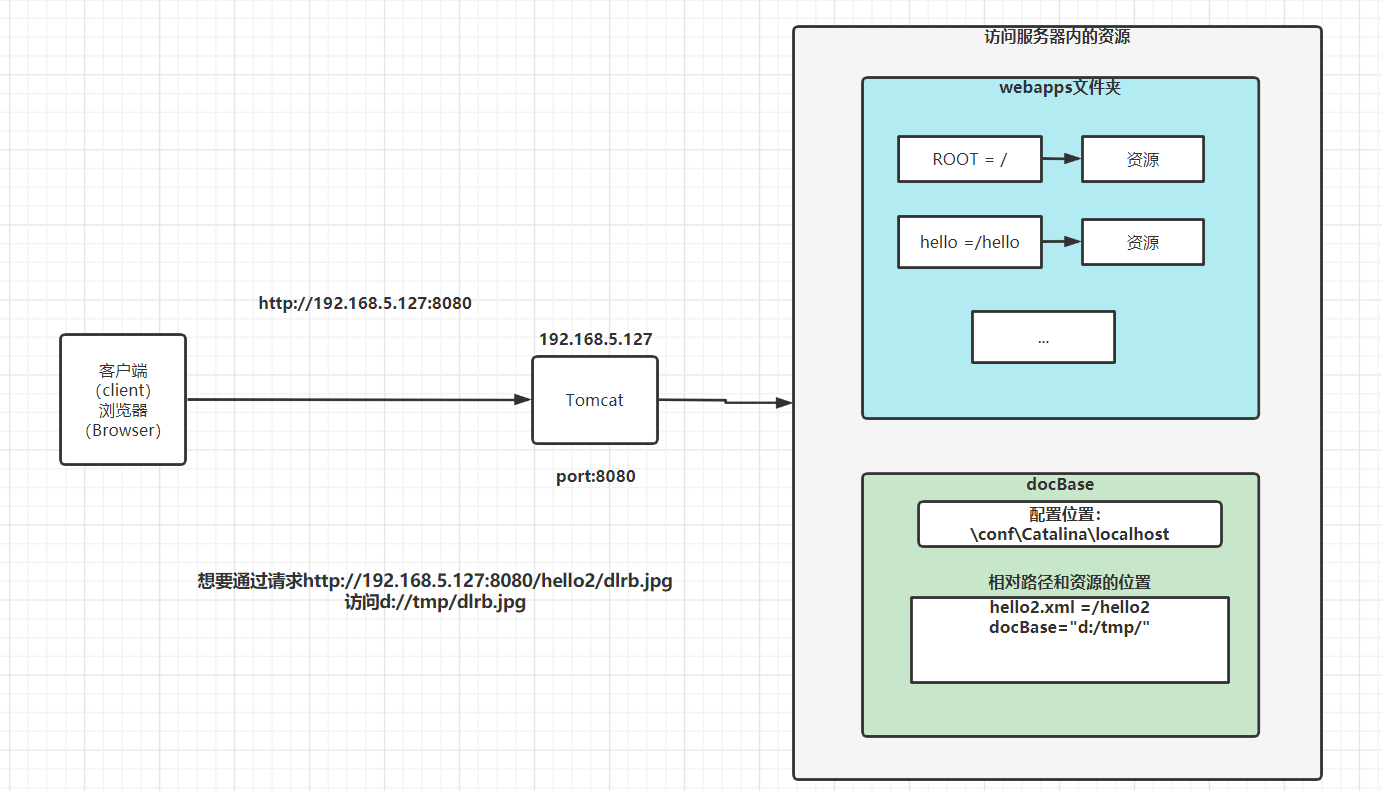
Tomcat的应用程序和启动、docBase配置
image-20230329110530954 开发工具:Postman
注解
注解如何定义 @interface
元注解(新增注解对当前注解做描述)
@Target → 当前注解可以出现在什么位置
@Retention → 当前注解在何时生效
注解里的属性值
- 如果没有default就一定要写这个属性,如果有default可以省略
- 如果注解中有value属性,并且使用的过程中仅仅使用了value属性,“value=”可以省略掉
- 如果属性值为数组,如果给其提供的值只有一个的话,”{}“是可以省略不写的
介绍
JavaEE介绍
Java SE Standard Edition
Java EE Enterprise Edition 企业开发 → 服务器开发
服务器:服务器硬件、服务器应用(软件)
B/S → Browser/Server
C/S → Client/Server
JSP(淘汰了)
Servlet
JDBC
Servlet → Request\Response → 会话技术(Cookie/Session) → Web组件(Listener/Filter) → MVC
项目
Servlet介绍
Server Applet 缩写组成的,小程序
运行在JavaEE容器(Tomcat)下的小程序
通过Tomcat可以访问静态资源和动态资源,静态资源就是我们前端学的内容,比如HTML、JS、CSS、xml、字体文件、图片等内容,而Servlet提供的是动态资源的访问
Servlet的开发其实就是Servlet中的service方法的开发
我们接下来的需求:访问http:0000000000000000000000000000000000000000000000000000000000000000000//localhost:8080/ee/user/login,页面上出现 LOGIN SUCCESS
图片缺失:../04-上课图片/Day13-第一个Servlet应用.jpg
import javax.servlet.GenericServlet;import javax.servlet.ServletException;import javax.servlet.ServletRequest;import javax.servlet.ServletResponse;import javax.servlet.annotation.WebServlet;import java.io.IOException;
/** * @author stone * @date 2023/01/12 22:44 */@WebServlet("/user/login")public class UserServlet extends GenericServlet { @Override public void service(ServletRequest servletRequest, ServletResponse servletResponse) throws ServletException, IOException { servletResponse.getWriter().write("LOGIN SUCCESS"); }}WEB-INF文件夹起到保护资源的目的,如果你的资源不想要被直接访问到,就放在这个文件夹中
★_Web应用和Maven工程
编译为Tomcat所支持的web应用
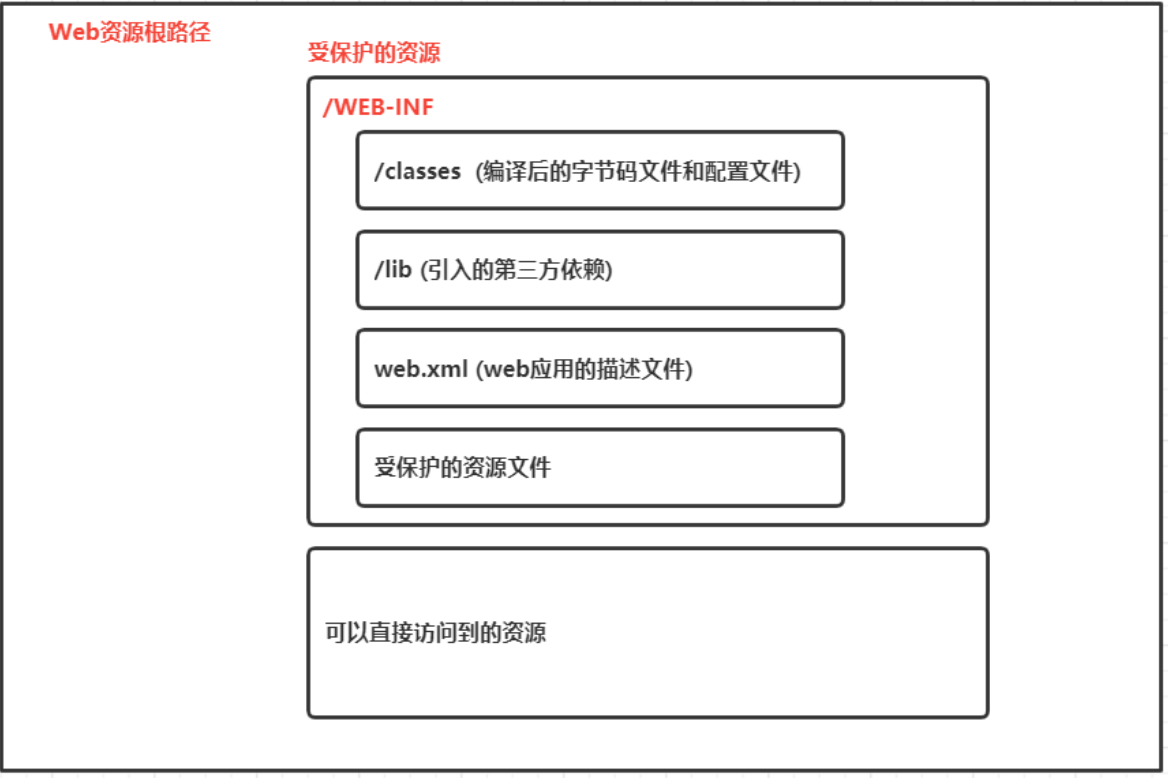
Web应用的目录结构
- Web应用的根目录
- 可以直接访问的资源(主要是静态资源,比如html、js、css、图片等)
- WEB-INF文件夹 (受保护的资源的文件)
- classes文件夹(字节码文件、配置文件)
- lib文件夹(第三方的依赖)
- web.xml(web应用的描述文件 → 基本上可以不使用了)
- 其他的文件(其他不想被直接访问的资源)
Maven工程的目录结构
packaging的值为war
src\main新增一个webapp文件夹
IDEA里识别为maven工程:import changes
- Maven工程的根目录
- src文件夹
- main文件夹(开发)
- java文件夹(java代码)
- resources文件夹(配置文件)
- webapp文件夹(web资源-对应的是web资源目录)
- test文件夹(测试)
- pom.xml文件
- target文件夹
- classes文件夹
- {artifactid}-{version}文件夹(WEB应用根目录)
对应关系图(核心)
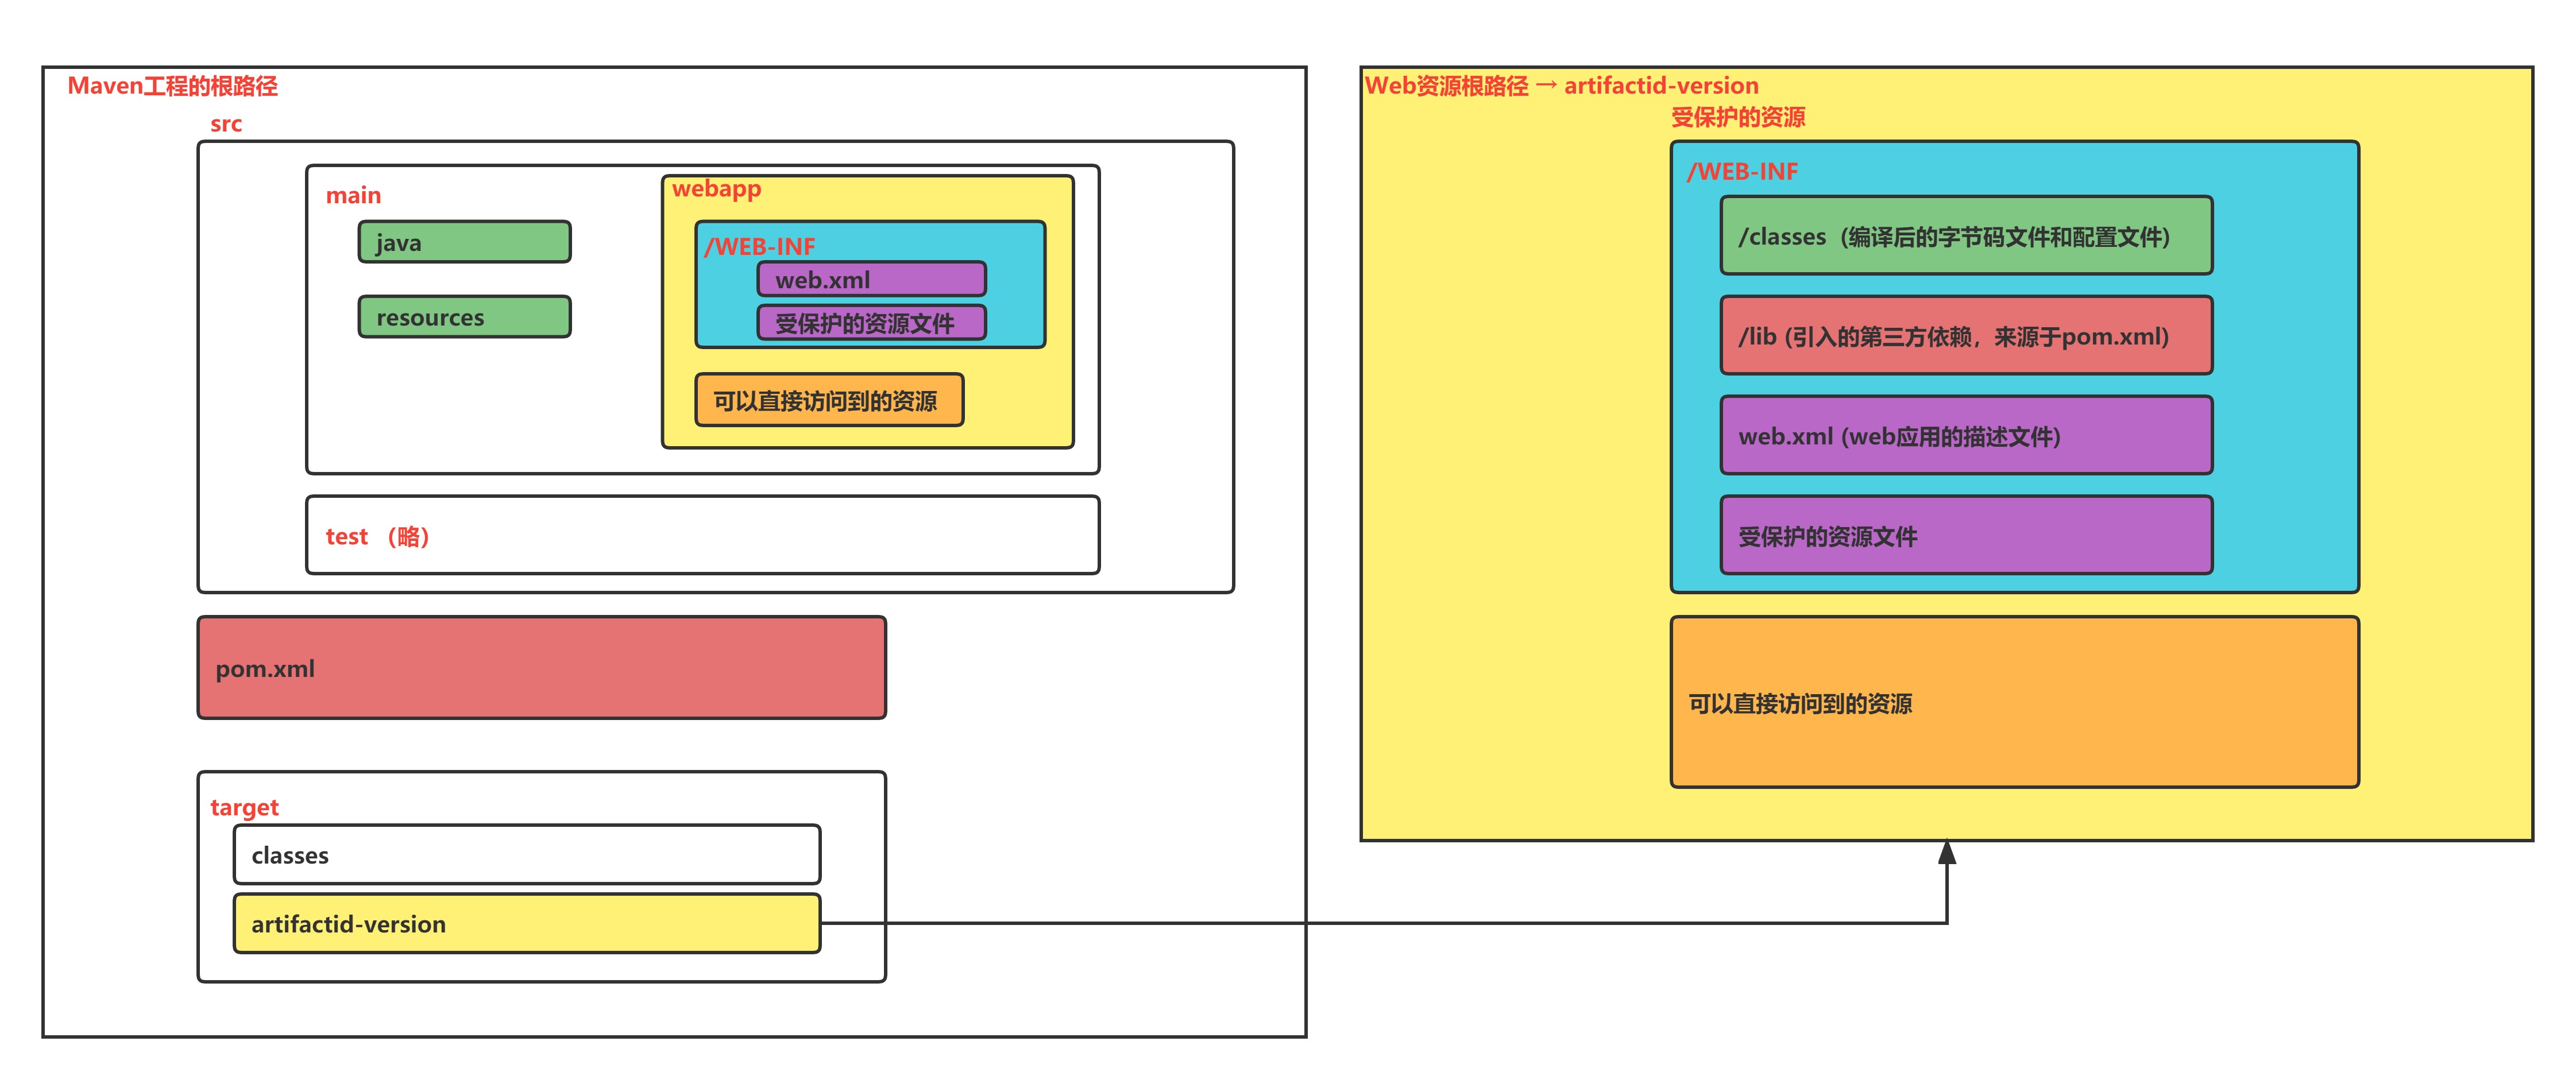
非常重要:贯穿整个阶段
遇到一些问题:
- ClassNotFound:编译后的内容里没有这个类 → target/artifactid-version/WEB-INF/ 里的classes、lib目录
- classes里没有 → src/main/java
- lib里没有 → pom.xml
- FileNotFound → target/artifactid-version/
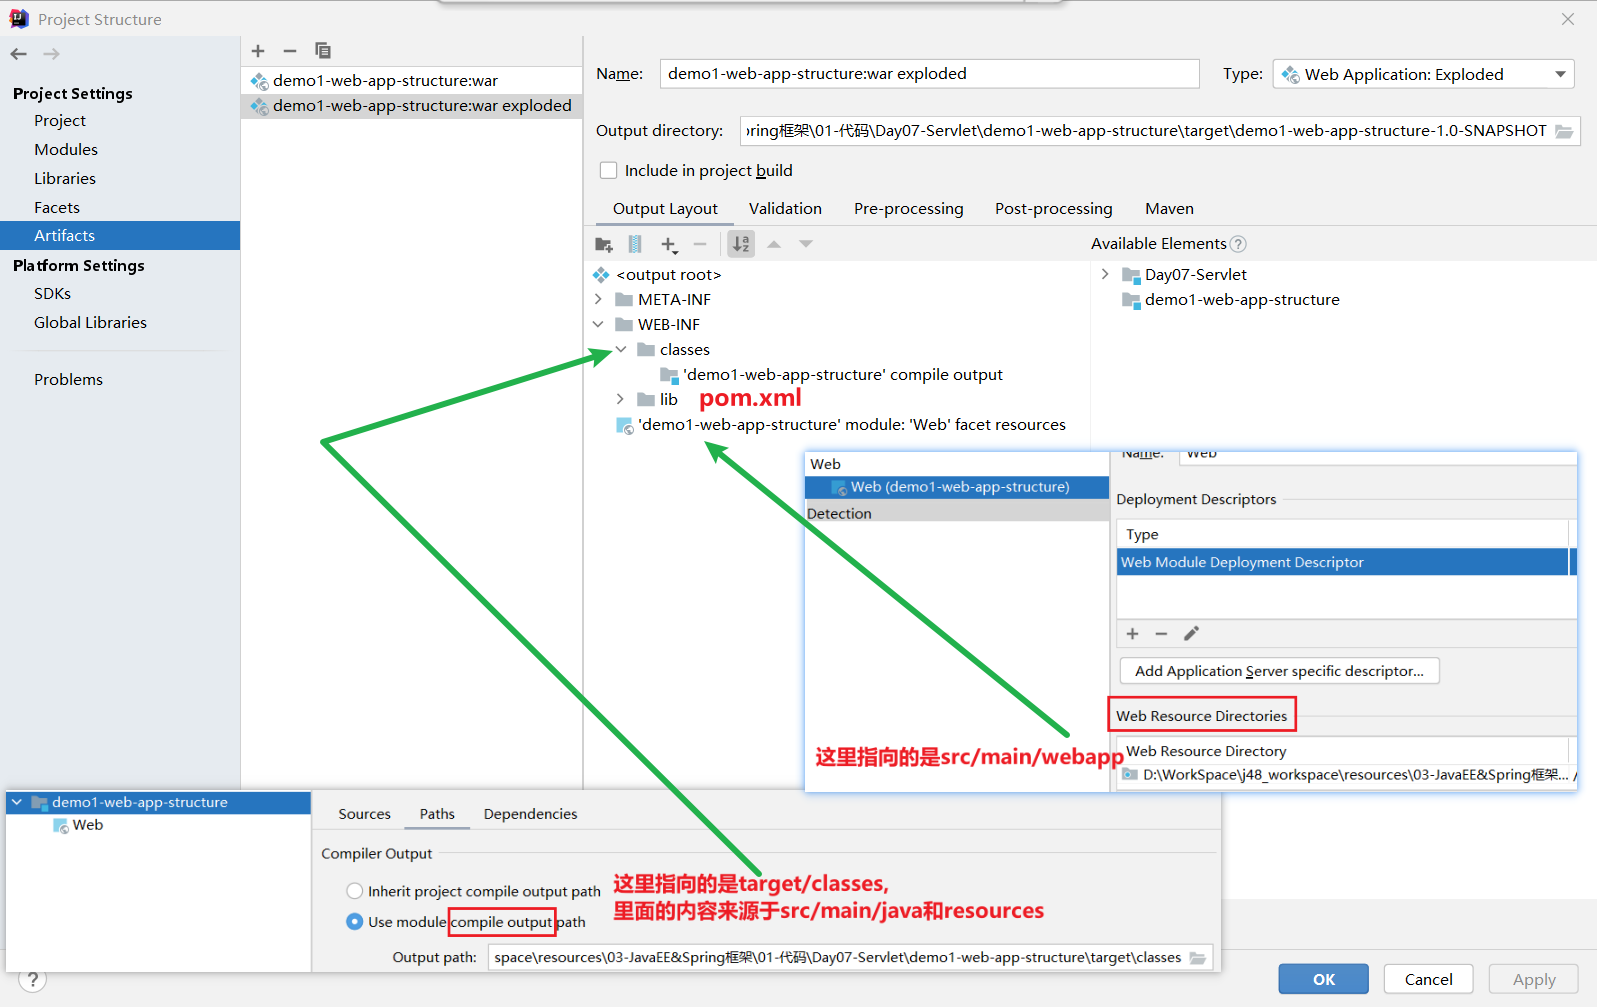
IDEA中开发Web应用
在idea中按照maven工程(web)的目录结构进行开发
pom.xml
<packaging>war</packaging>
<dependencies> <dependency> <groupId>javax.servlet</groupId> <artifactId>javax.servlet-api</artifactId> <version>3.1.0</version> <scope>provided</scope> </dependency></dependencies>打包方式
packaging = war
pom 父工程,提供子工程通用的内容,只有一个pom.xml,没有代码和文件
war web应用,要满足web应用的目录结构,要放在JavaEE容器下运行
jar 默认的打包方式,如果想要运行jar,里面要包含main方法
scope作用域
默认的作用域是compile
javax.servlet-api 的作用域是provided,编译的时候需要,而打包、运行的时候都不需要
因为已经有了,Tomcat中已经有了这个依赖,在tomcat的lib目录中有一个jar包servlet-api.jar
如果硬是要打包进去,有可能会发生冲突,导致未知的错误
Servlet开发(后面会单独重点讲解)
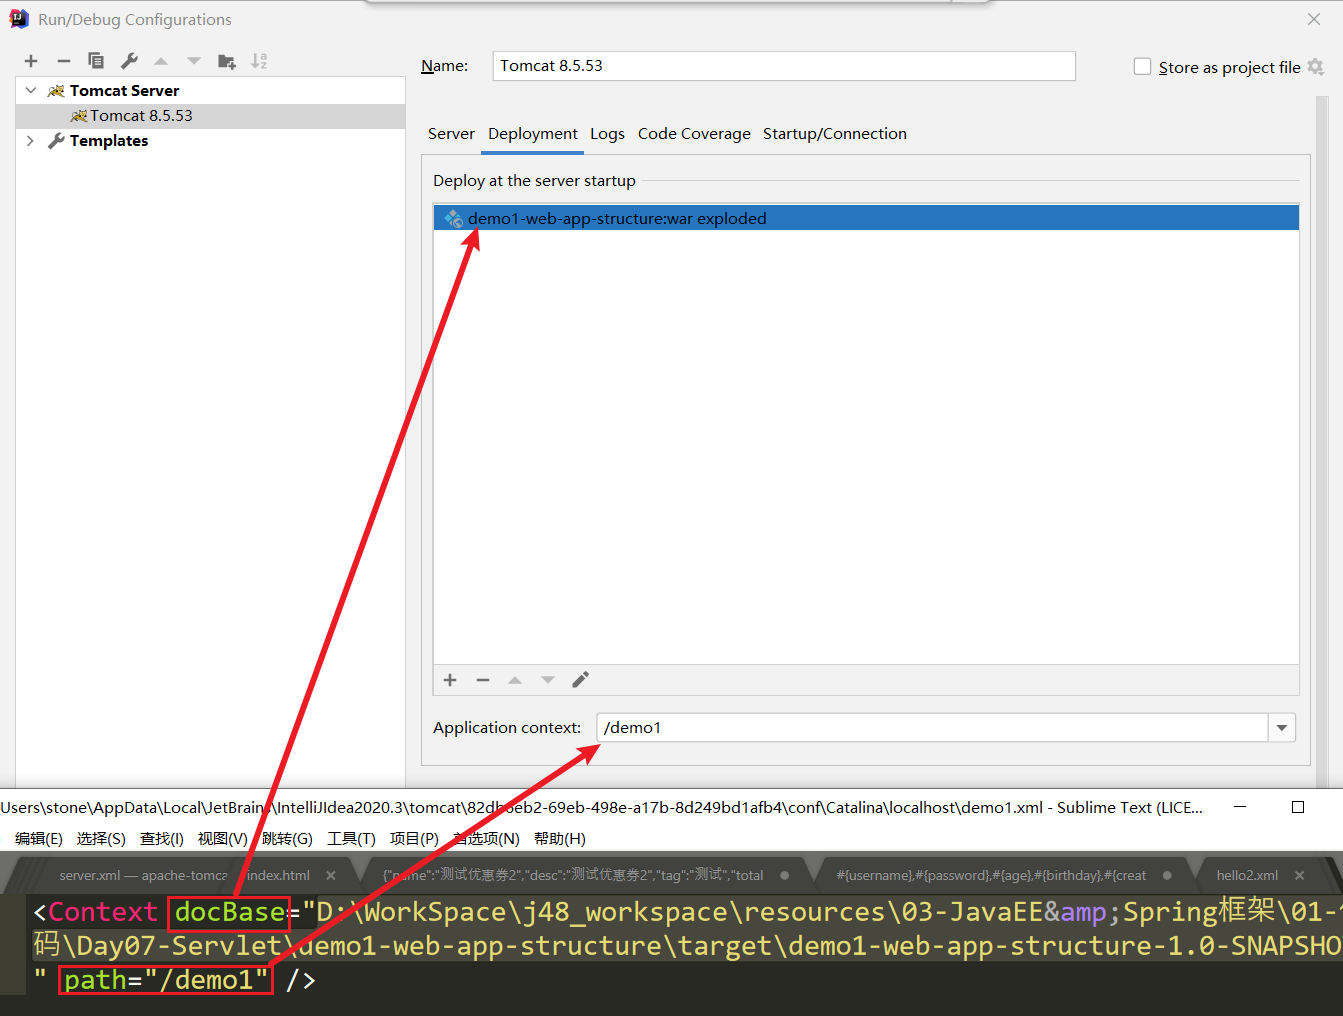
开发好的Servlet和资源文件 编译后(target/{artifactId}-{version}目录) 放入到Tomcat下的webapp目录里是可以访问的

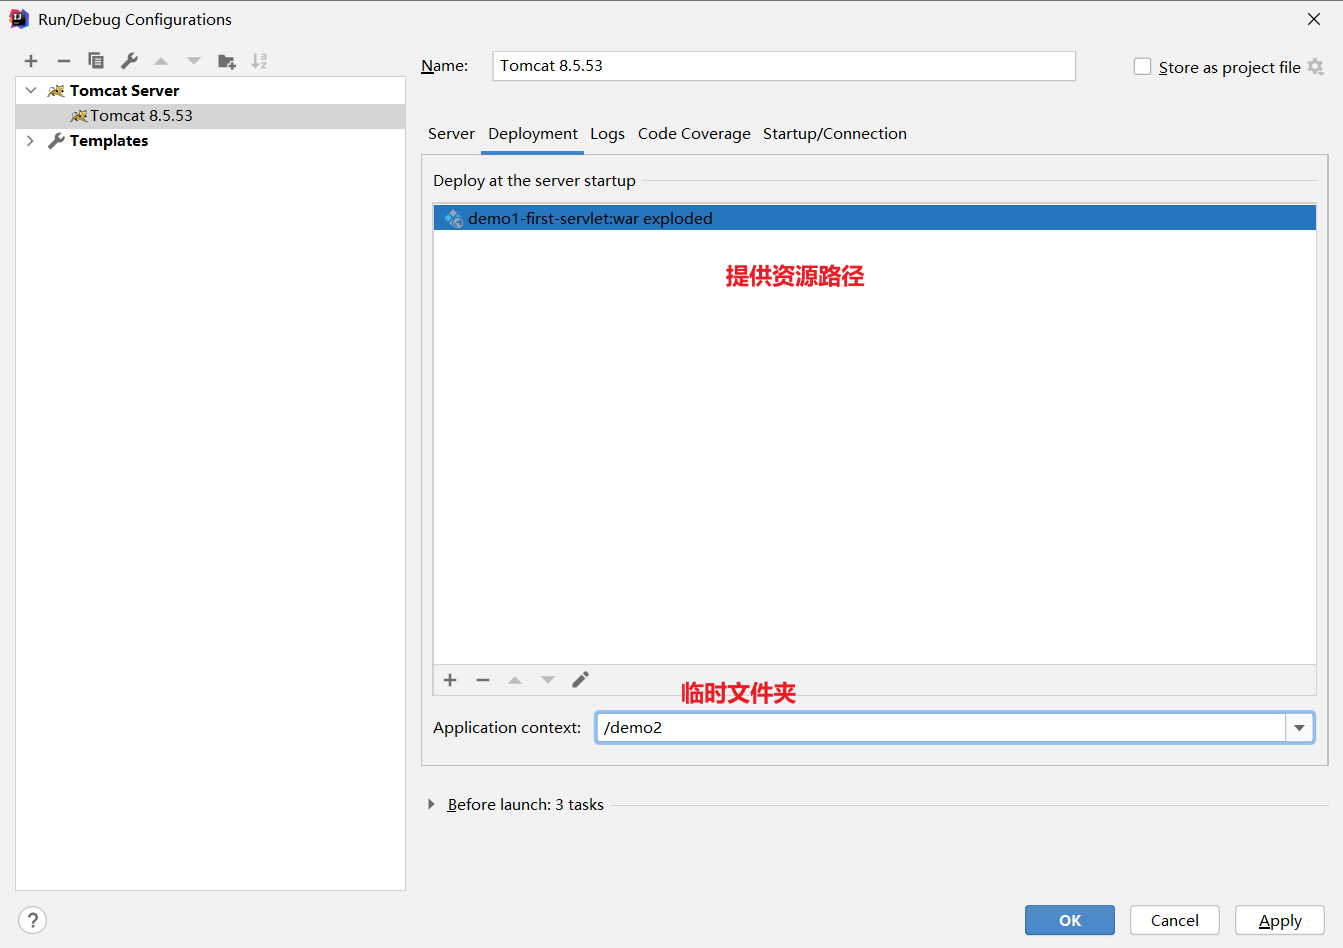
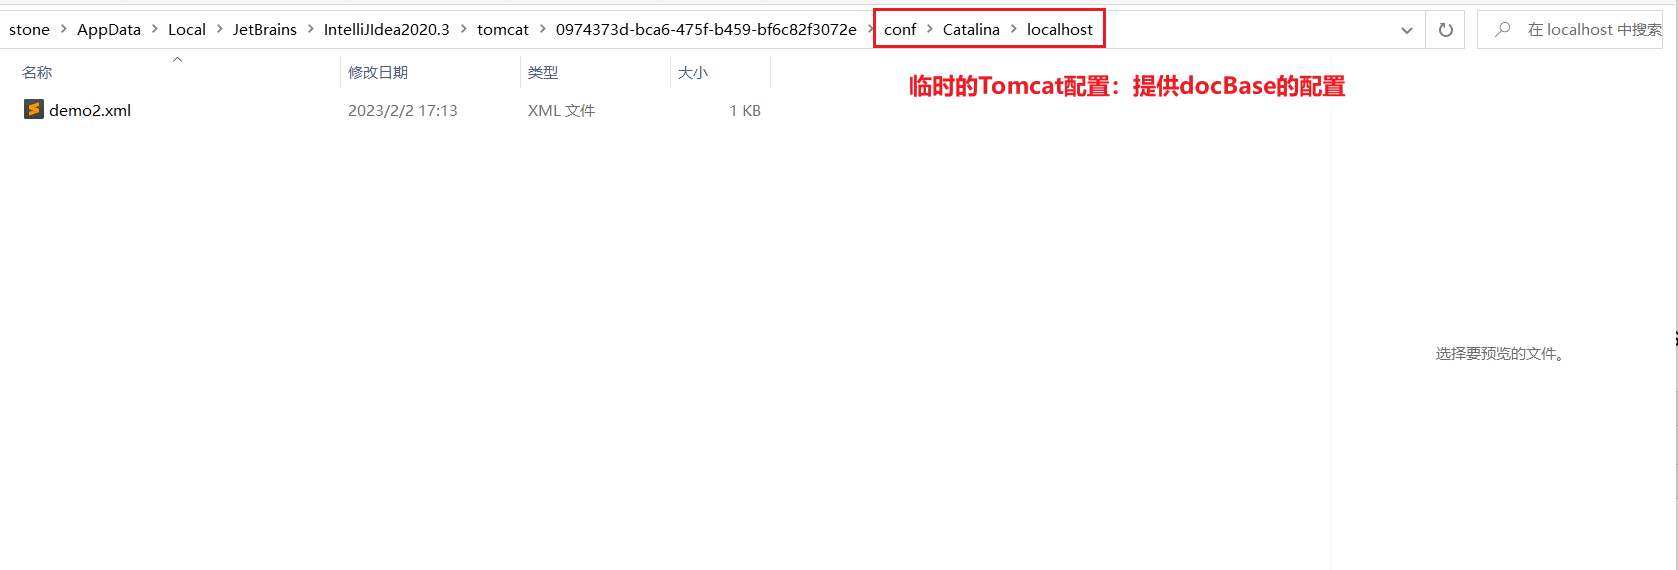
docBase 设置来访问资源

demo2.xml文件中的内容,指定docBase,其实访问的这个指定的这个路径下的资源
<?xml version="1.0" encoding="UTF-8"?><Context docBase="D:\WorkSpace\cskaoyan2023\02-备课\JavaEE\prepare_talk2\resources_new\codes\servlet2\demo1-first-servlet\target\demo1-first-servlet-1.0-SNAPSHOT"/>★_IDEA中使用Tomcat
JavaEE阶段都会在IDEA中使用Tomcat
SpringMVC阶段也会在IDEA中使用Tomcat
需要大家做的事情
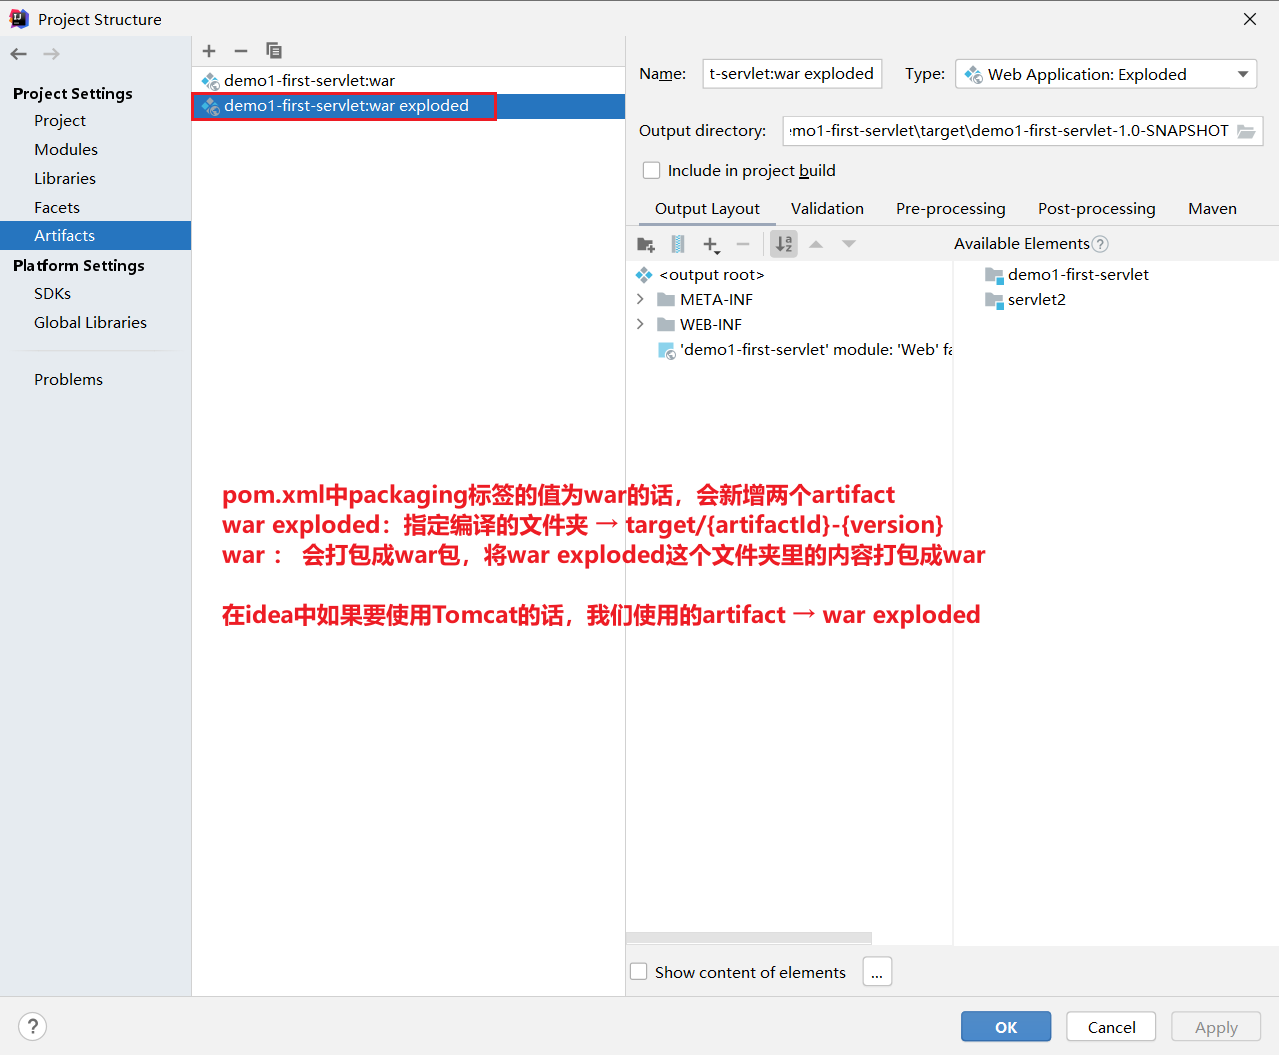
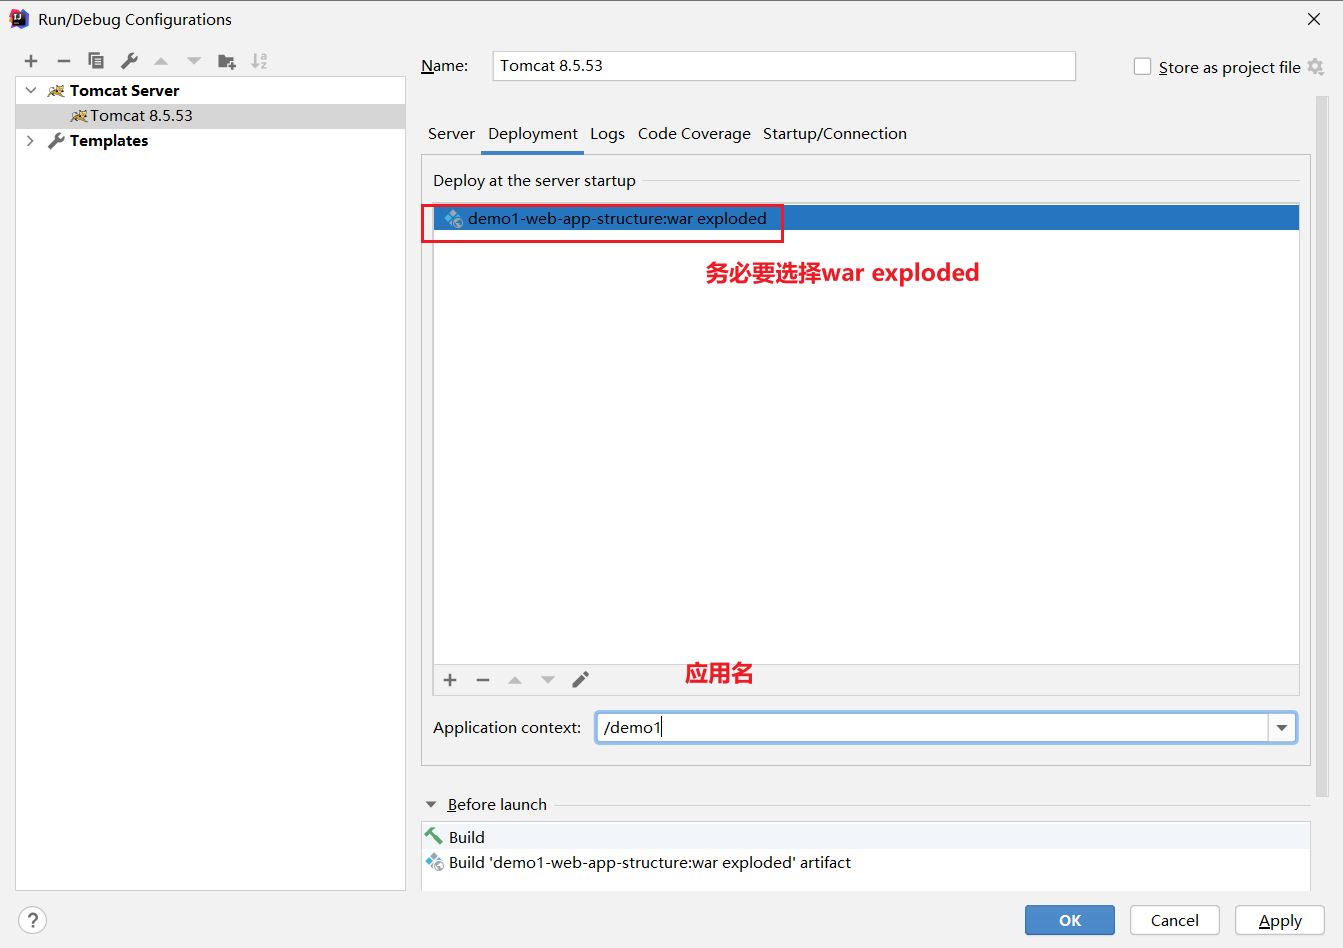
- packaging=war
- 增加Tomcat server
- 提供deployment的配置(docBase)
- artifact → war exploded
- application context → 路径
★★★_Servlet开发
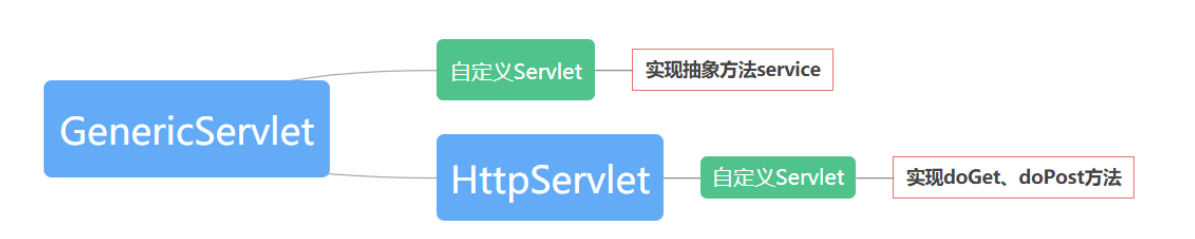
GenericServlet和HttpServlet
<dependencies> <dependency> <groupId>javax.servlet</groupId> <artifactId>javax.servlet-api</artifactId> <version>3.1.0</version> <!--强制要求写为provided → tomcat中已经有了这个依赖--> <scope>provided</scope> </dependency></dependencies>都可以使用 来进行Servlet的开发
通过继承,来实现其方法
- GenericServlet 实现其抽象方法service
- HttpServlet 重写doGet、doPost方法
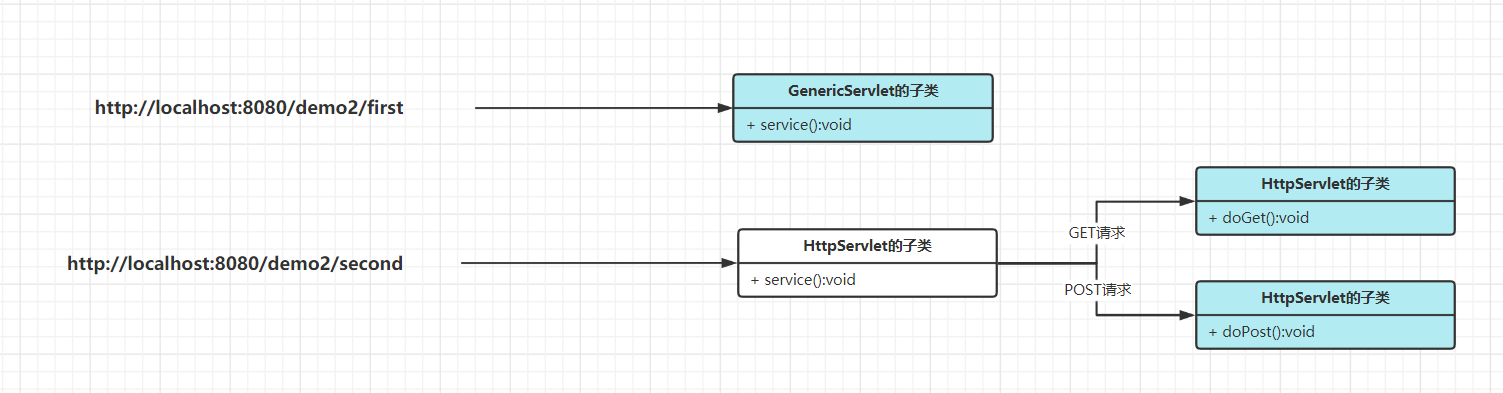
这两种方式其实都是执行的是service方法,HttpServlet是GenericServlet的子类,只不过是HttpServlet里的service方法给你实现好了
它会根据你的请求方法不同,去执行HttpServlet中的不同方法
public abstract class HttpServlet extends GenericServlet { protected void service(HttpServletRequest req, HttpServletResponse resp) throws ServletException, IOException { String method = req.getMethod(); if (method.equals("GET")) { this.doGet(req, resp); } else if (method.equals("POST")) { this.doPost(req, resp); } }}/** * 继承GenericServlet * 实现其抽象方法service * localhost:8080/demo1/servlet1 * 控制台里打印hello servlet1 * @author stone * @date 2023/02/02 17:29 */@WebServlet("/servlet1")public class Servlet1 extends GenericServlet { @Override public void service(ServletRequest servletRequest, ServletResponse servletResponse) throws ServletException, IOException { System.out.println("hello servlet1"); }}
/** * 继承HttpServletServlet * 重写其doGet、doPost方法 * localhost:8080/demo1/servlet2 * 控制台里打印hello servlet2 * @author stone * @date 2023/02/02 17:29 */@WebServlet("/servlet2")public class Servlet2 extends HttpServlet { @Override protected void doGet(HttpServletRequest req, HttpServletResponse resp) throws ServletException, IOException { // 接下来会使用浏览器方法,通过浏览器的地址栏发送的请求是GET请求 System.out.println("hello servlet2"); }
@Override protected void doPost(HttpServletRequest req, HttpServletResponse resp) throws ServletException, IOException { // 自己写业务 }}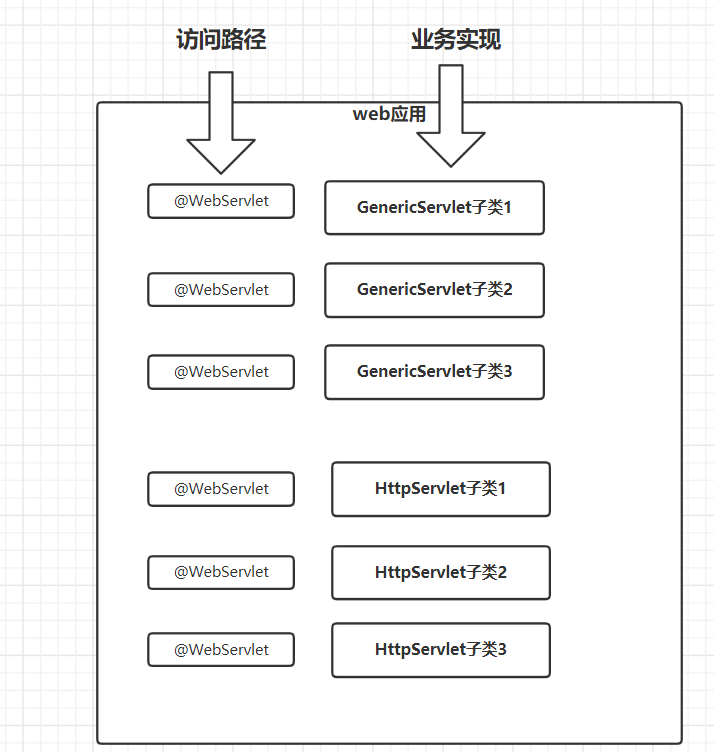
@WebServlet注解
@Target({ElementType.TYPE}) // 该注解可以写在类上@Retention(RetentionPolicy.RUNTIME) // 该注解运行时生效@Documentedpublic @interface WebServlet { String name() default "";
String[] value() default {}; // 该Servlet的路径,通过该路径可以访问到这个servlet的service或doGet、doPost方法
String[] urlPatterns() default {}; // 和value属性的功能是一致的
int loadOnStartup() default -1; // 默认值是负数;如果为负数的话,意味着放访问该servlet路径的时候,该Servlet才初始化;如果不为负数,则Tomcat启动的时候就初始化,并且会按照数字的顺序来初始化不同的Servlet
WebInitParam[] initParams() default {}; // 提供初始化参数,当前基本不用
boolean asyncSupported() default false;
String smallIcon() default "";
String largeIcon() default "";
String description() default "";
String displayName() default "";}value属性(或urlPatterns)
我们通常使用的是其value属性
功能上和urlPatterns其实是一样的,但是value属性有一个好处就是如果说该注解只使用了value属性的话,value= 可以省略不写
一个Servlet可以对应多个URL-Pattern
一个URL-Pattern不能对应多个Servlet
@WebServlet注解的时候,value属性和url-pattern属性,接收的值的类型String[]
@WebServlet({"/hello1","/hello2","/hello3"})public class HelloServlet extends HttpServlet { @Override protected void doGet(HttpServletRequest req, HttpServletResponse resp) throws ServletException, IOException { System.out.println("hello servlet"); }
@Override protected void doPost(HttpServletRequest req, HttpServletResponse resp) throws ServletException, IOException { doGet(req, resp); }}URL-Pattern
使用@WebServlet的value属性或url-pattern属性来维护,简历url-pattern和Servlet之间的映射关系
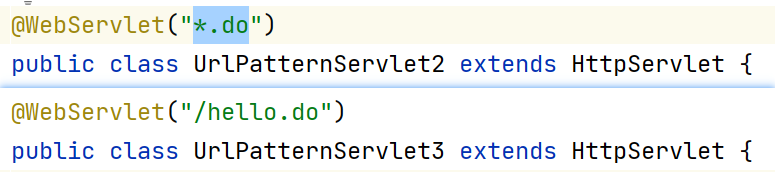
/** * 1.合法写法 * (1) /xxx 比如/first、/second、/hello1、/hello/world → 最左边要有/ * (2) *.xxx 比如*.do、*.action 如果访问localhost:8080/demo3/hello/world.do * 2.优先级 路径匹配 > 类型匹配 匹配度越高优先级越高 * 3.默认Servlet → tomcat有提供默认的Servlet 它的url-pattern是/ ,缺省匹配 * → 没有找到与之对应的Servlet的话,找的就是缺省Servlet * @date 2023/03/30 14:40 */@WebServlet("/urlpattern1")public class UrlPatternServlet extends HttpServlet {
@Override protected void doGet(HttpServletRequest req, HttpServletResponse resp) throws ServletException, IOException { System.out.println("/xxxx的形式"); }}合法写法
- /路径匹配
语法:/xxx或/xxx/*
注意事项:
- 以/作为开头(不能省略开头的/),可以写多级的url
- 可以使用通配符*
- 举个例子/hello/*, 这里的*可以代表多级的任意URL;
- /类型匹配
语法:*.xxx
注意事项:
- *.do、*.action这样的一些写法,比如 hello.do就可以找到*.do对应的Servlet来处理请求
- 当前基本上不再使用
- 比如一些特殊的资源,可以使用特殊的Servlet来处理,比如jpg、css等这些资源
- 缺省匹配
语法:/
注意事项:非常特殊的写法
优先级
路径匹配 > 类型匹配
使用的是匹配度更高的Servlet,/abc/d ,存在两个Servlet,分别url-pattern是/abc/d 和/
如果我们发送的请求:http://localhost:8080/demo3/hello.do → 找到的是Servlet3
缺省Servlet
如果你自己也开发了一个Servlet,你的这个Servlet的URL-Pattern也是/ (@WebServlet(”/”)),那么你这个Servlet就会变为默认的Servlet
提供了一个页面 hello.html,也提供一个servlet,这个Servlet映射的url-pattern也是hello.html
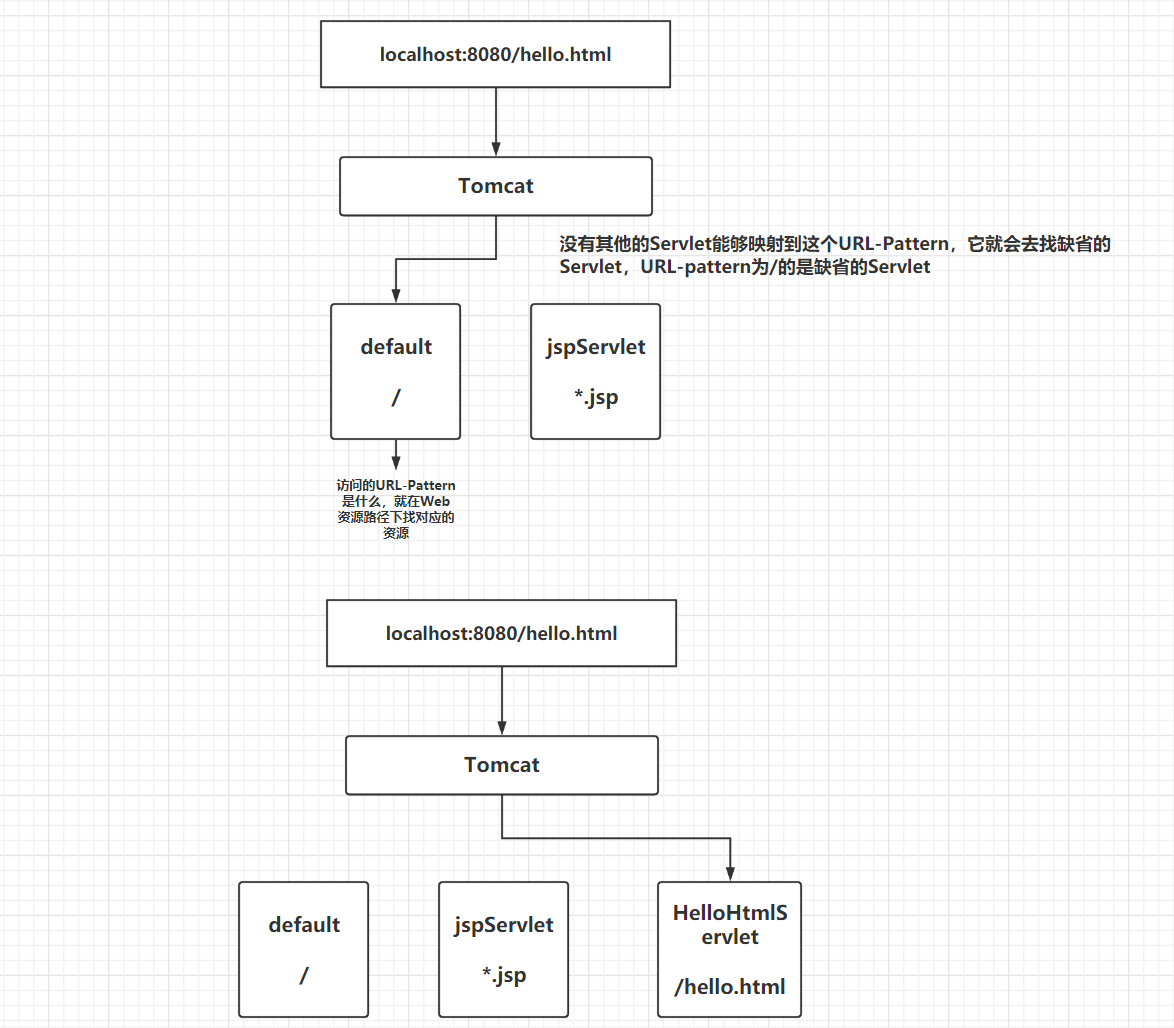
Tomcat会提供缺省的Servlet,本身是用来做静态资源访问的,如果你想要提供缺省的Servlet,可以做,将自定义的这个Servlet它的URL-Pattern设置为/ 即可,但是会导致原有的缺省Servlet失效
如果你没有提供,我给你提供一个默认的;如果你提供了,则以你提供的为准,后面SpringMVC就是在此基础上做了设计的
Tomcat提供的默认的Servlet其实它做的事情就是在你的Web应用的根目录下去找对应的资源(文件),如果能找到,就输出出来,如果找不到呢就404
Servlet的生命周期
LifeCycle
生命周期:在一些特定的时间会去执行一些方法,而时间通常指某个东西从初始化到结束在整个阶段中会遇到的一些时间点
这里我们讲的是Servlet的生命周期,指的是每一个Servlet的生命周期,每一个Servlet它的生命周期都需要单独去考虑
方法:后续去讲生命周期的时候,都会围绕着方法展开;话题都会是这个方法在什么时候执行,会执行多少次
| 方法名 | 时间 | 次数 | 说明 |
|---|---|---|---|
| init() | Servlet初始化 | 1 | 只执行一次,在service之前,用来用来做一些初始化 |
| service() | 访问Servlet对应的URL | n | 执行多次,用来处理业务 |
| destroy() | Servlet销毁 | 1 | 只执行一次,通常用来做资源的释放 |
Servlet是何时初始化的:前面讲@WebServlet注解的时候,有一个属性load-on-startup
- 默认值是负数;
- 如果为负数的话,意味着放访问该servlet路径的时候,该Servlet才初始化;
- 如果不为负数,则Tomcat启动的时候就初始化,并且会按照数字的顺序来初始化不同的Servlet
Servlet是何时销毁的:
- Tomcat停的时候
增加几个Servlet
@WebServlet(value = "/hello",loadOnStartup = -2)public class HelloServlet extends HttpServlet {}
@WebServlet(value = "/first",loadOnStartup = 1)public class FirstServlet extends HttpServlet {}
@WebServlet(value = "/second",loadOnStartup = 2)public class SecondServlet extends HttpServlet {}想要看到他们的init、service(doGet)、destroy
- 应用程序启动 → first init 、 second init
- 分别访问 (不分先后顺序)
- /first → first service
- /second → second service
- /hello → hello init 、hello service
- 再次访问/hello → hello service
- 应用程序关闭
- destroy
比如利用生命的init方法,读取classpath路径下的param.properties里的值
@WebServlet(value = "/parameter",loadOnStartup = 1)public class ParameterServlet extends HttpServlet { Map<String,String> map = new HashMap<>();
@Override public void init() throws ServletException { InputStream inputStream = ParameterServlet.class.getClassLoader().getResourceAsStream("param.properties");
Properties properties = new Properties(); try { properties.load(inputStream); } catch (IOException e) { e.printStackTrace(); } String username = properties.getProperty("username"); String password = properties.getProperty("password"); map.put("username", username); map.put("password", password); }
@Override protected void doGet(HttpServletRequest req, HttpServletResponse resp) throws ServletException, IOException { String username = map.get("username"); System.out.println("username = " + username); }}ServletConfig(了解)
键值对配置
- 放入配置
- 获取配置
要通过ServletConfig实例(对象)来进行操作,每一个Servlet都有与之对应的ServletConfig
放入配置
场景,将username=root这样的键值对放入到ServletConfig
@WebServlet(value = "/hello", initParams = {@WebInitParam(name = "username",value = "root"), @WebInitParam(name = "password",value = "123456")})public class HelloServlet extends HttpServlet {}在HelloServlet父类的父类GenericServlet中有一个成员变量config是ServletConfig类型的
而在init方法中有给这个成员变量做赋值
也就是这个成员变量在初始化阶段,已经获得了这些值
意味着在service方法(doGet、doPost)中,可以获得这个成员变量,并且从中获取值
取出配置
在Servlet中已经提供了一个方法getServletConfig方法,就是获得GenericServlet中的ServletConfig类型的成员变量config
public ServletConfig getServletConfig() { return this.config;}子类中可以使用父类的方法,也就是在我们自行开发的Servlet中可以直接来来调用方法来获得
@WebServlet(value = "/hello", initParams = {@WebInitParam(name = "username",value = "root"), @WebInitParam(name = "password",value = "123456")})public class HelloServlet extends HttpServlet { @Override protected void doGet(HttpServletRequest req, HttpServletResponse resp) throws ServletException, IOException { ServletConfig servletConfig = getServletConfig(); String username = servletConfig.getInitParameter("username"); String password = servletConfig.getInitParameter("password"); System.out.println(username + ":" + password); }}ServletContext
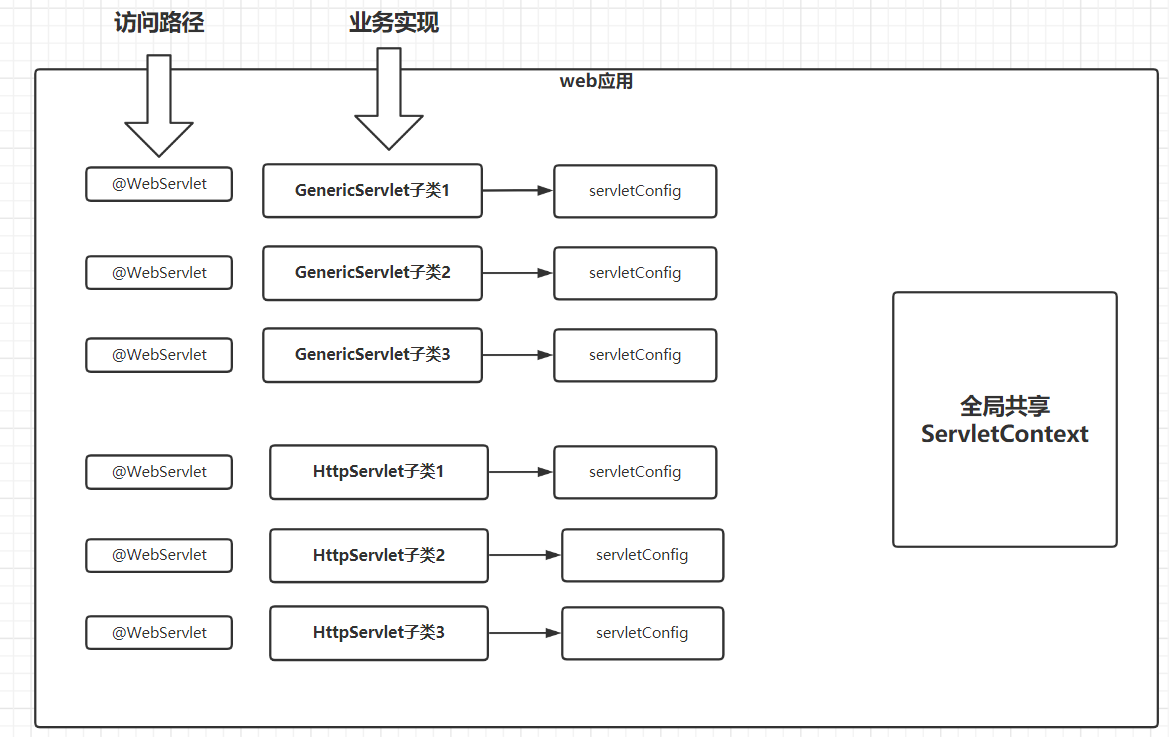
整个Web应用提供的共享空间,应用程序启动的时候会初始化,可以通过键值对的方式在存储和取出数据
Servlet上下文,开发过程中使用ServletContext实例(对象),使用这个实例其实维护的也是键值对
前面的ServletConfig是每一个Servlet使用的单独的一个ServletConfig
而ServletContext是所有的Servlet共享的
在所有的Servlet中都可以通过方法直接获得ServletContext,并且获得的是同一个ServletContext,在ServletContext中提供的数据其实就是被所有的Servlet共享了
/** * 要通过servlet1 向servletContext中存入 username=zhangsan这样的数据 * 通过servlet2 通过servletContext根据key=username取出对应的值 * 通过servlet3 通过servletContext根据key=username取出对应的值 * * step1. 首先获得ServletContext * (1).getServletConfig().getServletContext() * (2).getServletContext() * step2. servlet1中存入 * step3. servlet2、3读取 * * @author stone * @date 2023/03/30 15:57 */@WebServlet("/servlet1")public class Servlet1 extends HttpServlet { @Override protected void doGet(HttpServletRequest req, HttpServletResponse resp) throws ServletException, IOException { ServletContext servletContext1 = getServletConfig().getServletContext(); ServletContext servletContext2 = getServletContext(); // key为String字符串 // value是Object类型 servletContext1.setAttribute("username", "zhangsan"); }}/** * @author stone * @date 2023/03/30 15:57 */@WebServlet("/servlet2")public class Servlet2 extends HttpServlet { @Override protected void doGet(HttpServletRequest req, HttpServletResponse resp) throws ServletException, IOException { ServletContext servletContext = getServletContext(); Object username = servletContext.getAttribute("username"); System.out.println("username = " + username); }}获得方式
- 在Servlet中直接使用getServletContext()
- 通过ServletConfig提供的getServletContext方法来获得
@WebServlet("/hello")public class HelloServlet extends HttpServlet { @Override protected void doGet(HttpServletRequest req, HttpServletResponse resp) throws ServletException, IOException { ServletContext servletContext1 = getServletContext(); ServletContext servletContext2 = getServletConfig().getServletContext(); System.out.println("servletContext1 = " + servletContext1); System.out.println("servletContext2 = " + servletContext2); }}@WebServlet("/bye")public class GoodbyeServlet extends HttpServlet {
@Override protected void doGet(HttpServletRequest req, HttpServletResponse resp) throws ServletException, IOException { ServletContext servletContext = getServletContext(); System.out.println("servletContext = " + servletContext); }}想要在所有的Servlet中共享数据
username=root
password=123456
@WebServlet(value = "/parameter",loadOnStartup = 1)// 写正数,意味着应用程序启动的时候初始化,初始化会开始生命周期的init方法public class ParameterServlet extends HttpServlet {
@Override public void init() throws ServletException { ServletContext servletContext = getServletContext(); servletContext.setAttribute("username","root"); servletContext.setAttribute("password","123456");
}}获得真实路径
// 获得web资源的真实路径 → docBase里的真实路径String realPath = servletContext1.getRealPath("");System.out.println("realPath = " + realPath);
String realPath1 = servletContext1.getRealPath("hello.html");System.out.println("realPath1 = " + realPath1);案例
classpath路径下新增一个param.properties配置文件,我们想要里面的值,在整个web应用中共享
- 提供一个Servlet,这个Servlet它的loadOnStartup设置为正数
- 重写init方法,将properties配置文件读取,提供一个properties实例
- 获取ServletContext,并且properties实例放到ServletContext中
@WebServlet(value = "/properties",loadOnStartup = 1)public class PropertiesServlet extends HttpServlet { @Override public void init() throws ServletException { Properties properties = new Properties(); try { properties.load(PropertiesServlet.class.getClassLoader().getResourceAsStream("param.properties")); } catch (IOException e) { e.printStackTrace(); } getServletContext().setAttribute("properties", properties); String username = properties.getProperty("username"); String password = properties.getProperty("password"); //User user = new User(); String clazz = properties.getProperty("clazz"); Class<?> aClass = null; User user = null; try { aClass = Class.forName(clazz); user = (User) aClass.newInstance(); } catch (InstantiationException e) { e.printStackTrace(); } catch (IllegalAccessException e) { e.printStackTrace(); } catch (ClassNotFoundException e) { e.printStackTrace(); } getServletContext().setAttribute("user",user);
}}username=rootpassword=123456clazz=com.cskaoyan.demo6.bean.Userxml配置(了解项)
当前使用的是注解的方式来配置
<?xml version="1.0" encoding="UTF-8"?><web-app xmlns="http://xmlns.jcp.org/xml/ns/javaee" xmlns:xsi="http://www.w3.org/2001/XMLSchema-instance" xsi:schemaLocation="http://xmlns.jcp.org/xml/ns/javaee http://xmlns.jcp.org/xml/ns/javaee/web-app_4_0.xsd" version="4.0">
<!--value属性(或url-pattern属性):映射的url-pattern initParams属性:提供的初始化参数,可以通过ServletConfig来获得 load-on-startup属性 @WebServlet(value = "/HelloServlet", initParams = @WebInitParam(name = "username",value = "root"), loadOnStartup = 1)--> <servlet> <servlet-name>hello</servlet-name> <servlet-class>com.cskaoyan.service.HelloServlet</servlet-class> <init-param> <param-name>username</param-name> <param-value>root</param-value> </init-param> <load-on-startup>1</load-on-startup> </servlet>
<servlet-mapping> <servlet-name>hello</servlet-name> <url-pattern>/HelloServlet</url-pattern> </servlet-mapping></web-app>JSP(了解)
Java Server Page
提供的是类似于html这样的文件 → 主要web资源根目录
在jsp中也可以包含css样式,js脚本
它使用的是哪一个Servlet 用的是jspServlet(Tomcat中有的)
tomcat的conf/web.xml
<servlet> <servlet-name>jsp</servlet-name> <servlet-class>org.apache.jasper.servlet.JspServlet</servlet-class> <init-param> <param-name>fork</param-name> <param-value>false</param-value> </init-param> <init-param> <param-name>xpoweredBy</param-name> <param-value>false</param-value> </init-param> <load-on-startup>3</load-on-startup></servlet><servlet-mapping> <servlet-name>jsp</servlet-name> <url-pattern>*.jsp</url-pattern> <url-pattern>*.jspx</url-pattern></servlet-mapping>jsp文件其实最终会被编译为Servlet代码

文章分享
如果这篇文章对你有帮助,欢迎分享给更多人!