


Java Web 开发:SpringMVC
[TOC]
前言
学习目标
- 理解SpringMVC和Servlet之间的关系
- 熟悉Controller组件中的Handler方法和URL之间的映射关系的建立
- 熟悉Handler方法的返回值响应JSON数据
- 熟悉Handler方法接收key-value和JSON数据的方式
- 理解SpringMVC的核心流程(面试拔高)
- 理解SpringMVC的静态资源处理
- 理解SpringMVC使用过程中的拦截器
- 掌握SpringMVC的异常处理
前置知识准备
- 抽象类
- ApplicationContext
- Servlet阶段URI和Servlet中的方法之间的关系
- Servlet中如何通过Request获得请求参数
- QueryString和请求体中的key=value请求参数 → request.getParameter相关方法
- 请求体中的JSON请求参数
- Servlet中如何通过Response响应JSON字符串
- 注解
- 反射执行方法 method.invoke(instance,args)
- Filter和Listener的执行时机
- Servlet的URL-Pattern的合法写法
- 路径映射 /admin/auth/login /admin/auth/*
- 类型映射 *.jsp
- / 缺省Servlet → 找不到对应的Servlet执行的是缺省Servlet
SpringMVC介绍
MVC概念
MVC设计模式的任务是将包含业务数据的模块与显示模块的视图解耦。 SpringMVC是在Spring框架的基础上做的
SpringMVC和JavaEE的比较
SpringMVC出现就是为了解决JavaEE开发的复杂性而提出的。
SpringMVC对请求动作的解耦更加的简单,更加直接。
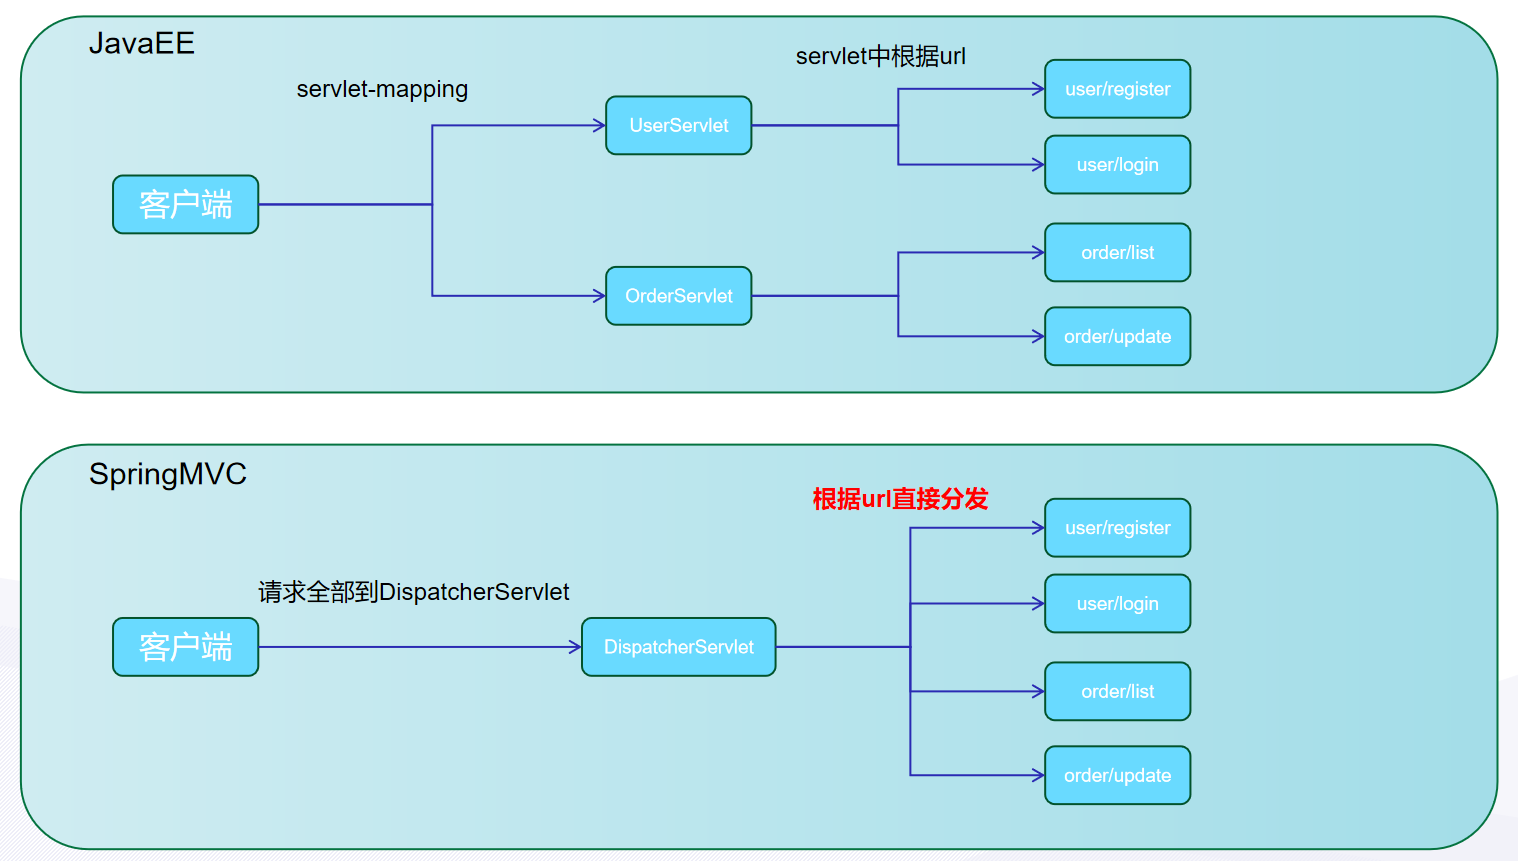
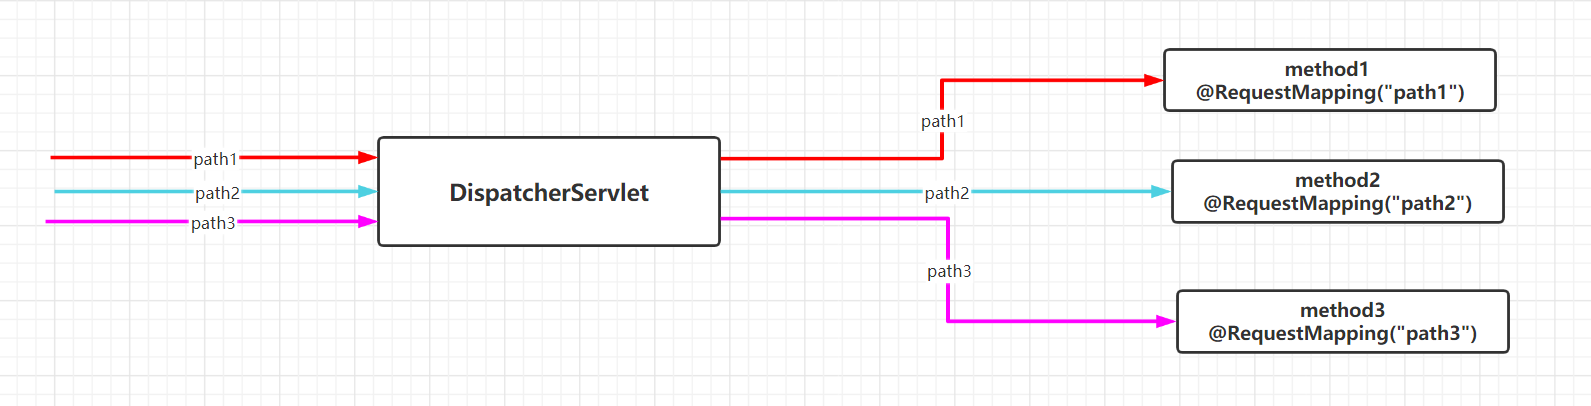
SpringMVC是通过一个Servlet(DispatcherServlet)来接收全部请求,然后分发到不同的方法上
SpringMVC的核心流程
全部的请求都通过DispatcherServlet来接收,然后根据请求url分发到不同的Handler,Handler处理之后响应ModelAndView或者Json数据
SpringMVC的入门案例
JavaConfig
AACDSI → 抽象类 AbstractAnnotationConfigDispatcherServletInitializer
抽象类的特点是啥,如果里面有抽象方法我们需要是实现其抽象方法
使用抽象类的时候,通常是这样的一个场景
- 使用过程中会使用到其非抽象方法
- 非抽象方法里会调用到抽象方法
- 我们提供其抽象方法的具体的实现
需要我们在抽象类的子类中去写这两个抽象方法的实现 → 提供自定义的配置类
实现
public class ApplicationInitialization extends AbstractAnnotationConfigDispatcherServletInitializer { @Override // ApplicationContext的实现类 AnnotationConfigWebApplicationContext,相较于ApplicationContext多了对Web应用支持 // 创建ApplicationContext的时候提供配置类ApplicationContext ac1 = new AnnotationConfigWebApplicationContext(clazz); protected Class<?>[] getRootConfigClasses() { return new Class[]{RootConfiguration.class}; // 内部的ApplicationContext的配置类 }
// 创建ApplicationContext的时候提供配置类ApplicationContext ac2 = new AnnotationConfigWebApplicationContext(clazz); // 应用程序中有了两个ApplicationContext了吗? // 两个ac之间存在着包含关系 @Override protected Class<?>[] getServletConfigClasses() { return new Class[]{WebConfiguration.class}; // 外部的ApplicationContext的配置类 }
// 配置DispatcherServlet的ServletMapping = / @Override protected String[] getServletMappings() { return new String[]{"/"}; }
}Spring配置类初始化的ApplicationContext做了什么事情?
- 扫描com.cskaoyan这个包目录,并且排除掉Controller
SpringMVC配置类初始化的ApplicationContext做了什么事情?
- 扫描com.cskaoyan.controller这个包目录
- @EnableWebMvc
//@Configuration@ComponentScan("com.cskaoyan.controller")@EnableWebMvc // mvc:annotation-driven// 后面还会做一些和SpringMVC相关的配置 需要实现接口 WebMvcConfigurer,如果实现接口里的方法就是提供一些额外的配置信息public class ServletConfiguration implements WebMvcConfigurer {}@Configuration@ComponentScan(value = "com.cskaoyan", //excludeFilters = {@ComponentScan.Filter(type = FilterType.ANNOTATION,classes = {Controller.class, EnableWebMvc.class})}) //excludeFilters = {@ComponentScan.Filter(type = FilterType.ANNOTATION,value = {Controller.class, EnableWebMvc.class})}) //classes和value互相替代 //excludeFilters = {@ComponentScan.Filter(value = {Controller.class, EnableWebMvc.class})})//省略掉了type属性值,其默认值就是FilterType.ANNOTATION //excludeFilters = {@ComponentScan.Filter({Controller.class, EnableWebMvc.class})})//省略掉了value= 只有value属性了 excludeFilters = @ComponentScan.Filter({Controller.class, EnableWebMvc.class}))//省略掉了{} 数组中只有一个值public class RootConfiguration {}使用
//controller组件中放handler方法,handler方法处理请求@Controllerpublic class HelloController {
@RequestMapping("hello") public ModelAndView hello(){ ModelAndView modelAndView = new ModelAndView(); modelAndView.setViewName("/jsp/hello.jsp"); modelAndView.addObject("content", "mvc2"); return modelAndView; }}问题
Q:@EnableWebMvc和WebMvcConfigurer接口能够起到什么功能A:帮助我们注册了一些组件,提供对数据绑定、json数据、conversion-service、validator等支持最重要的就是RequestMappingHandlerMapping和RequestMappingHandlerAdapter。Q:我们初始化容器构造Spring环境,Spring容器在Web环境下的具体存在是什么?A:具体存在仍然是ApplicationContext作为容器,只不过当前是WebApplicationContext我们在ServletContext下共享WebApplicationContext@RequestMapping注解的使用
- 请求URL限定
- 窄化请求
- 请求方法限定
- 请求参数限定
- 请求头限定
通过@RequestMapping注解的不同属性,实现不同功能上的限定
注解的定义
@Target({ElementType.TYPE, ElementType.METHOD})//该注解可以写在类上或方法上@Retention(RetentionPolicy.RUNTIME)public @interface RequestMapping { // 没用 String name() default ""; // value属性:映射的URL是什么 可以映射多个值,还可以写通配符* @AliasFor("path") String[] value() default {}; @AliasFor("value") String[] path() default {}; // 请求方法限定 RequestMethod[] method() default {}; // 请求参数限定 String[] params() default {}; // 请求头限定 String[] headers() default {}; // 特定请求头的值的限定:Content-Type String[] consumes() default {}; // 特定请求头的值的限定:Accept String[] produces() default {};}★★★URL路径映射 value
我们前面的案例用到的就是这个属性:
value属性的特点:如果只用到value属性,可以省略不写
数组:如果数组中只有一个值,可以省略掉{}
@RequestMapping(value={"hello"})//映射URL → localhost:8080/hello@ResponseBodypublic String hello(String username) {// 形参 → 通过形参接收了请求参数 String result = "hello " + username; return result; //要响应的值直接返回}
@RequestMapping("goodbye")@ResponseBodypublic String goodbye(String username) { return "goodbye " + username;}将URL和处理这个URL请求的方法 建立映射关系
String[] value() default {}; 值的类型是String数组
如果我们通过value属性提供了数组类型的值:这个数组对应url就可以通过这个方法来处理
写value属性的时候,可以使用通配符*
@Controllerpublic class UrlMappingController {
//localhost:8080/hello //localhost:8080/hi //localhost:8080/nihao //@RequestMapping(value = {"hello","hi","nihao"}) @RequestMapping({"hello","hi","nihao"}) @ResponseBody public String hello() { return "hello demo5"; } //localhost:8080/goodbye //localhost:8080/goodbyesong //localhost:8080/goodbyeligenli //localhost:8080/goodbye/ligenli //localhost:8080/goodbye/xuejia // 可以使用通配符* @RequestMapping({"goodbye*","goodbye/*"}) @ResponseBody public String goodbye() { return "byebye"; }}利用其value属性还可以做窄化请求
/user/create
/user/modify
/user/remove
/user/query
上面的值都是以/user开头的
@Controllerpublic class UserController {
@RequestMapping("user/query") @ResponseBody public String query() { return "user/query"; } @RequestMapping("user/create") @ResponseBody public String create() { return "user/create"; } @RequestMapping("user/remove") @ResponseBody public String remove() { return "user/remove"; } @RequestMapping("user/modify") @ResponseBody public String modify() { return "user/modify"; }}窄化请求:将@RequestMapping写在类上
该Controller组件中的方法映射的URL:类上的@RequestMapping的value属性值 + 方法上的@RequestMapping的value属性值
@Controller@RequestMapping("user")public class UserController {
//@RequestMapping("user/query") @RequestMapping("query") @ResponseBody public String query() { return "user/query"; } //@RequestMapping("user/create") @RequestMapping("create") @ResponseBody public String create() { return "user/create"; } //@RequestMapping("user/remove") @RequestMapping("remove") @ResponseBody public String remove() { return "user/remove"; } //@RequestMapping("user/modify") @RequestMapping("modify") @ResponseBody public String modify() { return "user/modify"; }}两者之间的/ 写不写都行
写URL的时候,也不必以 / 开头
通过窄化请求,我们可以去做解耦,如果请求做的是某一方面的业务的话,配置其URL的时候给其相同的前缀,并且将其写到同一个Controller类(组件)中,在这个类上就可以使用@RequestMapping注解做窄化请求
比如订单相关的业务,我们的方法,处理的url分别是order/create、order/remove、order/query,我们就可以写到同一个Controller组件中,比如OrderController,在上面增加窄化请求@RequestMapping(“order”)
@Controller@RequestMapping("order")public class OrderController{}SpringMVC这个框架的灵魂是@RequestMapping,@RequestMapping它的灵魂是value属性
请求方法限定 method
请求方法限定
在Servlet阶段处理get请求,使用Servlet中的doGet方法;处理post请求使用Servlet中的doPost方法;
如果我们在SpringMVC中处理特定的请求方法的请求,在这里就是用到了method属性
RequestMethod[] method() default {}; RequestMethod数组
可以写单个值,也可以写多个值,如果写多个值的话,多个值之间的关系是OR
@Controller@RequestMapping("method")public class RequestMethodLimitController {
@RequestMapping(value = "get",method = RequestMethod.GET) @ResponseBody public String methodGet() { return "Method GET"; } @RequestMapping(value = "post",method = RequestMethod.POST) @ResponseBody public String methodPost() { return "Method POST"; } @RequestMapping(value = "double",method = {RequestMethod.GET,RequestMethod.POST}) @ResponseBody public String methodDouble() { return "Method GET OR Method POST"; }}发送POST:大家可以写表单;也可以使用一个工具 Postman
在搜索引擎中搜索postman下载
安装就选:next
可以构建集合(类似于浏览器的书签),接下来这几天发送请求,大部分都会通过Postman来发送
可以导出和导入:可以获得和上课发送的请求相同的请求
引申注解:@GetMapping、@PostMapping
这两个注解就是限定了请求方法的@RequestMapping
@RequestMapping( method = {RequestMethod.GET})public @interface GetMapping {}@RequestMapping( method = {RequestMethod.POST})public @interface PostMapping {}我们可以改造一下我们前面的方法
//@RequestMapping(value = "get",method = RequestMethod.GET)@GetMapping("get")@ResponseBodypublic String methodGet() { return "Method GET";}//@RequestMapping(value = "post",method = RequestMethod.POST)@PostMapping("post")@ResponseBodypublic String methodPost() { return "Method POST";}请求参数限定 params
这里的请求参数指的是:key=value&key=value&key=value这种请求参数,使用request.getParameter方法能够获得的这种参数
含义:必须要携带这里指定的请求参数,如果没有携带则会报错
String[] params() default {};
值是字符串数组,意味着可以写多个值,写多个值的情况,多个值之间的关系是and
@RequestMapping("params") // @RequestMapping注解的value属性才是窄化请求@Controller//("params")// Controller注解是组件注册功能的注解,value属性指定的是组件的idpublic class ParameterLimitController {
//localhost:8080/params/login?username=songge&password=niupi //params = {"username","password"} 含义:既要携带username这个请求参数,也要携带password @RequestMapping(value = "login",params = {"username","password"}) @ResponseBody public String login() { return "ok"; }}请求头限定 headers
限定的是请求头的key
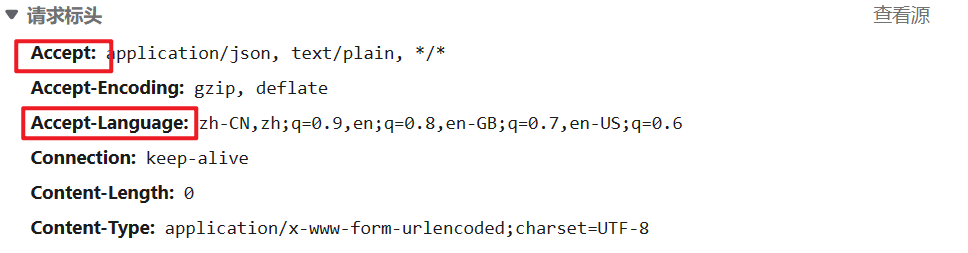
冒号左侧的部分就是请求头的key
请求报文有哪些组成部分:
- 请求行 → URI 协议 方法
- 请求头
- (空行)
- 请求体
仍然使用Postman来构造请求
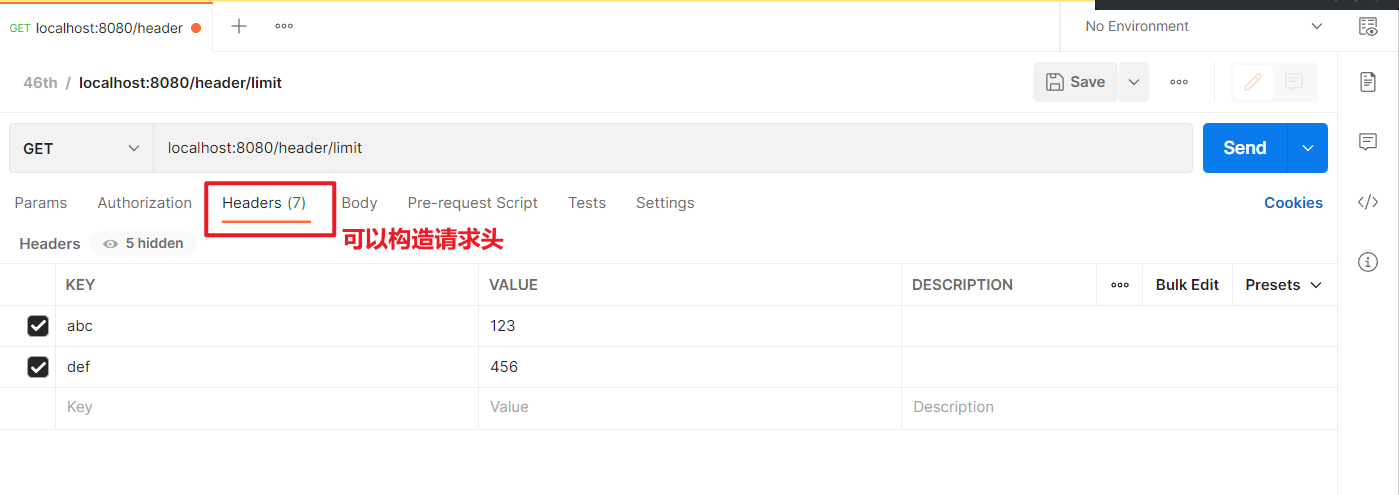
String[] headers() default {};也是字符串数组,多个值之间的关系也是and
@Controller@RequestMapping("header")public class HeaderLimitController {
// 既要携带abc这个请求头,也要携带def这个请求头 @RequestMapping(value = "limit",headers = {"abc","def"}) @ResponseBody public String headerLimit() { return "ok"; }}Content-Type请求头值限定 consumes
限定的是Content-Type这个请求头的值 → 这个请求头的含义:请求携带的 正文的类型(请求体)
比如一个jpg文件:image/jpeg
比如文本:text/html
比如json:application/json
语法的格式:xxx/xxx
我发送请求给张云,张云我给你带了一些东西过来,带的东西的类型是:苹果
@RequestMapping(value = "consumes",consumes = "abc/def")@ResponseBodypublic String contentTypeLimit() { return "ok";}Accept请求头值限定 produces属性
限定的是Accept这个请求头的值 → 这个请求的含义 → 客户端希望接收到的服务端响应的正文类型
我希望张云明天送我一个苹果,我发送一个请求给到张云,我就可以通过Accept这个请求头携带苹果的信息
比如一个jpg文件:image/jpeg
比如文本:text/html
比如json:application/json
语法的格式:xxx/xxx
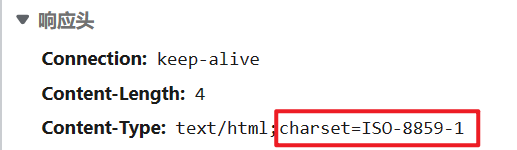
@RequestMapping(value = "produces",produces = "application/json")@ResponseBodypublic String acceptLimit(){ return "ok";}// 希望接收到正文的charset为utf-8@RequestMapping(value = "chinese",produces = "text/html;charset=utf-8")@ResponseBodypublic String chinese() { return "这是中文"; //响应这个字符串的是SpringMVC给我们去响应这个字符串, // 默认的值,响应头中的Content-Type的值变为了text/html;charset-iso-8859-1 // 昨天在微信群里给大家发了解决方案}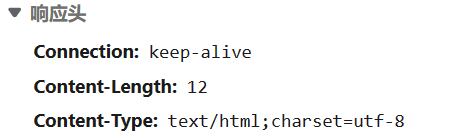
这里我们就不统一去处理全部的正文的charset:没必要
后面去讲返回值的时候,我们响应的中文的字符集会是utf-8;
拦截器解决不了这个问题,SpringMVC的字符串消息处理里面的默认的charset为iso-8859-1,Filter就算通过response做了设置,但是消息处理器仍然用的还是默认的iso-8859-1
JavaEE阶段解决响应中文乱码问题:响应头中Content-Type → 响应体的内容的字符集
SpringMVC阶段解决中文乱码问题:请求头中的Accept → 响应体的内容的字符集
如果感兴趣可以单独找我:BeanPostProcessor去修改其默认的字符集
小结
@RequestMapping注解 属性其实就是提供了不同信息,我们获得这些不同的信息,完成了不同的功能
通常一个注解最核心(重要)的属性就是其value属性,对于@RequestMapping注解也是一样的,它的最重要的属性也是value属性,我们后续在开发过程中,主要使用的就是其value属性
其他的属性,基本上很少使用,但是呢,你只要是在做SpringMVC的开发,一定会用到@RequestMapping注解和其value属性
Handler方法的返回值
前面的案例中我们返回值写的都是String,我们在这里还有一些其他的返回值
这个返回值被谁获取呢?
DispatcherServlet获取 → 判断类型
- 如果是ModelAndView → 转发到jsp页面,在jsp页面上渲染model提供的数据 → 已经不是主流了
- 如果是Json需要的形式 → response.getWriter.write(jsonStr)
ModelAndView(了解)
比较过时了
主流开发技术:前后端分离,使用Json做交互
ModelAndView主要是为单体应用服务的,单体应用的话,前端和后端都整合在一个应用程序中
ModelAndView主要是给访问前端的视图和数据的,当服务器的这个方法返回了一个ModelAndView的话,会访问到前端的内容
举个例子:hello.jsp
<%@ page contentType="text/html;charset=UTF-8" language="java" %><html><head> <title>Title</title></head><body>
</body></html>长相类似于html
现象:在webapp目录下放了一个banner.png和一个hello.jsp 两个文件,访问banner.png产生了404报错,访问hello.jsp是可以正常访问
分析:
- 是否是DispatcherServlet作为缺省的Servlet处理了hello.jsp这个请求呢? 并不是
- 有没有可能有其他的原因呢? Tomcat提供了专门处理jsp的Servlet,JSP本身就是一种Servlet
- Tomcat对jsp处理本身就是特殊的处理 → jsp文件会被编译Servlet
现在想要做一件事情: localhost:8080/hello?username=xxx ,发送这个请求能够访问到上面的hello.jsp,并且在里面能够输出hello xxx
这时候我们就需要使用到ModelAndView,ModelAndView的使用类似于完形填空,View提供的是题干,Model提供的题目的序号和答案
@Controllerpublic class ModelAndViewController {
@RequestMapping("hello") public ModelAndView hello(String username) {// 接收参数的这个方式大家先不用关注 ModelAndView modelAndView = new ModelAndView(); // 在ModelAndView中设置它的View,让这个view能够指向hello.jsp这个文件 modelAndView.setViewName("/hello.jsp"); // 如果希望在视图文件中显示一些值,通过Model来提供,Model封装的键值对(Map<String,Object>) modelAndView.addObject("username", username); return modelAndView; }}和前面写的方法的差别:
- 返回值写为了ModelAndView
- 在方法上并没有增加@ResponseBody
还有一种方式也可以返回ModelAndView,可以返回String,这个String字符串作为ModelAndView中的viewName来使用
@RequestMapping("hello2")public String hello2(String username, Model model) {// 接收参数的这个方式大家先不用关注 model.addAttribute("username", username); return "/hello.jsp";}和我们前面返回值为String的含义不一样:在方法上并没有增加@ResponseBody
★Json
需要做一些准备:
- jackson相关依赖(jackson-databind)
- @EnableWebMvc
- 方法上(或类上)增加注解@ResponseBody
String(并不建议继续使用了)
后续我们并不直接返回String了,因为这样子写比较繁琐,大家还需要处理字符集问题
返回值为String的话,它的字符集默认是iso-8859-1
Object(你写啥类型都行)
直接返回集合或引用类型对象就可以了
现在有一个需求:想要返回一个User实例对应的Json字符串的方法
@RequestMapping("json")@Controllerpublic class JsonController {
@RequestMapping("user") @ResponseBody public User user() { User user = new User("张松", "远志", 30); return user; }}注解返回User对象就可以了,Jackson会自动的帮我们进行转换, 并且也不需要设置字符集,返回值的中文没有乱码
进一步使用
看一下@ResponseBody注解
@Target({ElementType.TYPE, ElementType.METHOD})// 这个注解可以写在类上,也可以写在方法上@Retention(RetentionPolicy.RUNTIME)@Documentedpublic @interface ResponseBody {}我们前面学过的什么注解,也是可以写在类上,也可以写在方法上:@RequestMapping、@Transactional
@ResponseBody如果写在类上,意味着当前类下所有的方法响应的都是字符串或Json字符串
@RequestMapping("json")@Controller@ResponseBodypublic class JsonController {
@RequestMapping("user") //@ResponseBody public User user() { User user = new User("张松", "远志", 30);
return user; }}引申注解:**@RestController **= @Controller + @ResponseBody
@RequestMapping("json")//@Controller//@ResponseBody@RestControllerpublic class JsonController {
@RequestMapping("user") //@ResponseBody public User user() { User user = new User("张松", "远志", 30);
return user; }}@RestController注解在后续的开发过程中非常常用:基本上我们所有的方法响应的都是Json
注意事项
不仅仅是这里响应JSON,而是大家在使用任意一个Json工具的时候都需要注意的一个点,不管你用的是Jackson还是Gson还是fastJson等工具,都需要注意:
引用类型这个类需要提供:无参构造方法和Getter/Setter方法
如果没有提供,Json转换过程会报错
vo的封装是开发过程中非常常规的使用
@Datapublic class BaseRespVo <T>{ T data; String msg; int status;
// 可以在vo中增加一些静态方法,方便我们完成一些封装 public static BaseRespVo ok() { BaseRespVo baseRespVo = new BaseRespVo(); baseRespVo.setMsg("成功"); baseRespVo.setStatus(200); return baseRespVo; } public static <T> BaseRespVo ok(T data) { BaseRespVo<T> baseRespVo = new BaseRespVo(); baseRespVo.setData(data); baseRespVo.setMsg("成功"); baseRespVo.setStatus(200); return baseRespVo; }}@RequestMapping("vo")public BaseRespVo vo() { return BaseRespVo.ok("hello vo");//"hello vo" 作为BaseRespVo对象中的data的,也可以写其他的Object类型的值}在使用任何实体类的时候,如果增加了有参构造方法,一定要增加无参构造方法;后续大家会使用各种框架,各种框架设计里面一定会用到反射
Handler方法的形参
方法的形参:主要做的事情是接收请求参数 以及一些其他的信息
- key=value形式的请求参数
- Json形式的请求参数
- 其他的信息
key=value形式的请求参数
public BaseRespVo hello2(String username,String password,Integer age) {// hello2Method.invoke(jsonController,new Object[]{username,password,age}) request.getParameter("username"); String ageStr = request.getParameter("age"); if(age需要的类型是Integer) { Integer age = Integer.parseInt(ageStr);// 转换的业务代码 → 专门的转换器Converter }}localhost:8080/user/register1?username=songge&password=niupi&age=40
请求体
username=songge&password=niupi&age=40这个请求它的请求参数是什么?username、password、age
我们通过形参来接收这些请求参数,创建一个新的工程来做这件事
@RequestMapping("user")@RestController// = @Controller + @ResponseBodypublic class UserController {
//localhost:8080/user/register1?username=songge&password=niupi&age=40 @RequestMapping("register1") public BaseRespVo register1(String username,String password,String age) { System.out.println("username = " + username); System.out.println("password = " + password); System.out.println("age = " + age); return BaseRespVo.ok(); }}控制台里打印了对应的内容
username = songgepassword = niupiage = 40说明我们已经接收到了这些请求参数所对应的值
这个过程中我们做的事情:请求参数名和方法的形参名一致
SpringMVC给我们去接收这些参数,它帮我们使用request.getParameter来接收了
而request.getParameter这个方法的返回值,它的类型的是什么? String
所以我们在这里使用String来进行接收,就直接接收到了
SpringMVC就这?不仅仅就这
★String、基本类型以及对应的包装类
直接接收:请求参数名和方法的形参名一致
可以使用基本类型或其包装类接收的时候,建议使用包装类来接收 → 健壮性
包装类可以为null,但是基本类型不能为null
//localhost:8080/user/register2?username=zhangsan&password=niupi&age=40@RequestMapping("register2")//public BaseRespVo register2(String username,String password,int age) {public BaseRespVo register2(String username,String password,Integer age) { System.out.println("username = " + username); System.out.println("password = " + password); System.out.println("age = " + age); return BaseRespVo.ok();}为什么我们在这里可以使用基本类型或对应的包装类来进行接收,request.getParameter这个方法的返回值不是String吗?
上面这个案例我们用Integer类型的age来接收这个请求参数的过程中发生了这样的事情
- String result = request.getParameter(“age”);
- SpringMVC给我们提供了类型转换器converter,转换器能够将String类型的值转换为我们需要Integer类型的值
- SpringMVC不仅仅提供了 String → Integer这样的类型转换器,这些基本类型以及对应的包装类都有与之对应的类型转换器 (124个)
其实我们在开发过程中最常用的就是基本类型以及对应的包装类,字符串
Date
localhost:8080/user/register3?username=songge&password=niupi&age=30&birthday=2022/06/21
localhost:8080/user/register4?username=songge&password=niupi&age=30&birthday=2022-06-21
能否直接使用Date来接收请求参数呢?也就是能否使用Date来接收birthday
能否接收取决于SpringMVC是否有给我们提供一个能够将String → Date的Converter转换器
SpringMVC有提供能将String → Date的转换器
我们自己写的日期转换的代码
String string = "2022/12/23";// 将这个String转换为Date的代码如何写String pattern = "yyyy/MM/dd"; // 日期的格式SimpleDateFormat simpleDateFormat = new SimpleDateFormat(pattern);Date date = simpleDateFormat.parse(string);通过上面到了代码:String → Date的过程中需要pattern信息(格式信息)
SpringMVC提供的String → Date的转换器,执行转换的过程中也是需要pattern信息的
- 一种是:采用默认的pattern信息 → yyyy/MM/dd
- 另一种:使用@DateTimeFormat注解的pattern属性指定
localhost:8080/user/register3?username=songge&password=niupi&age=30&birthday=2022/06/21
- 期望用的是默认的pattern → yyyy/MM/dd
localhost:8080/user/register4?username=songge&password=niupi&age=30&birthday=2022-06-21
- 期望按照@DateTimeFormat注解的pattern属性值的格式做转换
注意:请求参数名和方法的形参名一致
//localhost:8080/user/register3?username=songge&password=niupi&age=30&birthday=2022/06/21@RequestMapping("register3")public BaseRespVo register3(String username, String password, Integer age, Date birthday) { System.out.println("birthday = " + birthday); return BaseRespVo.ok();}//localhost:8080/user/register4?username=songge&password=niupi&age=30&birthday=2022-06-21@RequestMapping("register4")public BaseRespVo register4(String username,String password,Integer age, @DateTimeFormat(pattern = "yyyy-MM-dd") Date birthday) { System.out.println("birthday = " + birthday); return BaseRespVo.ok();}数组
可以直接来形参中使用数组来接收
前面能够接收到的这个类型的值,也可以使用对应类型的数组来接收
//localhost:8080/user/register5?username=songge&password=niupi&age=30// &hobbies=sing&hobbies=dance&hobbies=rap&ids=1&ids=2&ids=3@RequestMapping("register5")public BaseRespVo register5(String username,String password,Integer age, String[] hobbies,Integer[] ids) { //String[] hobbies = request.getParameterValues("hobbies"); System.out.println("hobbies = " + Arrays.asList(hobbies)); System.out.println("ids = " + Arrays.asList(ids)); return BaseRespVo.ok();}思考:开发过程中什么场景使用数组? 多选题
比如你要查询订单信息:查询未收货 101、已付款201状态的订单信息
这样的sql语句应该如何写?
--- 这样写并不好select * from cskaoyan_order where order_status = 101 or order_status = 201--- 应该使用的是in语句select * from cskaoyan_order where order_status in (101,201)--- 使用mybatis的foreach标签来做拼接文件 MultipartFile
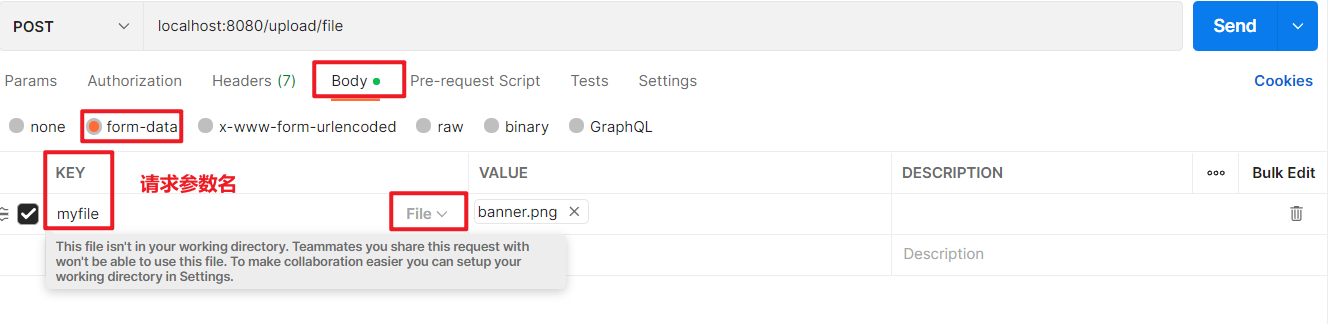
localhost:8080/upload/file
localhost:8080/upload/files
这两个请求会提交文件,可以接收到 → 对应JavaEE阶段的fileupload
可以接收到文件,并且保存到本地
如果我们要做文件上传,我们的请求如何构造?
通过form表单来构造请求,注意:input标签的name属性就是请求参数名
<form action="/upload/file" enctype="multipart/form-data" method="post"> <input type="file" name="myfile"/><br> <input type="submit"/></form>如果要上传多个文件,input标签中增加一个multiple属性<form action="/upload/files" enctype="multipart/form-data" method="post"> <input type="file" multiple name="myfiles"/><br> <input type="submit"/></form>我们上课使用Postman来做请求的构造
需要做的事情
-
commons-io和commons-fileupload依赖
-
<!--引入commons-fileupload时候也会将commons-io引入--><dependency><groupId>commons-fileupload</groupId><artifactId>commons-fileupload</artifactId><version>1.4</version></dependency>
-
-
需要向容器中注册一个组件,multipartResolver这个组件id必须为multipartResolver,不能为其他值,SpringMVC在使用这个组件的时候applicationContext.getBean(“multipartResolver”)
-
可以在xml中注册,也可以在配置类中注册
-
@Configurationpublic class MvcConfiguration {// 组件id一定要是multipartResolver@Bean("multipartResolver")public CommonsMultipartResolver multipartResolver() {CommonsMultipartResolver commonsMultipartResolver = new CommonsMultipartResolver();// commonsMultipartResolver.set 可以使用其set方法做一些设置return commonsMultipartResolver;}}
-
-
方法的形参中使用MultipartFile来接收
注意:请求参数名和方法的形参名一致
@RestController@RequestMapping("upload")public class UploadController {
@RequestMapping("file") public BaseRespVo file(MultipartFile myfile) { return BaseRespVo.ok(); }}接收到MultipartFile,我们能够做什么事情,取决于MultipartFile给我们提供了什么方法?
| 方法名 | 描述 | 返回值 |
|---|---|---|
| getOriginFileName() | 获得上传时的文件名 | String |
| getContentType() | 获得上传的文件的正文类型,比如上传banner.png,正文类型就是image/png | String |
| getName() | 获得是请求参数名(没啥用) | String |
| getSize() | 获得文件大小 | long |
| transferTo(File) | 提供的参数是File类型的值,File提供的保存位置及文件名,就可以保存这个文件 | void |
@RequestMapping("file")public BaseRespVo file(MultipartFile myfile) { String name = myfile.getName(); // myfile String originalFilename = myfile.getOriginalFilename(); //如果上传的是banner.png → banner.png String contentType = myfile.getContentType(); // image/png long size = myfile.getSize(); // 比如我们要保存到D:\tmp路径下,保存的文件名叫banner.png ,我们就要提供一个这样的File //File file = new File("D:\\tmp\\banner.png"); //File file = new File("D:\\tmp\\","banner.png"); // 保存时以原始的文件名保存,如果上传同名文件会覆盖 → JavaEE hashcode和uuid File file = new File("D:\\tmp\\",originalFilename); try { myfile.transferTo(file); } catch (IOException e) { e.printStackTrace(); } return BaseRespVo.ok();}也可以上传多个文件,使用数组来接收
private void uploadSingleFile(MultipartFile myfile) { String name = myfile.getName(); // myfile String originalFilename = myfile.getOriginalFilename(); //如果上传的是banner.png → banner.png String contentType = myfile.getContentType(); // image/png long size = myfile.getSize(); // 比如我们要保存到D:\tmp路径下,保存的文件名叫banner.png ,我们就要提供一个这样的File //File file = new File("D:\\tmp\\banner.png"); //File file = new File("D:\\tmp\\","banner.png"); // 保存时以原始的文件名保存,如果上传同名文件会覆盖 → JavaEE hashcode和uuid File file = new File("D:\\tmp\\",originalFilename); try { myfile.transferTo(file); } catch (IOException e) { e.printStackTrace(); }}
@RequestMapping("files")public BaseRespVo files(MultipartFile[] myfiles) { for (MultipartFile myfile : myfiles) { uploadSingleFile(myfile); } return BaseRespVo.ok();}★使用引用类型接收
请求参数名和引用类型的成员变量名一致
仍然是上面的这些请求,上面这些请求,它的请求参数,是放在方法的形参中
使用引用类型的话,将接收到的形参,封装为一个引用类型对象,这个引用类型的对象的成员变量封装的就是这些形参的值
localhost:8080/user/register6?username=songge&password=niupi&age=30&hobbies=sing&hobbies=dance&hobbies=rap&ids=1&ids=2&ids=3&birthday=2022-06-21
上面这个请求如果要使用形参来接收,我们的方法如何来写
//localhost:8080/user/register6?username=songge&password=niupi&age=30// &hobbies=sing&hobbies=dance&hobbies=rap&ids=1&ids=2&ids=3// &birthday=2022-06-21@RequestMapping("register6")public BaseRespVo register6(String username,String password,Integer age, String[] hobbies,Integer[] ids, @DateTimeFormat(pattern = "yyyy-MM-dd") Date birthday) { return BaseRespVo.ok();}将这个形参变为一个实体类的成员变量,形参这里写这个实体类的实例
@Datapublic class User { String username; String password; Integer age;
String[] hobbies; Integer[] ids;
@DateTimeFormat(pattern = "yyyy-MM-dd") Date birthday;
}@RequestMapping("register6")public BaseRespVo register6(User user) { return BaseRespVo.ok();}SpringMVC帮助我们做的封装,当它发现方法的形参是一个引用类型的实例的时候,会根据这个类中的成员变量的名称和类型去接收请求参数的值,根据名称获得值,根据类型来做格式转换,通过set方法做的封装
思考
我们在后续的开发中,使用哪些形式来接收:
- 使用形参直接接收:如果参数比较少,直接使用形参
- 使用引用类型的对象来接收:参数比较多;在多个请求中都使用了相同的请求参数
- 可以都用:有些参数就用一次或者用的次数比较少(直接接收),有的参数用了多次(封装为实体类)
比如我们要做一个查询
localhost:8080/user/query?username=song&sort=add_time&order=asc&page=1&limit=10
请求参数username:根据这个值做username的模糊查询
请求参数page、limit:根据这两个值做分页,page是页码,limit是这一页的数据量
请求参数sort、order:做结果排序,根据添加时间做升序排序
page、limit、sort、order在做其他的查询时也是会使用的,为了这些参数的复用,我们就可以封装为实体类
//localhost:8080/user/query?username=song&sort=add_time&order=asc&page=1&limit=10@RequestMapping("query")public BaseRespVo query(String username, CommonParameter commonParameter) { return BaseRespVo.ok();}
@Datapublic class CommonParameter { String sort; String order; Integer page; Integer limit;
}Json请求参数
如果说一个请求携带Json请求参数,这个请求具有什么样的特点?
- 请求方法:POST
- 正文类型Content-Type:application/json
- 数据是Json字符串
如果构造请求是Json请求参数:ajax、axios
可以使用Postman来构造请求
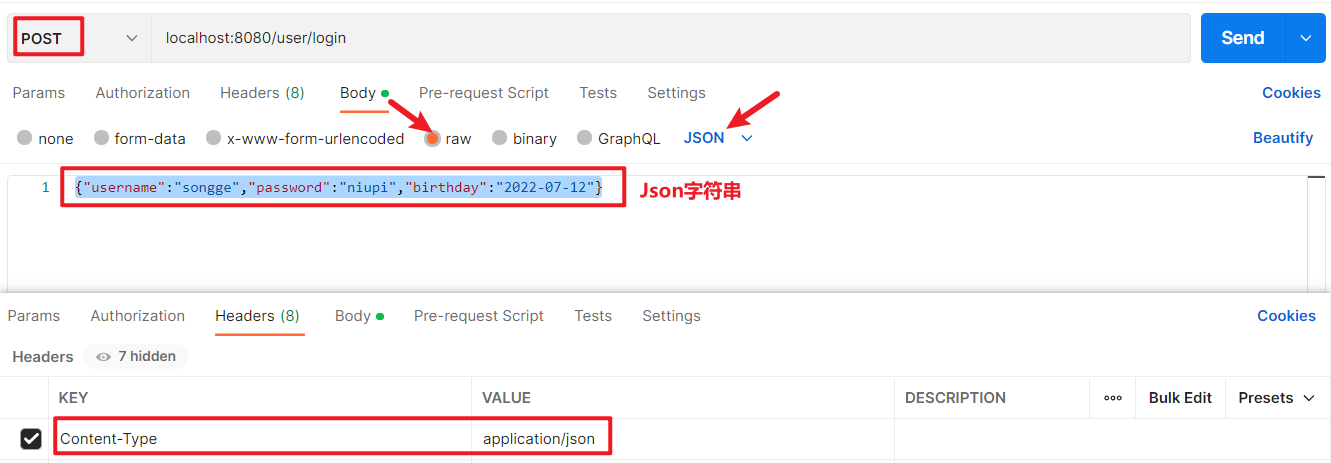
Json请求参数仍然是在形参中进行接收,可以使用以下几种类型来接收
- String
- 引用类型对象
- Map
形参前需要增加一个注解@RequestBody
@RequestBody和@ResponseBody这两个注解都是和Json打交道的时候使用的注解
接收的时候用的是@RequestBody
响应的时候用的是@ResponseBody
为什么我们可以使用引用类型对象、Map来进行接收
我们本身接收到的值是String,jackson识别了我们方法的形参类型,将字符串转换为对应的类型的形参
@RestController@RequestMapping("user")public class UserController { /** * String * {"username":"songge","password":"niupi","birthday":"2022-07-12"} * @return */ @RequestMapping("login") public BaseRespVo login(@RequestBody String result) { System.out.println(result); return BaseRespVo.ok(); }
/** * 引用类型对象 * {"username":"songge","password":"niupi","age":50,"birthday":"1995-03-19"} * @return */ @RequestMapping("login2") public BaseRespVo login2(@RequestBody User user) { System.out.println(user); return BaseRespVo.ok(); }
/** * Map → LinkedHashMap * {"username":"songge","password":"niupi","age":50,"birthday":"1995-03-19"} * @return */ @RequestMapping("login3") public BaseRespVo login3(@RequestBody Map map) { System.out.println(map); return BaseRespVo.ok(); }}如果要指定日期格式
@NoArgsConstructor@Datapublic class User {
private String username; private String password; private Integer age; // 提供的Json数据birthday这个key对应的值就是String // 这个字符串有点像Date的一个pattern → yyyy-MM-dd //private String birthday; // 接收Json字符串的时候,将其变量的类型定义为Date //@DateTimeFormat(pattern = "yyyy-MM-dd") → 这个是不行,这个注解是给Key-value这种请求参数使用的 // 我们接收Json数据的过程中 String → user对象,这个过程完全是靠Json工具类 → 可以做Date格式的指定 @JsonFormat(pattern = "yyyy-MM-dd")// 影响接收过程中的日期指定;也影响响应过程中的日期格式 private Date birthday;}思考:我们在开发的过程中我们采用上面3种方式中的哪种方式?
- String不使用,因为接收到String类型的值,你还需要额外处理,过程就繁琐了
- 引用类型对象:可以使用。参数比较多,封装比较复杂,你需要确切的参数类型的时候,使用的场景比较多
- Map:可以使用。如果你的参数比较少,也比较简单,就直接使用Map就行了
- {“username”:“songge”}
其他信息
HttpServletRequest、HttpServletResponse
可以直接写在形参中
不太建议,除非万不得已
不演示了
// Controller组件中的方法上都是可以增加HttpServletRequest和HttpServletResponse这两个形参的@RequestMapping("reqAndResp")public BaseRespVo reqAndResp(HttpServletRequest request, HttpServletResponse response) { return BaseRespVo.ok();}Cookie和Session
需要通过request来获得
//localhost:8080/cookies@RequestMapping("cookies")public BaseRespVo cookies(HttpServletRequest request) { Cookie[] cookies = request.getCookies(); for (Cookie cookie : cookies) { System.out.println(cookie.getName() + " = " + cookie.getValue()); } return BaseRespVo.ok();}通过浏览器构造Cookie
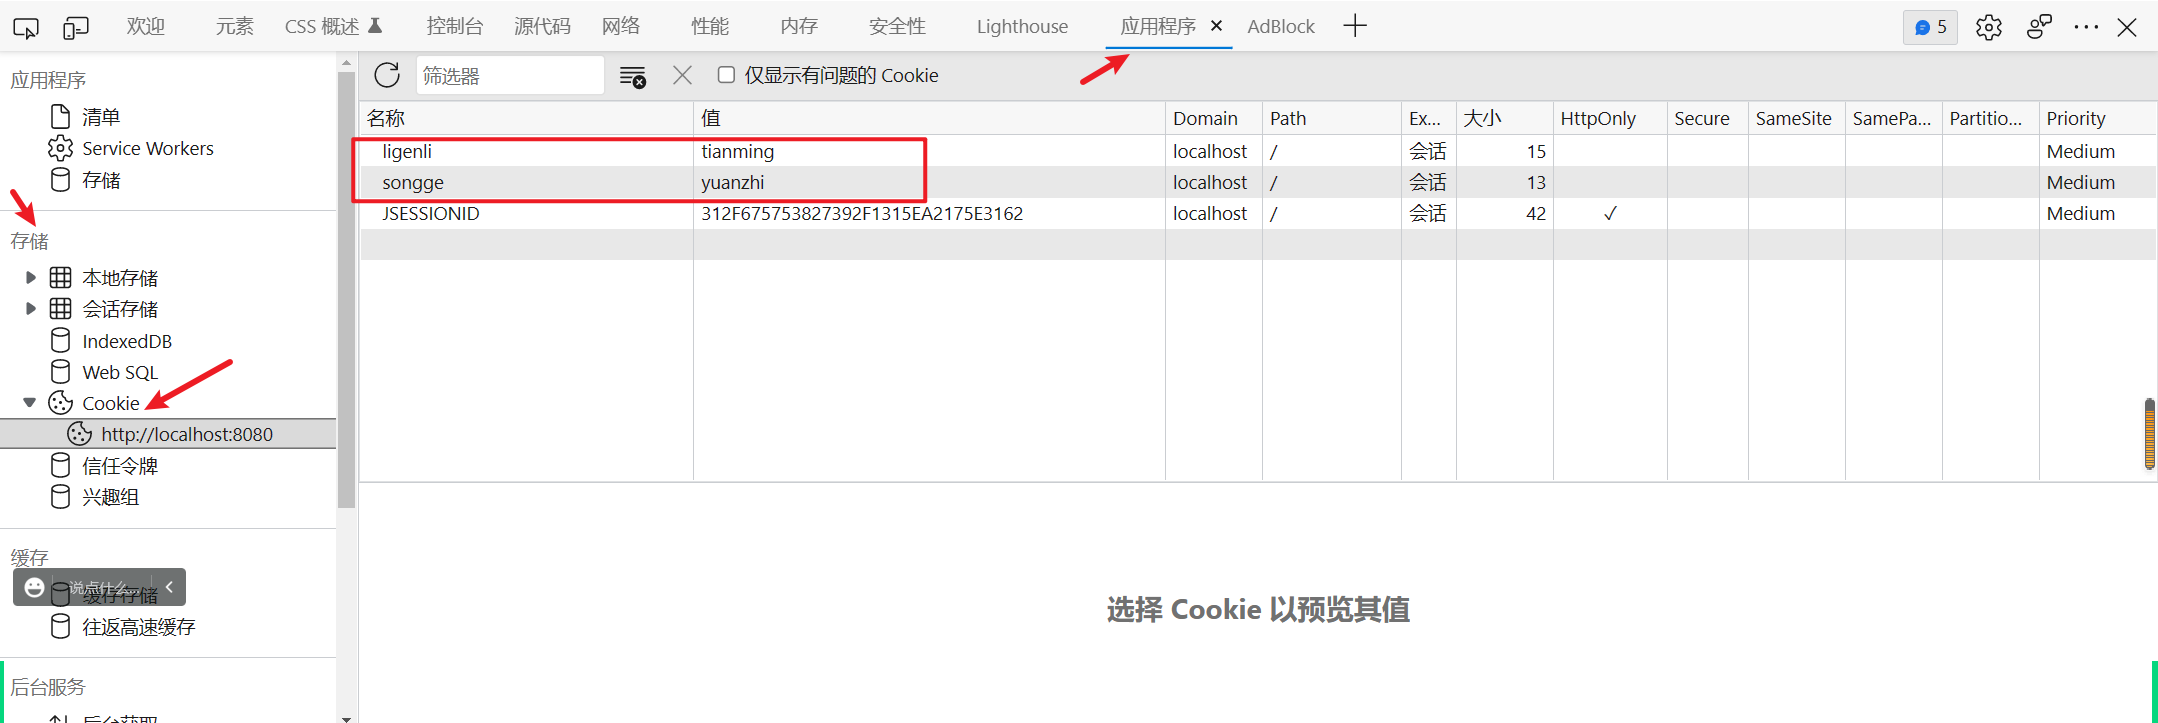
请求头里有Cookie
也可以通过Postman构造Cookie → 构造Postman的请求头就可以了
可以通过request来获得,也可以直接在形参中写HttpSession
http://localhost:8080/session1?username=xuejia
http://localhost:8080/session2
这两个请求,
session1,获得session,向session中放入数据
session2,获得session,从session中取出数据
通过两种不同的方式来获得session
//http://localhost:8080/session1?username=xuejia@RequestMapping("session1")public BaseRespVo session1(HttpServletRequest request,String username) { HttpSession session = request.getSession(); session.setAttribute("username", username); return BaseRespVo.ok();}//http://localhost:8080/session2@RequestMapping("session2")public BaseRespVo session2(HttpSession session) { Object username = session.getAttribute("username"); System.out.println("username = " + username); return BaseRespVo.ok(username);}RESTful风格接口
REST → 是单词的首字母缩写 → 表述性状态传递 → Representational State Transfer
通过请求(报文)能够提供一些对应的信息,提供给服务器 也就是通过一些方法来获得对应的信息
其实就是对Request的封装
过去使用RESTful风格接口的时候,构建一个场景,做user的增删改查,请求URL都是/user
- /user 查询 GET
- /user 删除 DELETE
- /user 新增 PUT
- /user 修改 POST
请求URL都是user,我们可以知道做的是user的相关业务,我们还需要一些信息辅助我们去判断到底做的新增还是查询还是删除还是修改,通过请求方法的不同,可以做出不同操作的判断
当前的主流我们并不这样做了,主流的请求方法其实就是GET/POST,当前我们说RESTful的时候,通过包含一个信息,你能够使用JSON做数据交互:@RequestBody、@ResponseBody
而我们当前定义接口的URL,通过URL的不同区分不同的操作
- /user/query 查询
- /user/remove 删除
- /user/create 新增
- /user/modify 修改
另外我们还可以获得一些其他的信息
- 请求URL的信息 → @PathVariable
- 请求参数信息 → @RequestParam
- 请求头信息 → @RequestHeader
- Cookie信息 → @CookieValue
- Session信息 → @SessionAttribute
能够获得这样的信息,获得的这些信息是放在方法的形参中,使用不同的注解来区分获得的不同的信息
★@PathVariable → URI
//localhost:8080/path/songge//@PathVariable → 获得请求URL的一部分值 → 在@RequestMapping的value属性写占位符{}// 获得指定占位符位置的值给到所对应的形参 → 形参通过注解接收指定占位符位置的值// 通过这个注解,就可以把一部分请求参数写到URL中,比如豆瓣、CSDN@RequestMapping("path/{username}")public BaseRespVo path(@PathVariable("username")String name) { System.out.println("name = " + name); return BaseRespVo.ok();}@RequestParam → 请求参数
// localhost:8080/param?username=songge&password=niupi//@RequestParam → 开发过程中基本不用,直接使用形参名// 形参通过这个注解获得指定请求参数,如果使用了这个注解,就一定要携带对应的请求参数@RequestMapping("param")public BaseRespVo param(@RequestParam("username")String usernamea, @RequestParam("password")String passwordb) { return BaseRespVo.ok();}@RequestHeader → 请求头
//@RequestHeader// 比如要获得Accept这个请求和Host这个请求头的值// 可以使用字符串或字符串数组来接收 → 如果使用数组来接收,其实就是将字符串通过逗号分隔为数组(split)// 形参通过这个注解获得指定请求头的值@RequestMapping("header")public BaseRespVo header(@RequestHeader("Accept")String[] accept, @RequestHeader("Host")String host) { System.out.println(Arrays.asList(accept)); System.out.println(host); return BaseRespVo.ok();}@CookieValue → Cookie
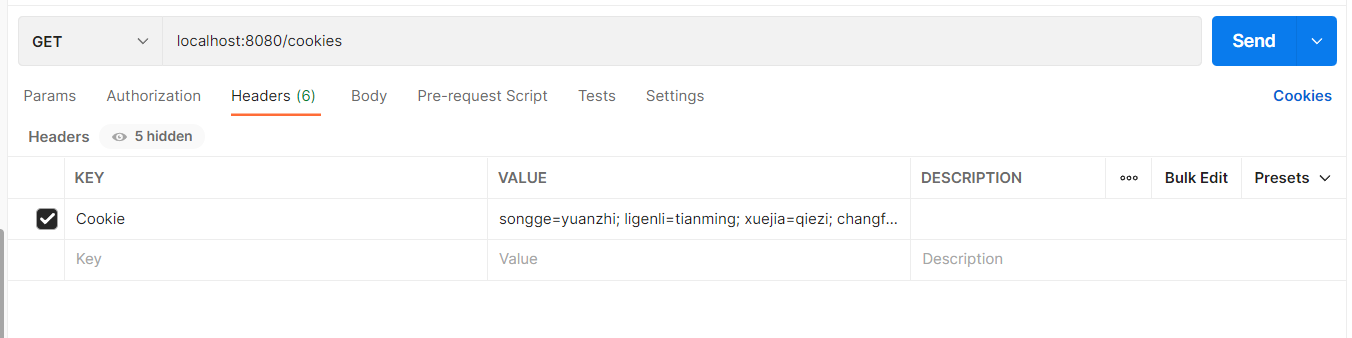
//@CookieValue// 形参通过这个注解获得指定Cookie的值,根据key获得value// 比如构造的Cookie是这样的 Cookie:songge=yuanzhi;ligenli=tianming;xuejia=qiezi// 相较于前面使用Cookie的话(要通过request获得Cookies数组,然后通过遍历获得key对应的值),要方便的多@RequestMapping("cookie")public BaseRespVo cookie(@CookieValue("songge")String value) { System.out.println(value); return BaseRespVo.ok();}@SessionAttribute → Session
//@SessionAttribute// 形参通过这个注解获得指定Session的值,根据key获得value// 比如我向session中放入一个key=username的值,我们可以直接取出username对应的值@RequestMapping("session")public BaseRespVo session(@SessionAttribute("username")String username) { return BaseRespVo.ok();}//localhost:8080/put/xuejia@RequestMapping("put/{username}")public BaseRespVo sessionPut(@PathVariable("username")String username, HttpSession session) { session.setAttribute("username",username); return BaseRespVo.ok();}SpringMVC核心流程(难)
前面的学习过程中,我们产生一些共识:
- DispatcherServlet处理我们(几乎)全部请求
- Controller组件中的方法处理请求,这也是我们主要开发的内容
DispatcherServlet和ApplicationContext的关系
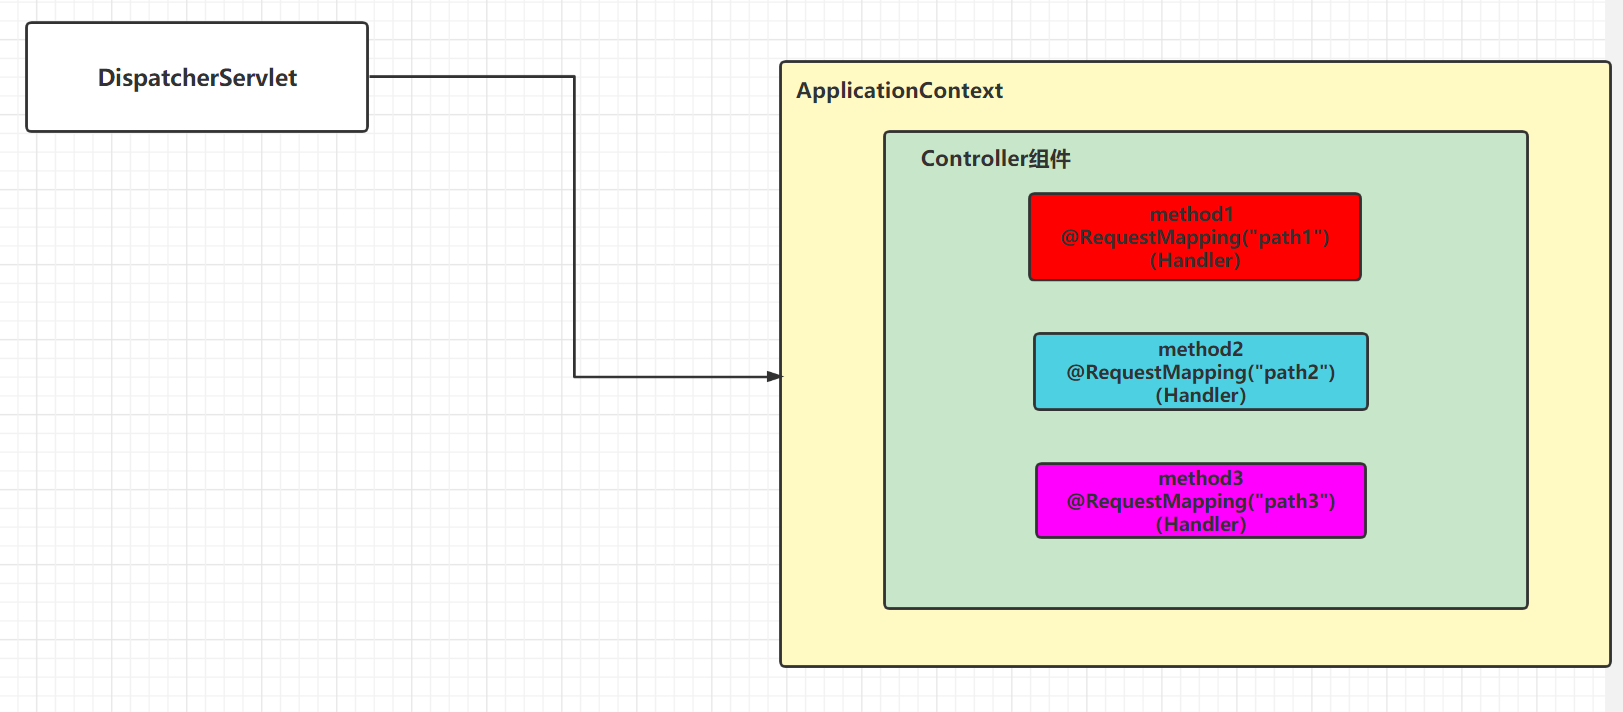
为什么我们去开发Controller组件中的方法就可以了?
方法是哪里的?
存在于Controller组件中
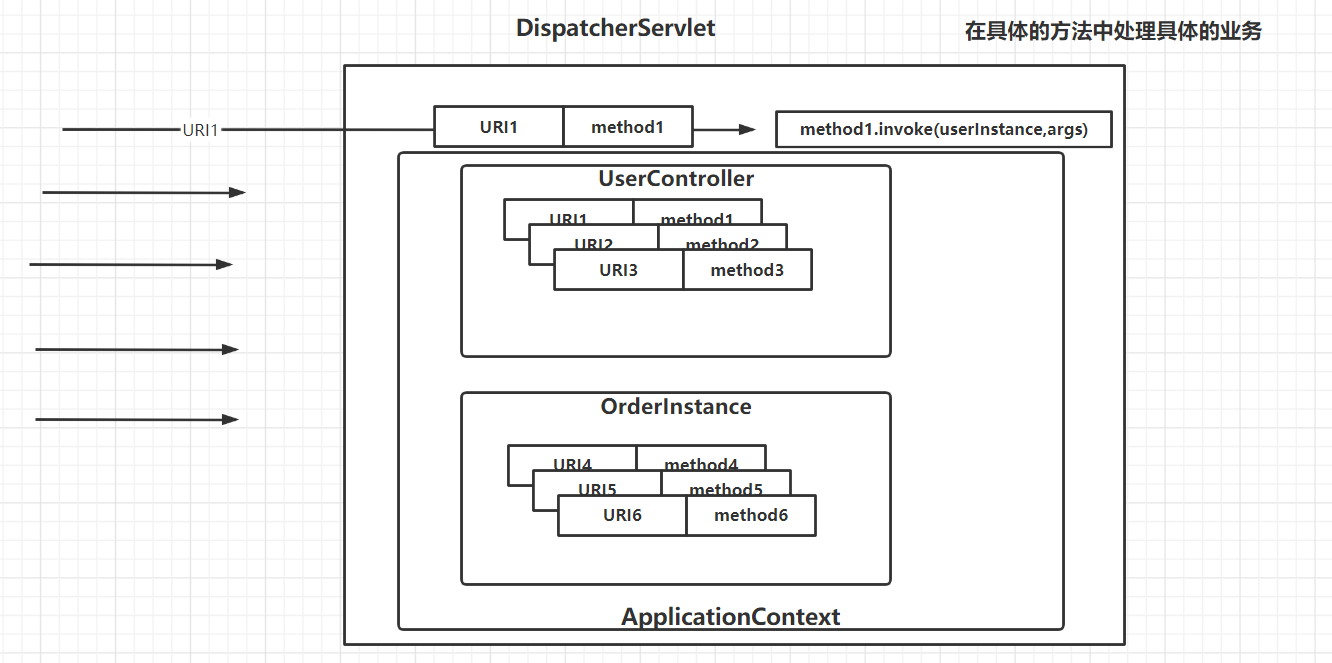
Controller组件放在哪里?从哪里能够获得Controller组件?
容器中 ,容器就是ApplicationContext
在哪里执行到这些方法?
当我们发送请求的时候,会执行到这些方法;当我们发送请求的时候,DispatcherServlet处理我们全部的请求, DispatcherServlet → 方法
如果找到的这些方法,找到这些方法的过程中发生了什么?
Handler:处理器,method1、method2、method3其实就是处理器,处理我们的请求,也称之为HandlerMethod(Handler方法)
小结论:DispatcherServlet如果能够找到ApplicationContext(容器),就可以执行到容器中的Controller组件中Handler(方法)
接下来考虑的问题,DispatcherServlet如何和ApplicationContext建立联系?
可否在DispatcherServlet中增加成员变量,叫ApplicationContext可以不?可以
SpringMVC是这样子做:DispatcherServlet的父类中增加了成员变量(Web)ApplicationContext,如果这个父类中提供了getWebApplicationContext这个方法的话,DispatcherServlet可以获得ApplicationContext吧
public abstract class FrameworkServlet { private WebApplicationContext webApplicationContext; @Nullable public final WebApplicationContext getWebApplicationContext() { return this.webApplicationContext; }}public class DispatcherServlet extends FrameworkServlet {}WebApplicationContext是SpringMVC阶段我们使用的容器,也是ApplicationContext,是ApplicationContext的子接口,ApplicationContext提供的功能,WebApplicationContext全部都有;里面还有一个额外的方法getServletContext;通过ServletContext可以和Servlet共享数据,而我们这里的Servlet只有DispatcherServlet
也就是:WebApplicationContext和DispatcherServlet可以通过ServletContext共享数据
public interface WebApplicationContext extends ApplicationContext {
@Nullable ServletContext getServletContext();}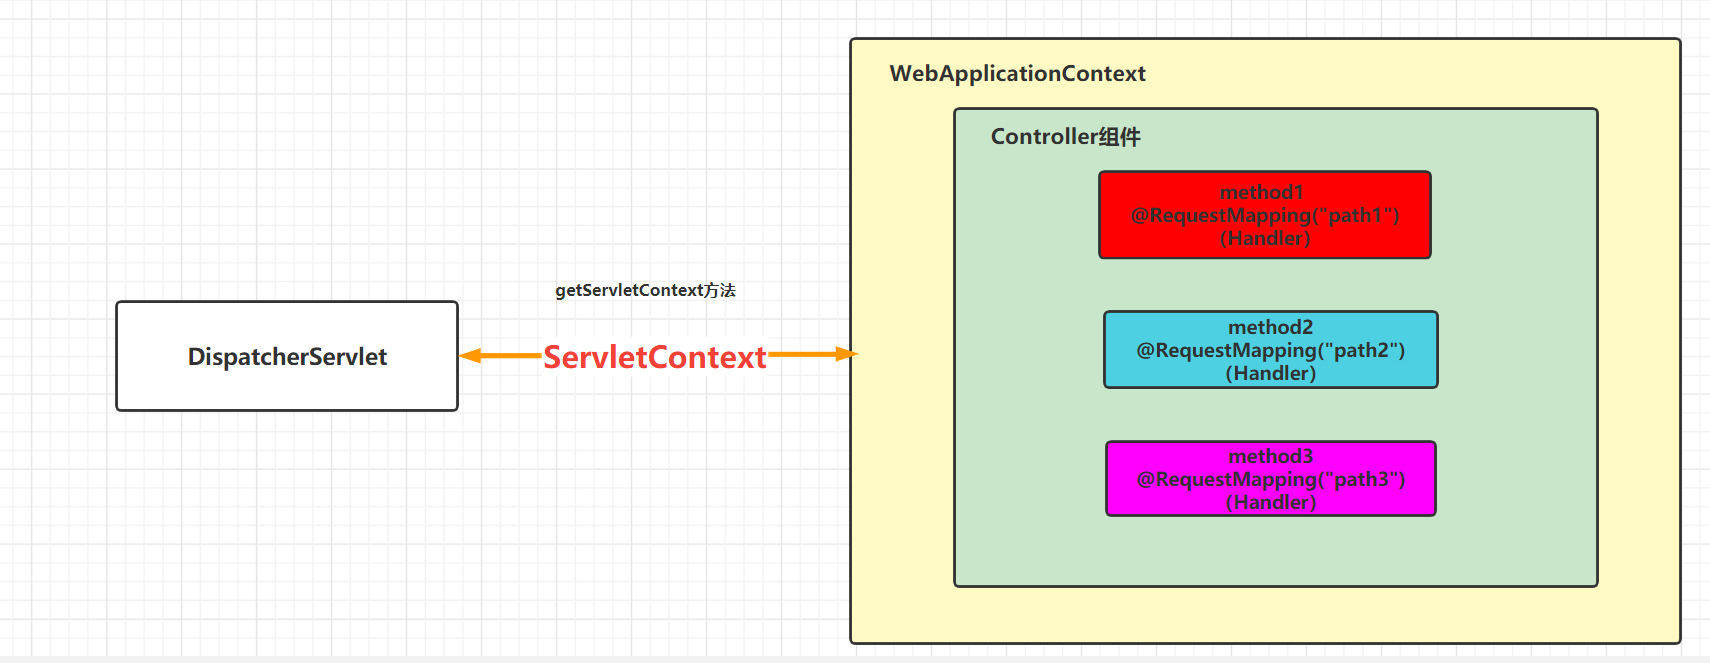
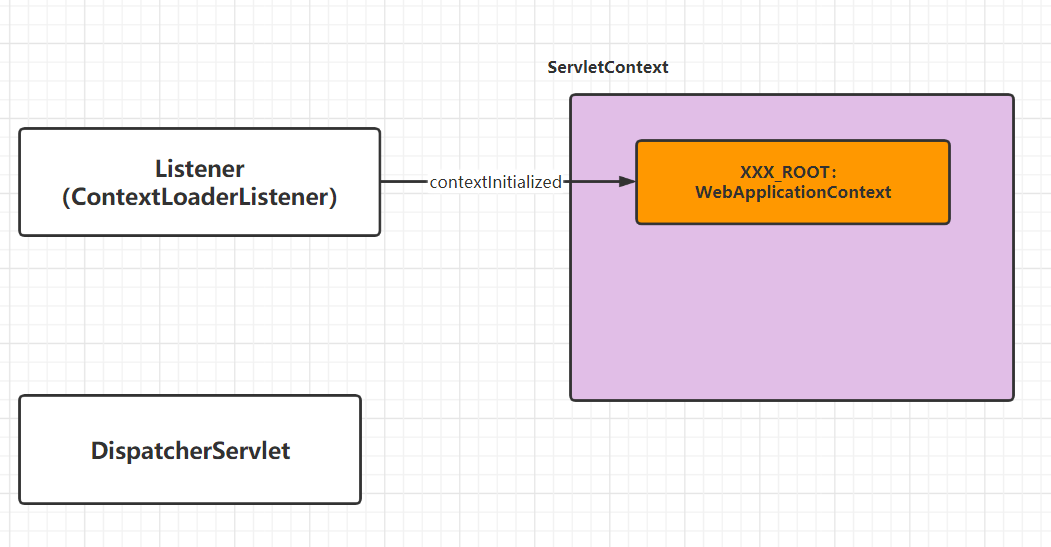
DispatcherServlet使用的WebApplicationContext是什么时候初始化的?容器何时初始化的,也就WebApplicationContext的实例是何时生成的,作为DispatcherServlet的成员变量?
Servlet工作的方法是service方法,WebApplicationContext要在service方法执行之前完成初始化
- Listener → contextInitialized
- Servlet的生命周期的init方法
SpringMVC是采用上面的哪种方式?
我们前面:2。也可以12都用
如果既使用Listener,又使用Servlet的init方法,这个过程如何维护的?
SpringMVC给我们提供了一个Listener → ContextLoaderListener。初始化了一个WebApplicationContext,并且给它放到了ServletContext中
public class ContextLoaderListener extends ContextLoader implements ServletContextListener { public void contextInitialized(ServletContextEvent event) { this.initWebApplicationContext(event.getServletContext()); }}执行完Listener
接下来 要执行DispatcherServlet的生命周期的init方法
DispatcherServlet自己会初始化一个WebApplicationContext
DispatcherServlet在执行init方法的过程中,从ServletContext里根据xxx_ROOT这个key获得WebApplicationContext,作为DispatcherServlet初始化的WebApplicationContext的成员变量
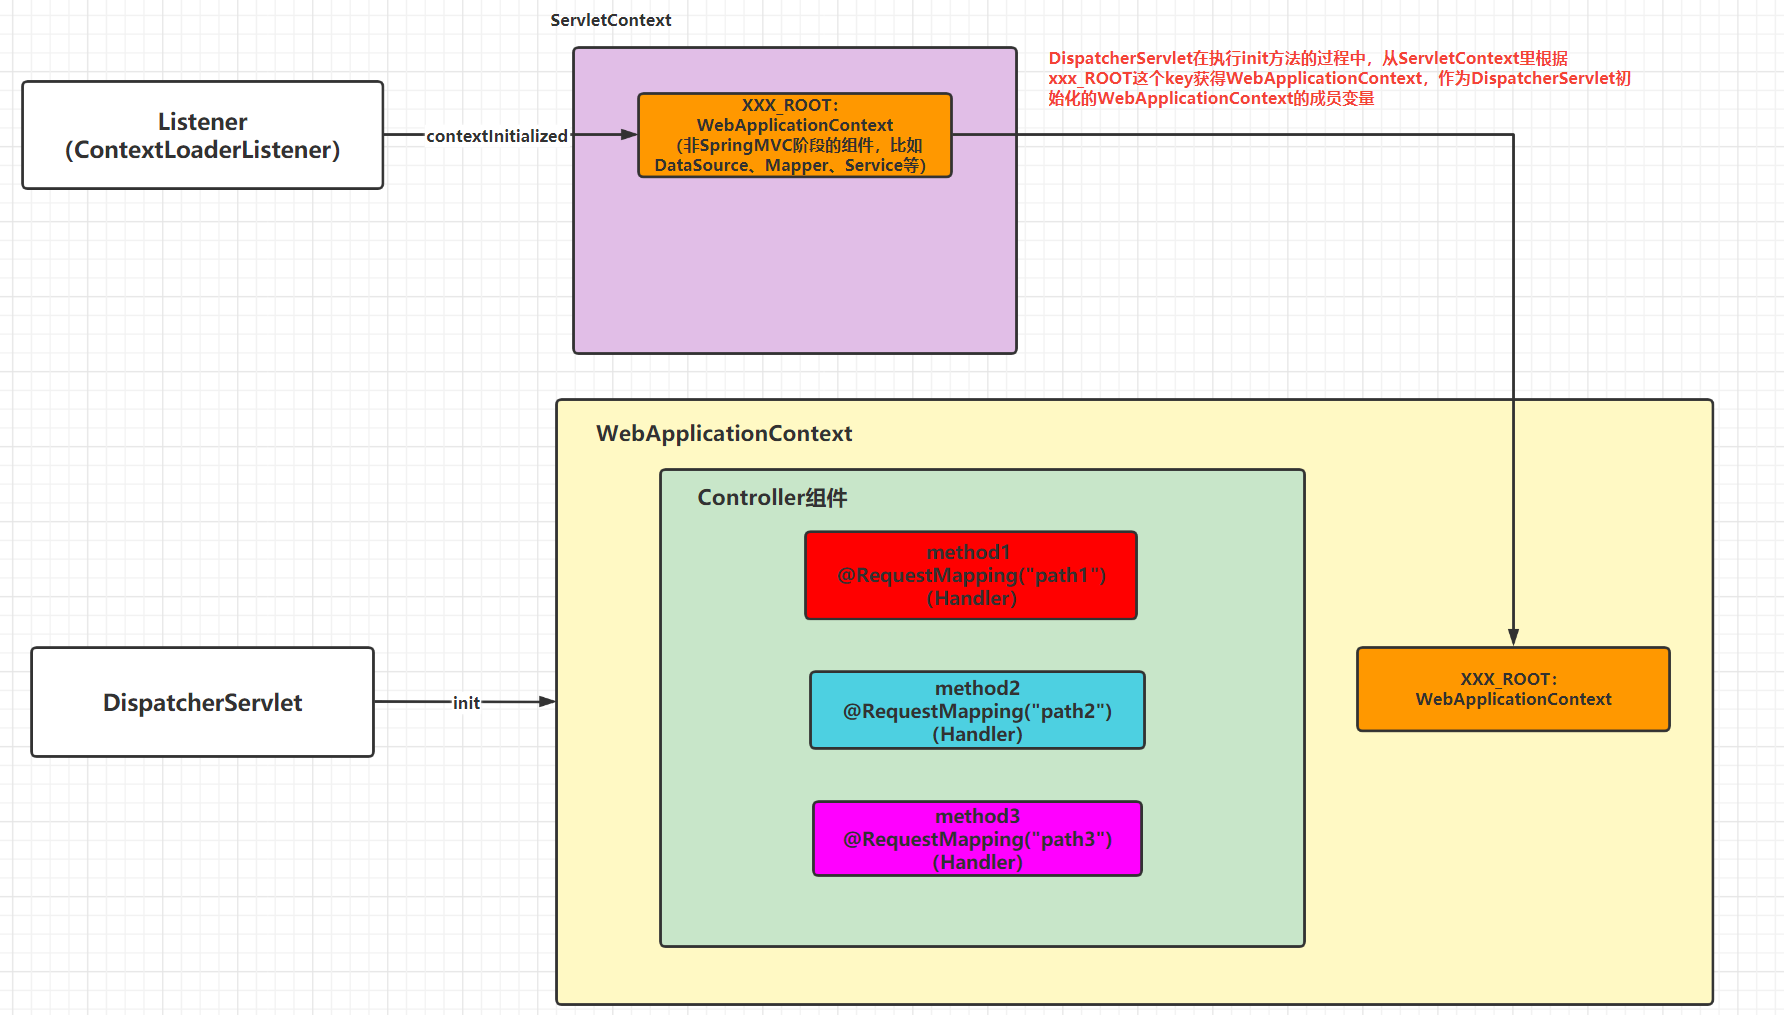
结论:DispatcherServlet它总是和黄色(大)的这WebApplicationContext做交互,DispatcherServlet可以使用到橙色(小)的WebApplicationContext,只是要通过黄色(大)的WebApplicationContext。我们可以粗暴的认为只有一个WebApplicationContext(黄色大)
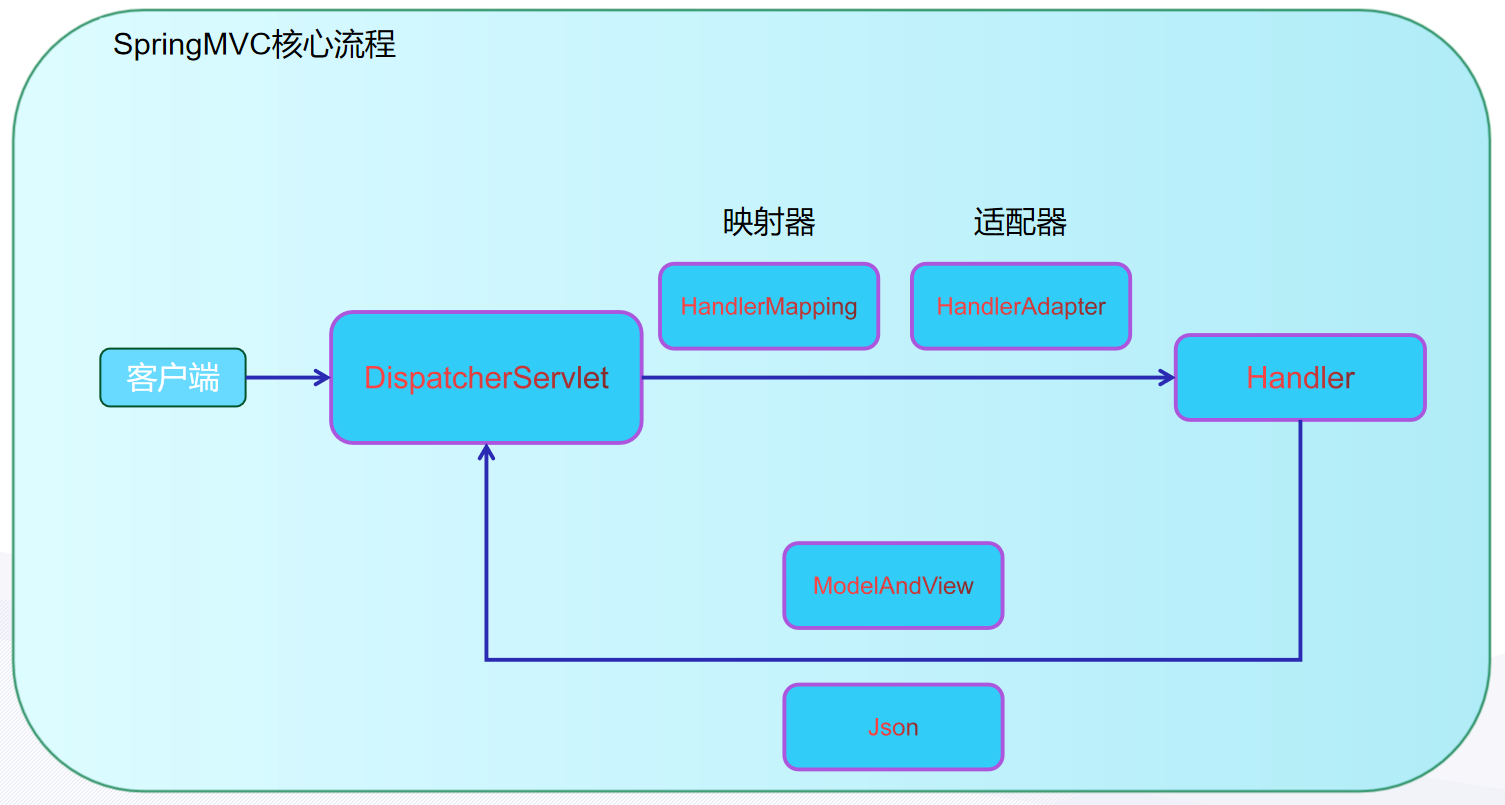
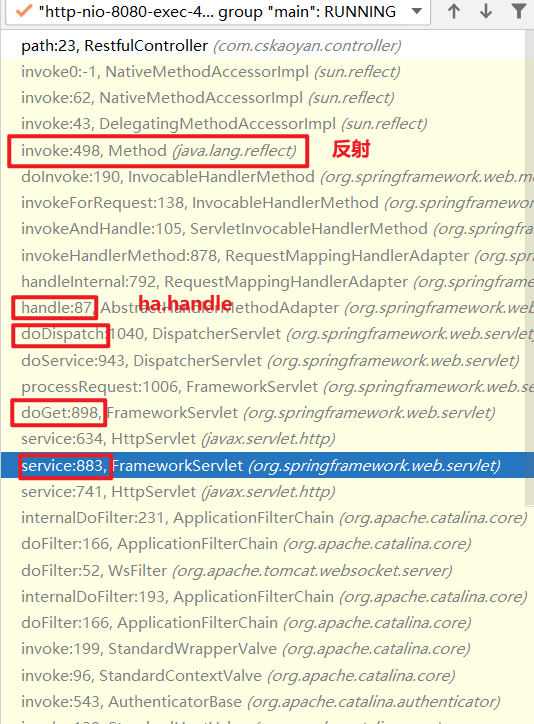
Handler的分发
发送请求的时候如何执行到对应的方法
大家可以找指定位置的原图查看更清晰一些
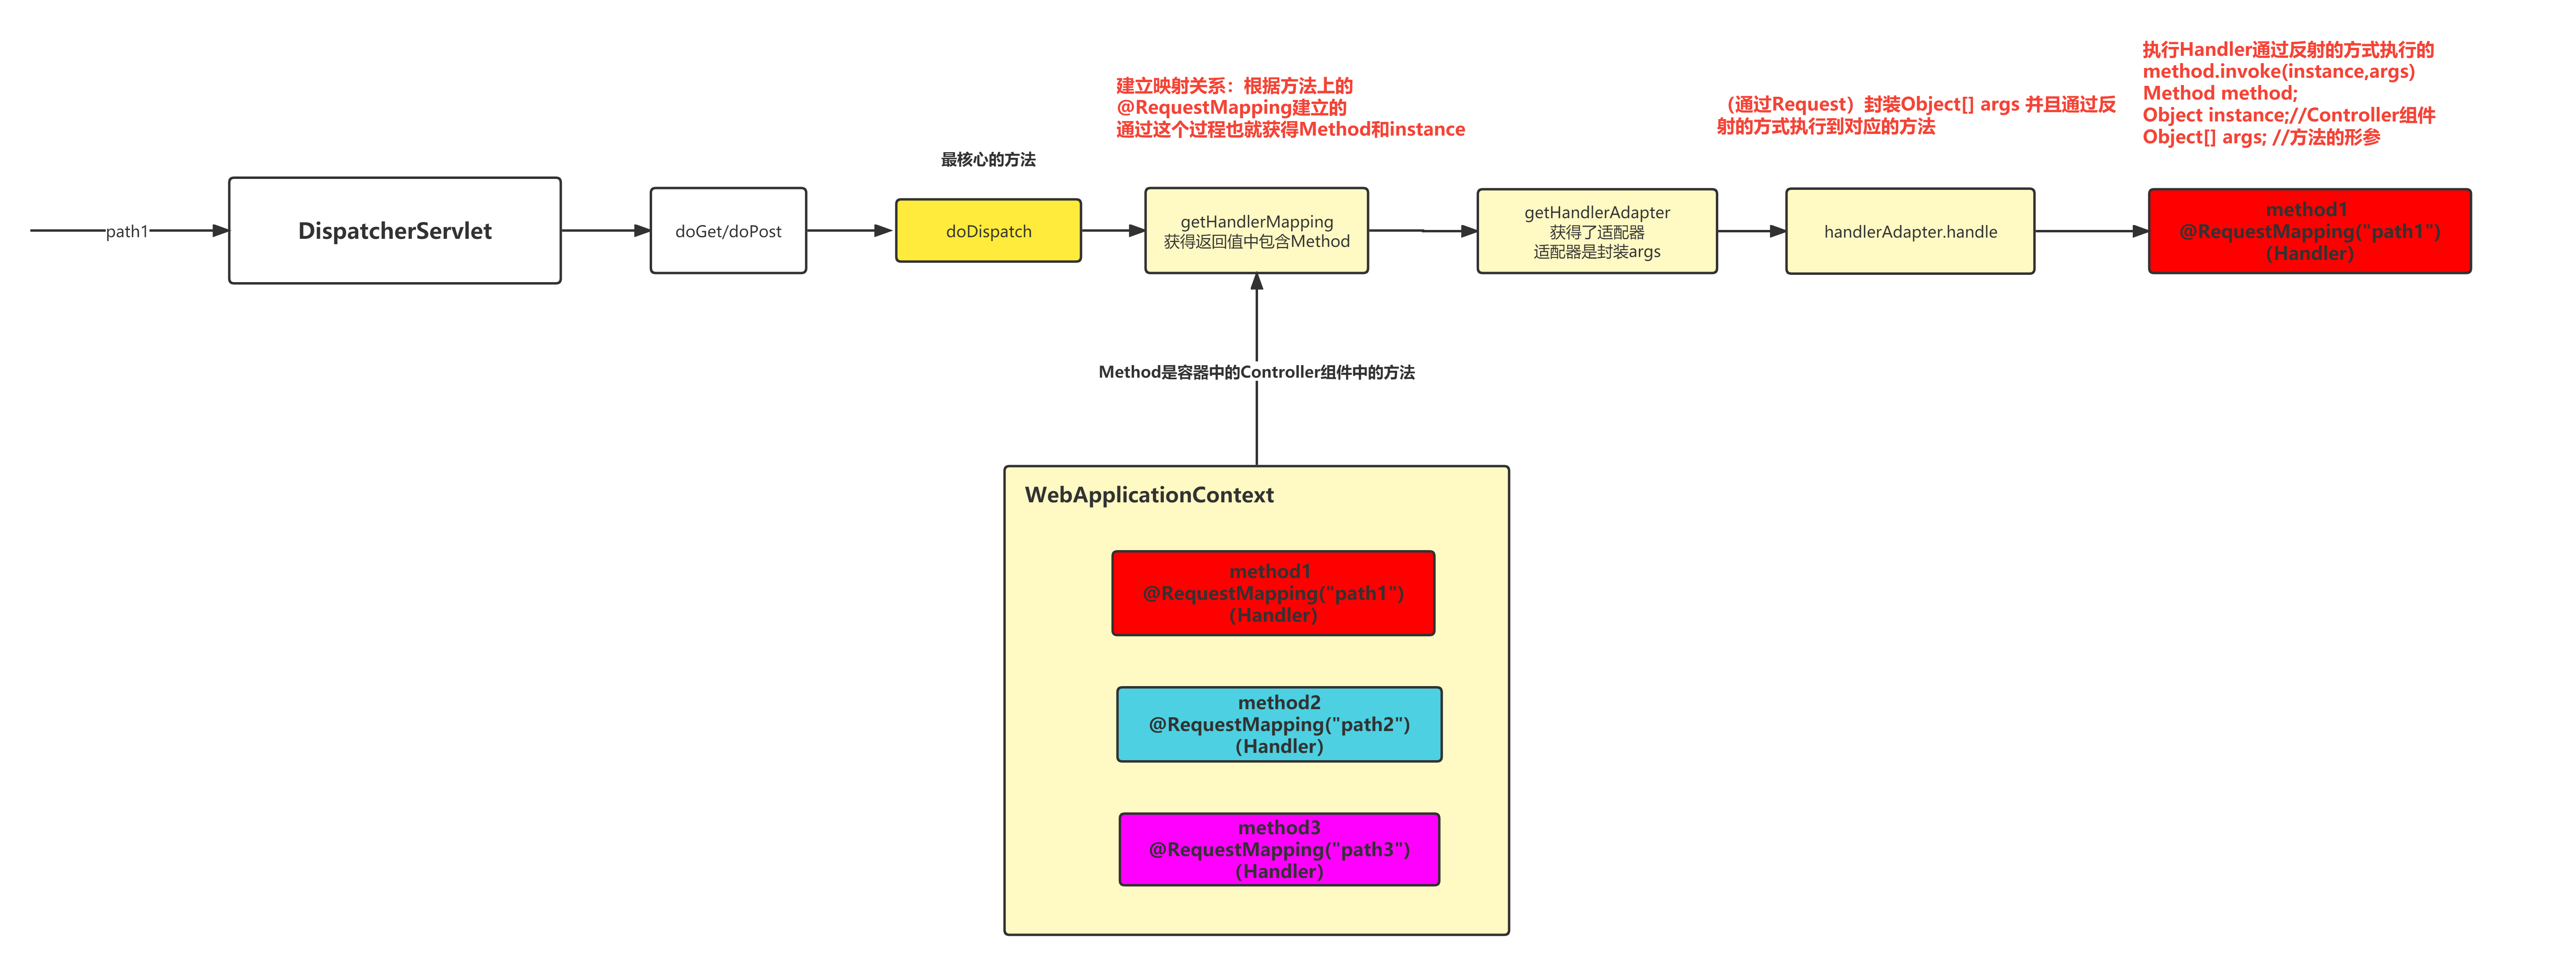
通过DispatcherServlet的doGet/doPost方法作为入口,最终执行到doDispatch方法,这个方法是最核心的方法
在doDispatch方法中,执行getHandlerMapping方法,根据URL和方法之间的关系(@RequestMapping注解维护的),通过当前请求的URL找到对应的HandlerMethod(也就是执行反射的一个依据)
接着在doDispatch方法中,执行getHandlerAdapter,这个是根据上面getHandlerMapping找到的Handler找到与之对应的适配器
找到适配器之后,执行适配器的handle方法,执行该方法的话会封装Object[] args(执行反射时提供的参数),并且会通过反射的方式(method.invoke)执行到对应的Handler方法
配置的分析
抽象类的特点是啥,如果里面有抽象方法我们需要是实现其抽象方法
使用抽象类的时候,通常是这样的一个场景
- 使用过程中会使用到其非抽象方法
- 非抽象方法里会调用到抽象方法
- 我们提供其抽象方法的具体的实现
这个抽象类中有一个核心的方法,这个抽象类实现了一个接口
public interface WebApplicationInitializer { void onStartup(ServletContext var1) throws ServletException;}这个onStartup方法是AbstractAnnotationConfigDispatcherServletInitializer中的核心方法
Tomcat在启动的过程中会做一件事情,扫描你所有的类,检查是否有实现WebApplicationInitializer接口的类,如果有实现这个接口的类,就会执行其onStartup方法
这个onStartup方法就是应用程序的启动方法
这个onStartup方法是一个非抽象的方法
- 初始化Listener,初始化一个WebApplicationContext放在ServletContext中
- 这个WebApplicationContext加载的不是xml文件,而是配置类
- 配置类的信息通过 方法提供 → getRootConfigClasses方法
- getRootConfigClasses方法是一个抽象方法
- 初始化DispatcherServlet,初始化一个WebApplicationContext
- 这个WebApplicationContext加载的不是xml文件,而是配置类
- 配置类的信息通过 方法提供 → getServletConfigClasses方法
- getServletConfigClasses这个方法也是一个抽象方法
需要我们在抽象类的子类中去写这两个抽象方法的实现 → 提供自定义的配置类
public void onStartup(ServletContext servletContext) throws ServletException { super.onStartup(servletContext);// 初始化Listener → 初始化一个WebApplicationContext放在ServletContext中 this.registerDispatcherServlet(servletContext);// 注册DispatcherServlet}public void onStartup(ServletContext servletContext) throws ServletException { this.registerContextLoaderListener(servletContext);}protected void registerDispatcherServlet(ServletContext servletContext) {
WebApplicationContext servletAppContext = this.createServletApplicationContext();}静态资源处理
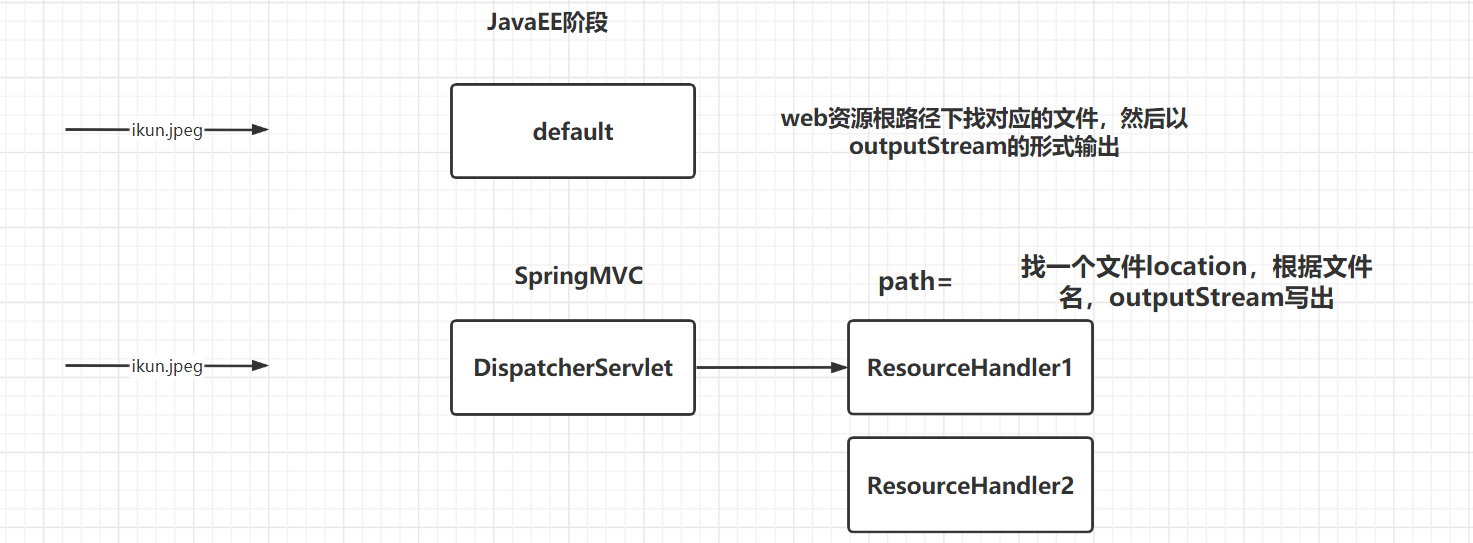
我们为什么需要做静态资源处理
JavaEE阶段如果将图片放在webapp目录,它会编译到web资源根目录,图片能访问到;
应用程序整合SpringMVC之后,放在web资源根目录的图片访问不到了,原因是什么
- JavaEE阶段,缺省的servlet是default → 这个缺省的servlet做的事情就是根据请求找目录下的静态资源
- SpringMVC这里,缺省的Servlet是DispatcherServlet → localhost:8080/banner.png找的是DispatcherServlet而不是default
DispatcherServlet渣男
如果我们提供了能够处理banner.png这样的Handler我们就能够处理静态资源
- SpringMVC有提供对应的类,需要我们自己来配置
- 提供的是ResourceHandler
- 处理静态资源
- 配置其映射范围
// 注册ResourceHandler使用ResourceHandlerRegistry// addResourceHandler配置ResourceHandler的映射范围// addResourceLocations告知当前ResourceHandler你的资源文件处于什么位置// ** 代表多级任意url@Overridepublic void addResourceHandlers(ResourceHandlerRegistry registry) { // localhost:8080/demo6/pic/ikun.jpeg // localhost:8080/demo6/pic/ikun2.jpeg // localhost:8080/demo6/pic/banner.jpeg // localhost:8080/demo6/pic/a/dlrb.jpg // location最后要加一个 / // 如果指定文件路径,需要增加file: 这样的前缀 registry.addResourceHandler("/pic/**").addResourceLocations("file:d:/tmp/"); // localhost:8080/demo6/pic2/666.png // localhost:8080/demo6/pic2/image/ikun.jpeg // 如果指定类加载路径(target/artifactid-version/WEB-INF/classes),需要增加classpath: 这样的前缀 registry.addResourceHandler("/pic2/**").addResourceLocations("classpath:/"); // localhost:8080/demo6/pic3/ikun.jpeg // 如果指定web资源路径(target/artifactid-version),不需要增加前缀,如果要指定根路径,只写/ registry.addResourceHandler("/pic3/**").addResourceLocations("/");
// localhost:8080/demo6/wx/storage/fetch/4af4f62b-f37e-49d8-bb24-6871bd480d99.jpeg registry.addResourceHandler("/wx/storage/fetch/**").addResourceLocations("file:d:/tmp/");}来源于WebMvcConfigurer接口,如果你实现里面的方法,它就会自动生效。
location写的时候注意:最后的位置/不要漏掉
访问静态资源需要构造的URL: mapping映射的url这部分值 + 静态资源相对于location的位置
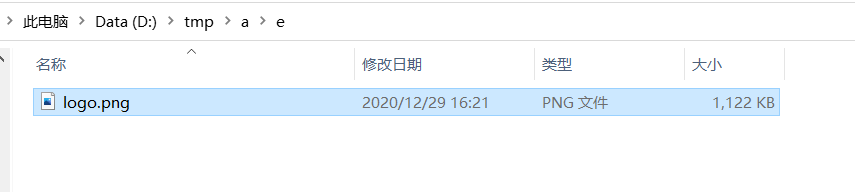
根据上面的配置能否访问到logo.png ? 可以
localhost:8080/pic3/a/e/logo.png
为何我们建议大家使用文件路径
过去(“当前”)应用程序打包的时候打包为war包,后面我们使用SpringBoot应用 → 应用程序打包的时候是jar包
Filter和HandlerInterceptor
起到拦截器功能的
Filter
Filter就是JavaEE阶段的Filter → 实现Filter接口 → doFilter
Filter在SpringMVC阶段仍然是可以使用的,Filter和SpringMVC之间的关系是什么样的关系?本质上就是Filter和Servlet之间的关系,执行SpringMVC的核心DispatcherServlet的doDispatch方法之前先去执行的是Filter的doFilter方法
在SpringMVC的过程中使用Filter,并不是直接使用Filter接口,有问题:有可能导致Filter里的doFilter方法执行多次
SpringMVC给我们提供了一个抽象类OncePerRequestFilter → 实现了Filter接口 → 里面包含了doFilter方法的实现(非抽象方法),它在里面调用了一个抽象方法doFilterInternal,它实现的这个doFilter保证了doFilterInternal这个方法只会执行一次
如果要提供拦截器,做一些业务的话,业务代码写在OncePerRequestFilter的doFilterInternal
public class CustomFilter extends OncePerRequestFilter { // 能够保证doFilterInternal这个方法在这次请求中只会执行一次 @Override protected void doFilterInternal(HttpServletRequest httpServletRequest, HttpServletResponse httpServletResponse, FilterChain filterChain) throws ServletException, IOException { System.out.println("custom filter"); filterChain.doFilter(httpServletRequest,httpServletResponse); }}//AACDSI里的@Overrideprotected Filter[] getServletFilters() { return new Filter[]{new CustomFilter()};}配置的这个Filter它的作用范围是/* (JavaEE阶段讲的 → 所有)
SpringMVC有提供一个处理字符集的Filter → CharacterEncodingFilter,也是继承了OncePerRequestFilter
@Overrideprotected Filter[] getServletFilters() { // 提供filter的配置 → 你要告知web应用,你有哪一个或哪一些Filter //return new Filter[]{new CustomFilter()}; CharacterEncodingFilter characterEncodingFilter = new CharacterEncodingFilter(); characterEncodingFilter.setEncoding("utf-8"); characterEncodingFilter.setForceEncoding(true); return new Filter[]{characterEncodingFilter};}HandlerInterceptor
Handler的拦截器,在Handler执行之前做的拦截
在doDispatch这个方法中在Handler执行之前做的拦截
一个Handler有可能有多个HandlerInterceptor,如何知晓当前这个请求对应的HandlerInterceptor是哪一个或哪一些呢?
HandlerMapping 帮我们做映射
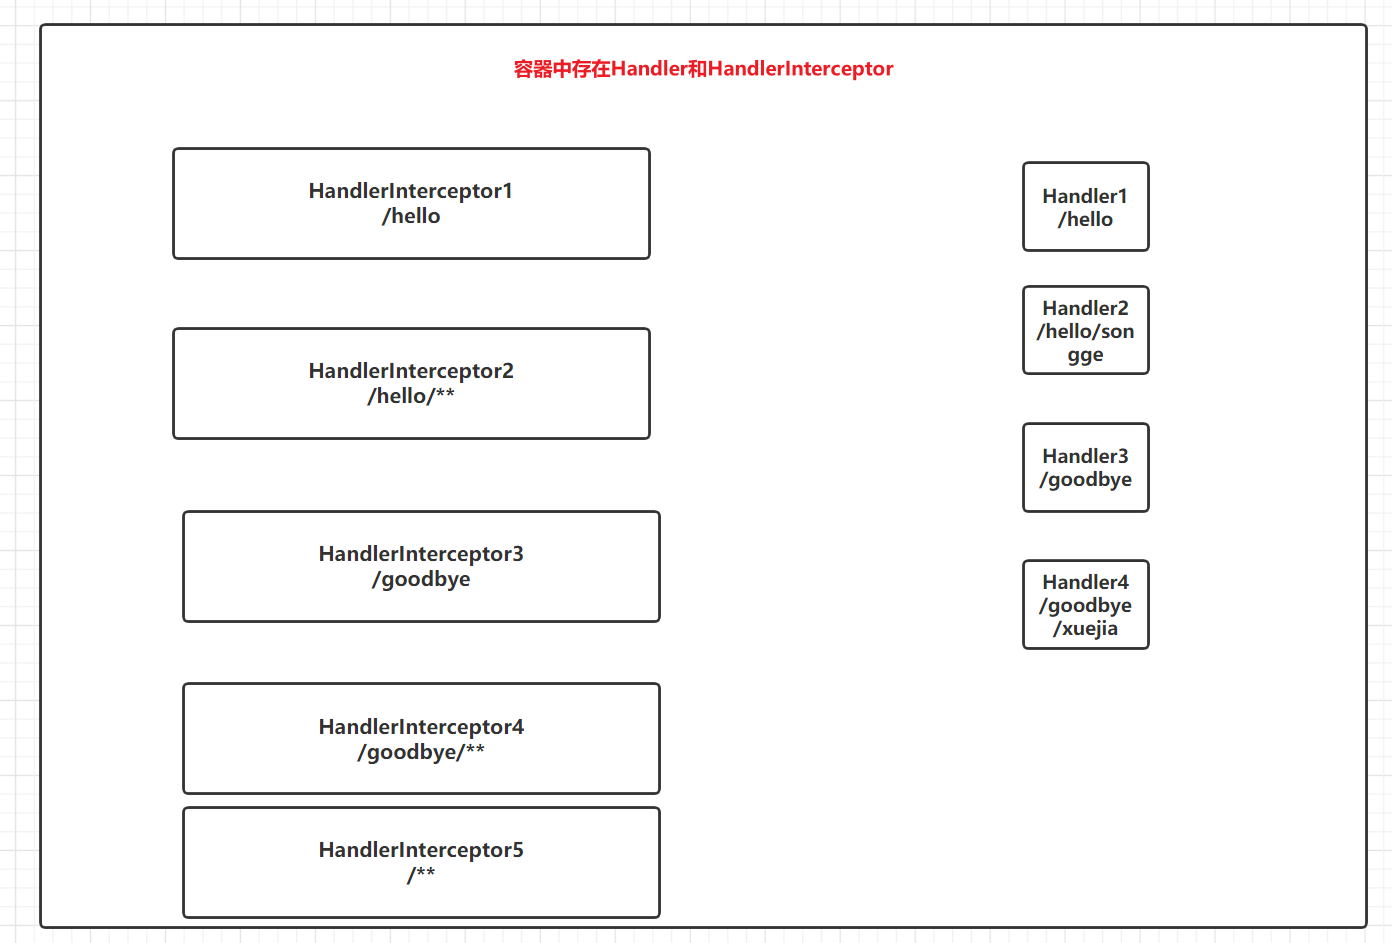
分析发送不同请求的时候找到的Handler和HandlerInterceptor
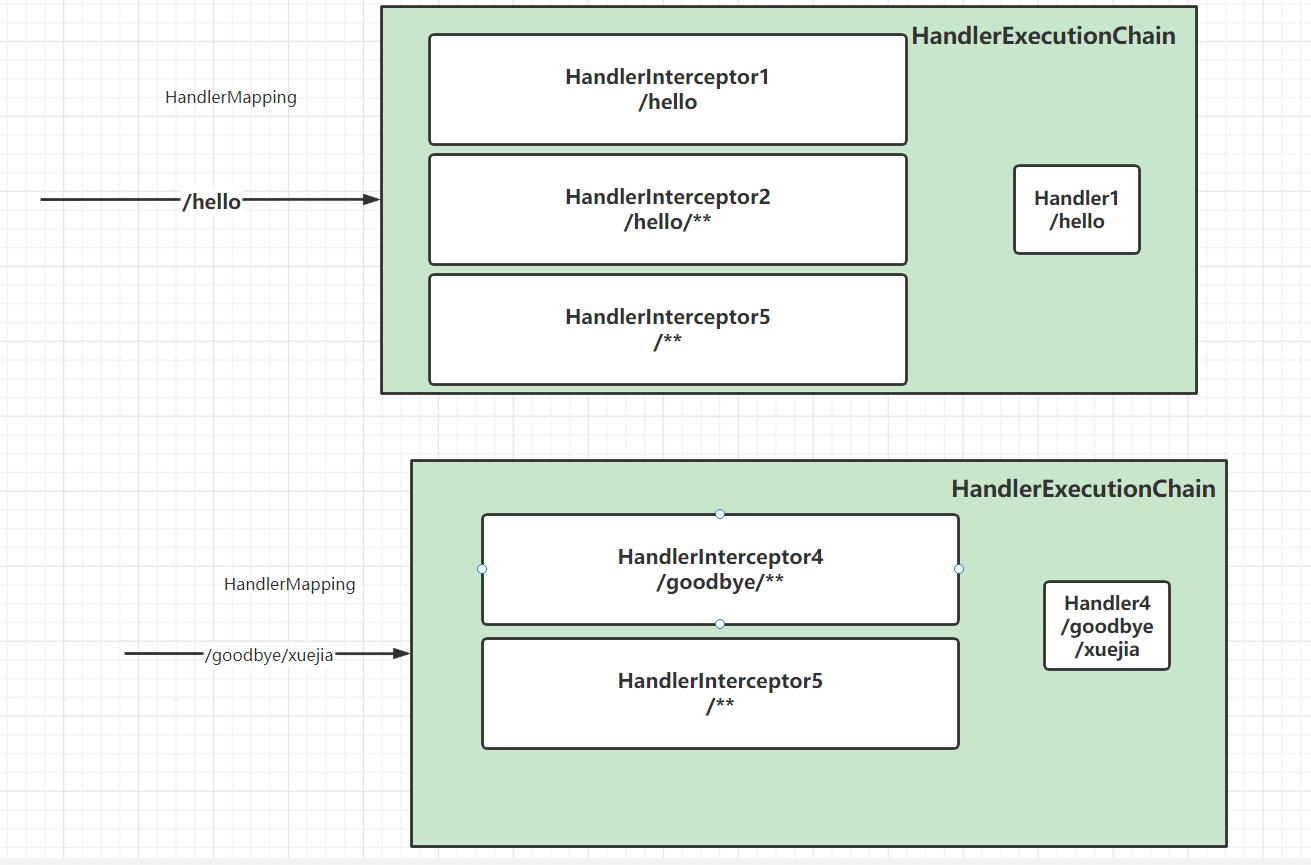
HandlerMapping起作用 → HandlerExecutionChain实例
每次发送请求:都会生成新的HandlerExecutionChain的实例
- 封装了Handler
- 封装了多个HandlerInterceptor
HandlerExecutionChain mappedHandler = this.getHandler(processedRequest);public class HandlerExecutionChain { // Handler private final Object handler; //多个HandlerInterceptor @Nullable private HandlerInterceptor[] interceptors; @Nullable private List<HandlerInterceptor> interceptorList; // 标记(记号) private int interceptorIndex;}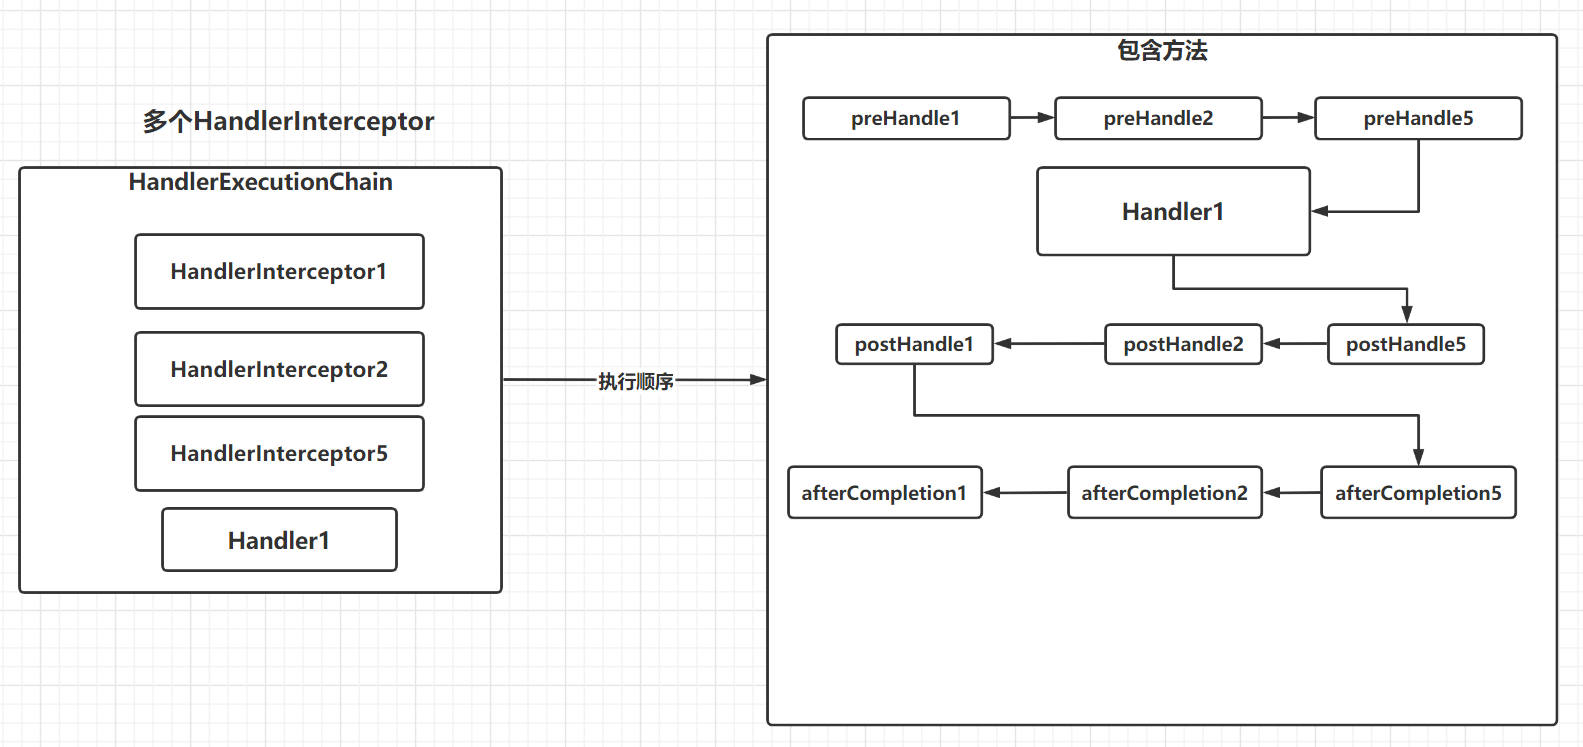
配置HandlerInterceptor
- 实现HandlerInterceptor接口
- preHandle → 在Handler执行之前执行的,返回值为boolean
- 如果返回值为true则继续流程
- 如果返回值为false则中断流程;会去执行返回值为true的部分的afterCompletion
- 如果有多个HandlerInterceptor,preHandle方法是正序遍历
- Handler → 通常就是Controller组件中的Handler方法
- postHandle → 在Handler之后执行的
- 如果执行不到Handler(前面的preHandle返回值为false),那么一个postHandle都执行不到
- 如果能够执行到Handler就能够执行到全部的postHandle
- 如果有多个HandlerInterceptor,postHandle方法是倒序遍历
- afterCompletion → 执行完postHandle、preHandle返回值为false
- 执行完postHandle之后执行afterCompletion,能够执行到全部的afterCompletion
- preHandle返回值为false的时候执行afterCompletion的话,执行的是preHandle返回值为true的部分afterCompletion
- 如果有多个HandlerInterceptor,afterCompletion方法是倒序遍历
- preHandle → 在Handler执行之前执行的,返回值为boolean
- 配置HandlerInterceptor以及其作用范围
- WebMvcConfigurer接口中的方法:getInterceptors
开发,和上面的示意图是一致的
@RequestMapping("hello")public String handler1() { System.out.println("Handler1"); return "handler1";}@RequestMapping("hello/songge")public String handler2() { System.out.println("Handler2"); return "handler2";}@RequestMapping("goodbye")public String handler3() { System.out.println("Handler3"); return "handler3";}@RequestMapping("goodbye/xuejia")public String handler4() { System.out.println("Handler4"); return "handler4";}提供HandlerInterceptor的实现类
public class HandlerInterceptor1 implements HandlerInterceptor { @Override public boolean preHandle(HttpServletRequest request, HttpServletResponse response, Object handler) throws Exception { System.out.println("preHandle1"); return true; }
@Override public void postHandle(HttpServletRequest request, HttpServletResponse response, Object handler, ModelAndView modelAndView) throws Exception { System.out.println("postHandle1");
}
@Override public void afterCompletion(HttpServletRequest request, HttpServletResponse response, Object handler, Exception ex) throws Exception { System.out.println("afterCompletion1"); }}配置这5个HandlerInterceptor
@AutowiredHandlerInterceptor handlerInterceptor1;
// HandlerInterceptor的实例,可以直接调用构造方法初始化;也可以从容器中取出@Overridepublic void addInterceptors(InterceptorRegistry registry) { //registry.addInterceptor(new HandlerInterceptor1()).addPathPatterns("/hello"); registry.addInterceptor(handlerInterceptor1).addPathPatterns("/hello"); registry.addInterceptor(new HandlerInterceptor2()).addPathPatterns("/hello/**"); registry.addInterceptor(new HandlerInterceptor3()).addPathPatterns("/goodbye"); registry.addInterceptor(new HandlerInterceptor4()).addPathPatterns("/goodbye/**"); registry.addInterceptor(new HandlerInterceptor5());//.addPathPatterns("/**");}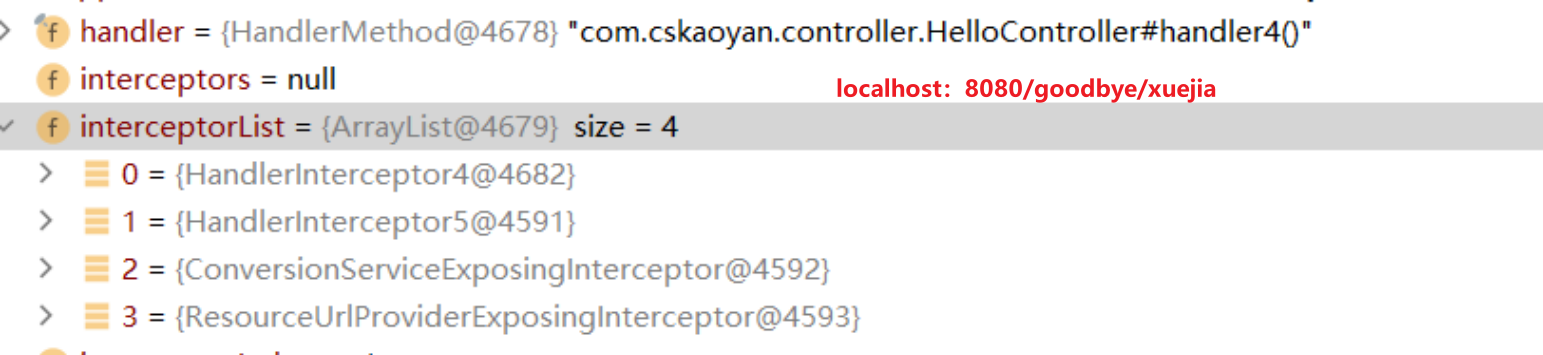
preHandle4preHandle5Handler4postHandle5postHandle4afterCompletion5afterCompletion4如果发送某个请求,能够找到的HandlerInterceptor有5个,
如果其中第四个HandlerInterceptor的preHandle返回值为false,那么执行请求如何? 1234321
如果其中的2和5的preHandle执行可能为false,那么执行情况如何呢?121
如果这5个全为true → 123455432154321
如果说找不到对应的Handler,那么HandlerExecutionChain的值就为null,就执行不到HandlerInterceptor;也就是只有有对应的Handler的情况下才有可能会执行到HandlerInterceptor
看一点点源码
// 正序遍历HandlerInterceptor的数据,遍历过程中执行HandlerInterceptor的preHandle,如果preHandle方法执行的返回值为false,保留一个标记interceptorIndex,中断流程之前执行了afterCompletion方法的调用if (!mappedHandler.applyPreHandle(processedRequest, response)) { return;}// preHandle在它前面调用的// 执行Handler方法mv = ha.handle(processedRequest, response, mappedHandler.getHandler());// postHandle在它后面调用的mappedHandler.applyPostHandle(processedRequest, response, mv);正序遍历HandlerInterceptor的数据,遍历过程中执行HandlerInterceptor的preHandle,如果preHandle方法执行的返回值为false,保留一个标记interceptorIndex,中断流程之前执行了afterCompletion方法的调用
boolean applyPreHandle(HttpServletRequest request, HttpServletResponse response) throws Exception { HandlerInterceptor[] interceptors = this.getInterceptors(); if (!ObjectUtils.isEmpty(interceptors)) { for(int i = 0; i < interceptors.length; this.interceptorIndex = i++) { HandlerInterceptor interceptor = interceptors[i]; if (!interceptor.preHandle(request, response, this.handler)) { this.triggerAfterCompletion(request, response, (Exception)null); return false; } } }
return true;}执行preHandle返回值为true的部分的afterCompletion;如果所有的preHandle返回值都为true,interceptorIndex=interceptors.length-1 ,遍历的就是全部的afterCompletion
void triggerAfterCompletion(HttpServletRequest request, HttpServletResponse response, @Nullable Exception ex) throws Exception { HandlerInterceptor[] interceptors = this.getInterceptors(); if (!ObjectUtils.isEmpty(interceptors)) { for(int i = this.interceptorIndex; i >= 0; --i) { HandlerInterceptor interceptor = interceptors[i];
try { interceptor.afterCompletion(request, response, this.handler, ex); } catch (Throwable var8) { logger.error("HandlerInterceptor.afterCompletion threw exception", var8); } } }
}void applyPostHandle(HttpServletRequest request, HttpServletResponse response, @Nullable ModelAndView mv) throws Exception { HandlerInterceptor[] interceptors = this.getInterceptors(); if (!ObjectUtils.isEmpty(interceptors)) { for(int i = interceptors.length - 1; i >= 0; --i) { HandlerInterceptor interceptor = interceptors[i]; interceptor.postHandle(request, response, this.handler, mv); } }
}HandlerInterceptor使用过程中关注的几个问题:
- HandlerInterceptor是谁
- HandlerInterceptor的作用范围是什么
- 多个HandlerInterceptor的顺序是什么
- preHandle返回值为true或false的执行情况
登录案例 → HandlerInterceptor来做
- 提供两个Handler方法,/login 和 /hello
- 如果没有登录的情况下访问hello,输出“no login”(并不是在hello方法中输出)
- 如果已经通过login请求执行登录的话,访问hello 输出 hello world
- 限定一个要求,HandlerInterceptor的作用范围是/** (采用默认作用范围就行)
interceptorIndex就是一个标记,标记HandlerInterceptorList或数组中哪一些preHandle返回值为true,提供的是下标(序号)
小结
实现的功能都是类似的:Filter是在Servlet之前、之后都可以执行一些业务;HandlerInterceptor是在Handler之前和之后可以执行一些业务
思考问题:如果我访问不到对应的Handler,能否执行到Filter或HandlerInterceptor?
Filter可以执行到;如果没有对应的Handler处理对应的请求,HandlerExecutionChain也为空
HandlerInterceptor的使用和Filter不一样 → 容器 → 注册进去 可以维护和其他组件之间的依赖关系(成员变量注入容器中的其他组件) → 取出来的时候其成员变量就已经赋值了
异常处理
在Handler中制造异常
如果不做异常处理:不友好、有可能泄露信息
HandlerExceptionResolver(了解)
处理全局的全部异常
返回值为ModelAndView
/** * 生效:只需要注册到容器中就生效 * @author stone * @date 2022/12/26 17:15 */@Componentpublic class CustomHandlerExceptionResolver implements HandlerExceptionResolver { /** * * @param handler 抛出异常的Handler * @param exception Handler抛出的异常 * @return */ @Override public ModelAndView resolveException(HttpServletRequest httpServletRequest, HttpServletResponse httpServletResponse, Object handler, Exception exception) { ModelAndView modelAndView = new ModelAndView(); modelAndView.setViewName("/exception.jsp"); // 如果想要响应字符串或Json字符串可以不?可以 → 第二个参数是什么 return modelAndView; }}@ExceptionHandler → 建议
处理的特定类型的异常
返回值可以为ModelAndView,也可以为String或Json字符串
ModelAndView(了解)
@ControllerAdvicepublic class CustomExceptionControllerAdvice {
/*@ExceptionHandler(ArithmeticException.class) public ModelAndView resolveArithmeticException(){ ModelAndView modelAndView = new ModelAndView(); modelAndView.setViewName("/exception.jsp"); return modelAndView; }*/ @ExceptionHandler(ArithmeticException.class) public String resolveArithmeticException(){
return "/exception.jsp";//返回值作为ModelAndView中的视图名 }}字符串 或Json字符串
方法上或类上增加注解@ResponseBody
/** * @author stone * @date 2022/12/26 17:26 *///@ControllerAdvice//@ResponseBody@RestControllerAdvice //上面两个注解的和,意味着里面的全部方法响应的都是字符串或Json字符串public class CustomExceptionControllerAdvice {
/*@ExceptionHandler(ArithmeticException.class) public ModelAndView resolveArithmeticException(){ ModelAndView modelAndView = new ModelAndView(); modelAndView.setViewName("/exception.jsp"); return modelAndView; }*/ /*@ExceptionHandler(ArithmeticException.class) public String resolveArithmeticException(){
return "/exception.jsp";//返回值作为ModelAndView中的视图名 }*/
@ExceptionHandler(ArithmeticException.class) //@ResponseBody public BaseRespVo resolveArithmeticException(){ return BaseRespVo.fail("算术异常!"); }}@ExceptionHandler注解的value属性是数组Class[]
@Target({ElementType.METHOD})@Retention(RetentionPolicy.RUNTIME)@Documentedpublic @interface ExceptionHandler { Class<? extends Throwable>[] value() default {};}在方法的形参中可以直接写抛出的异常
@ExceptionHandler(ArithmeticException.class)//@ResponseBodypublic BaseRespVo resolveArithmeticException(ArithmeticException exception){ String message = exception.getMessage();//by zero return BaseRespVo.fail("算术异常!" + message);}文章分享
如果这篇文章对你有帮助,欢迎分享给更多人!