


Java Web 开发:Spring IOC
[TOC]
前言
学习目标
- 掌握IOC和DI的概念
- 熟悉注册组件的几种方式和相关注解
- 熟悉取出组件的几种方式和相关注解
- 理解Spring组件的生命周期的含义
- 熟悉BeanPostProcessor的执行时机
- 掌握FactoryBean的方式向容器中注册组件
前置知识准备
- 项目一开发的常用风格
- 注解的相关知识@Target、@Retention、属性
- @Target → 描述注解可以出现在什么位置
- @Retention → 注解何时生效
- 属性,如果有提供默认值可以省略不写,如果没有提供默认值就必须要写;
- 数组 → 数组中如果只有一个值可以省略掉{}
- value属性 → 如果只使用了value属性,“value=”可以省略掉
- 理解容器的思想
介绍Spring
SpringFramework的起源
Spring Framework通常人们称之为Spring。
Spring是一个开源框架,Spring是于2003 年兴起的一个轻量级的Java 开发框架,由Rod Johnson 在其著作Expert One-On-One J2EE Development and Design中阐述的部分理念和原型衍生而来。
它是为了解决企业应用开发的复杂性而创建的。框架的主要优势之一就是其分层架构,分层架构允许使用者选择使用哪一个组件,同时为 J2EE 应用程序开发提供集成的框架。
Spring是一个分层的Java SE/EE full-stack(一站式) 轻量级开源框架。
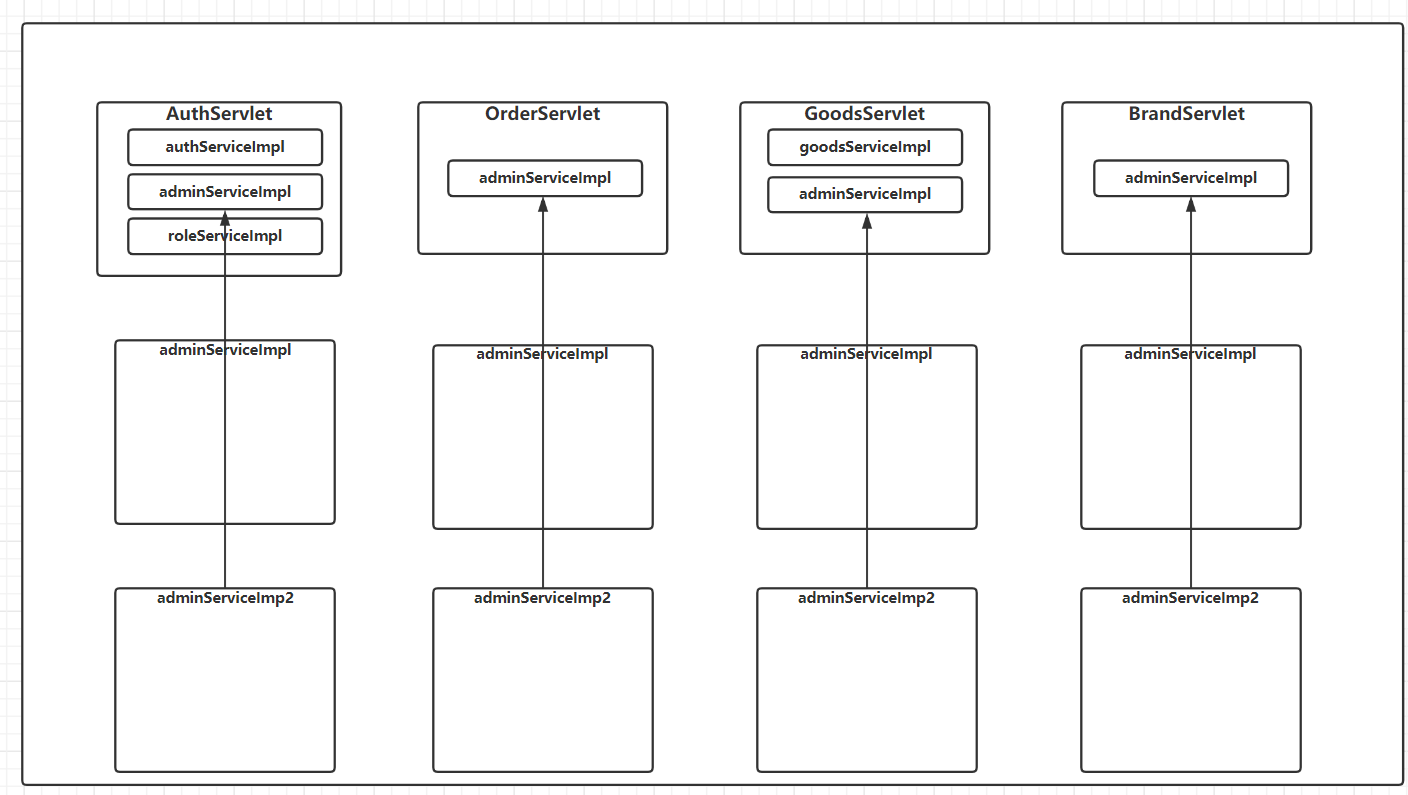
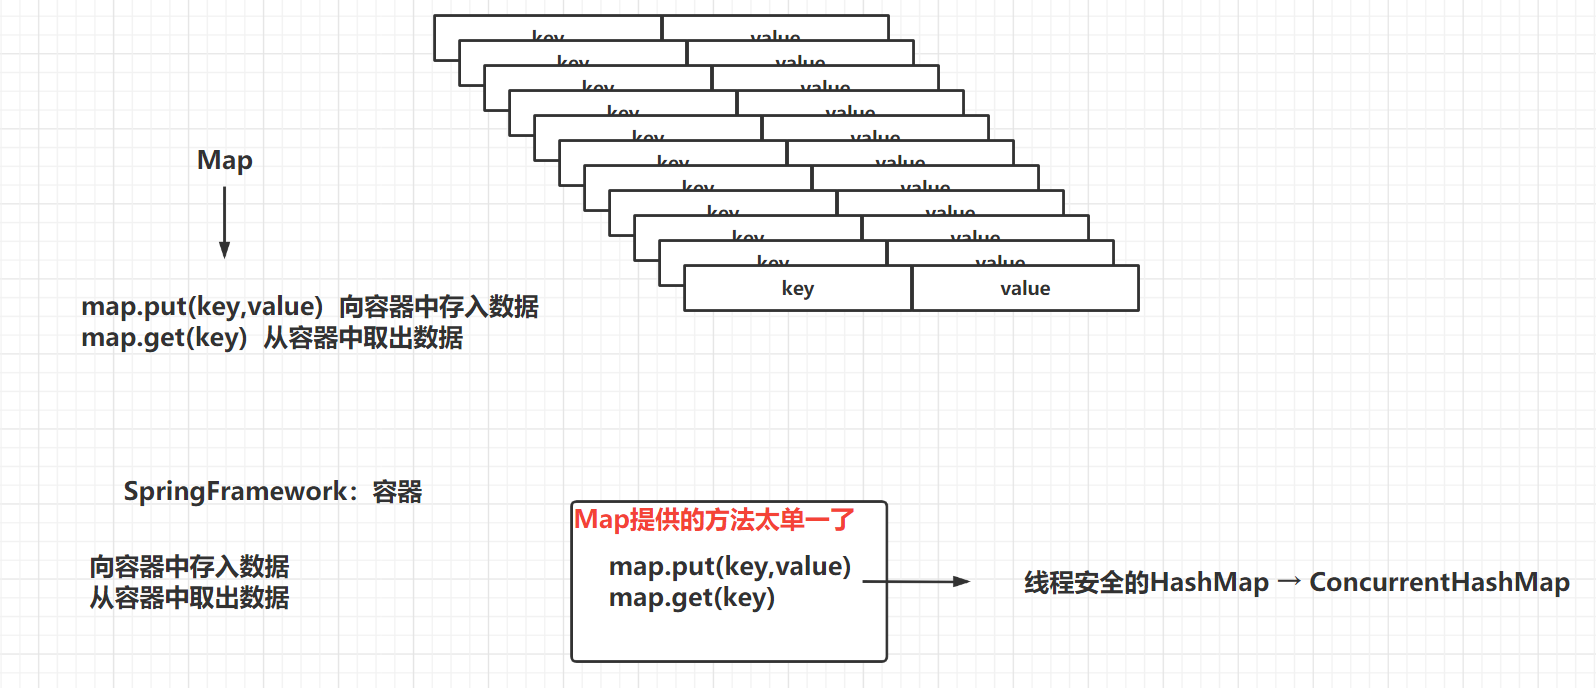
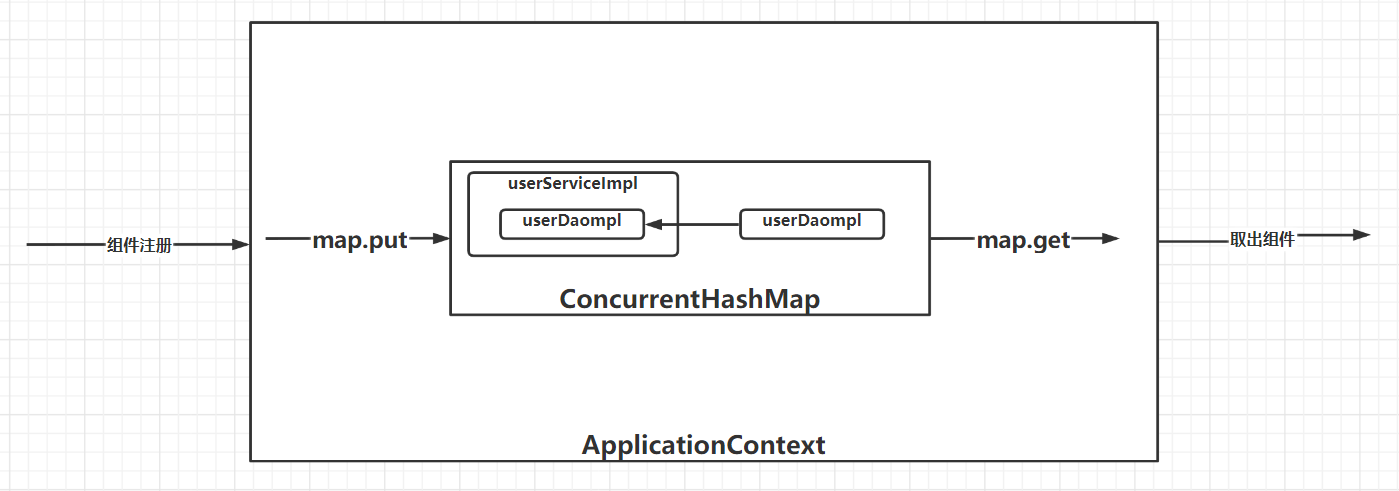
前面的应用程序中AdminServiceImpl类型的实例其实创建了多次,去建立引用关系多次,维护起来比较麻烦,也浪费了内存的空间
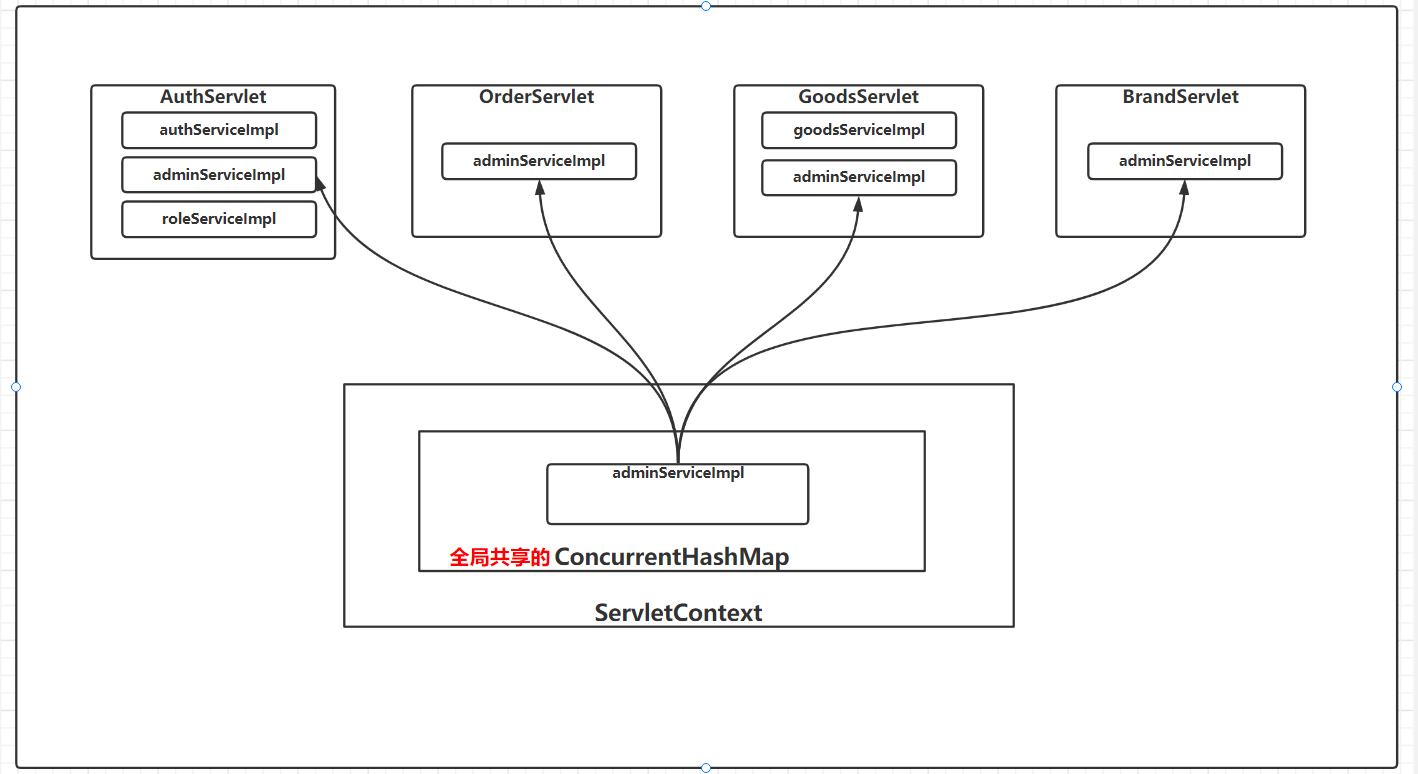
想要做的事情:在整个应用程序中使用同一个adminServiceImpl的实例
- 将其放在ConcurrentHashMap中,然后后面每一次使用的时候通过同一个ConcurrentHashMap来取
- 要保证使用的是同一个ConcurrentHashMap,使用ServletContext保存,并且做到了整个应用程序中的共享
思考:如果想要替换adminServiceImpl的实例为AdminServiceImpl2的实例,我们修改几次就行了?
修改初始化的位置
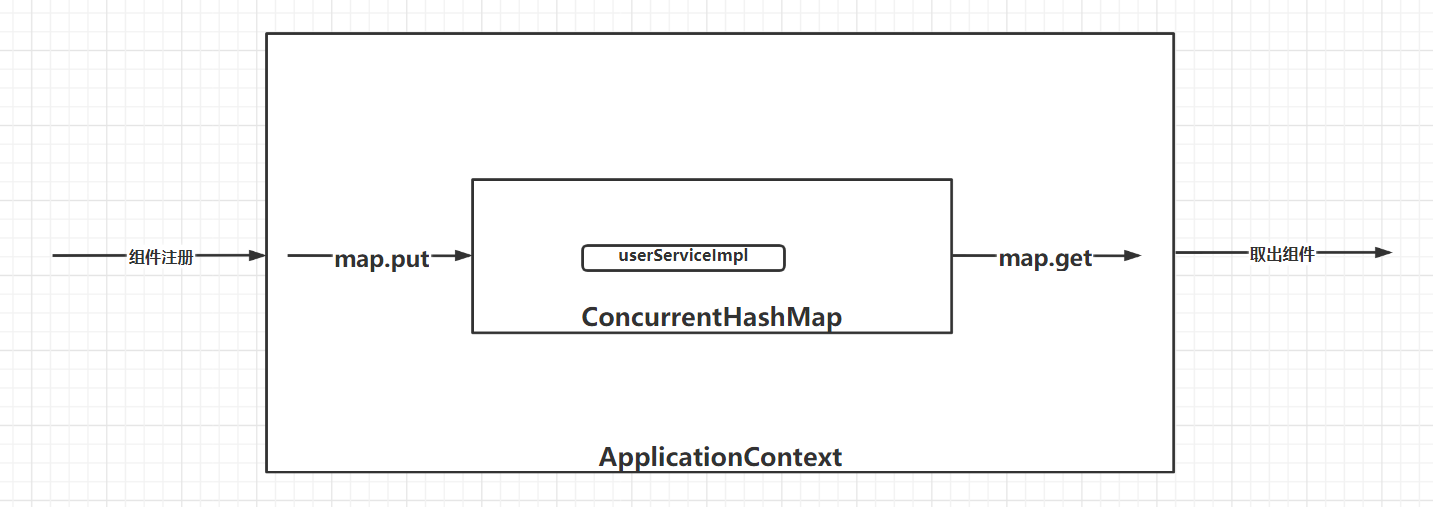
核心点:我们保存的是什么,我们取出的是什么?
保存的是应用程序运行过程中所需要的实例,比如adminService、userService等;取的也是这些实例
★IOC控制反转
Inverse of Control
控制反转这个词要拆开来看
**控制:**实例的生成权
**反转:**由应用程序反转给Spring容器
**容器:**生成并管理实例的抽象空间
获取依赖对象被反转了,它是被动获取;
正转就是自己去new一个对象,自己获取对象
★DI依赖注入
Dependency Injection
Q1谁依赖谁?Q2为什么需要依赖?Q3谁注入谁?Q4注入了什么?
思考上面的问题,一定要在控制反转的基础上去思考。
思考的是应用程序和Spring容器之间的关系 👉 经过了控制反转,Spring容器(IoC容器)掌握了更多的实例,变得更加富有,而应用程序变得**“贫穷”**
Answer1 应用程序依赖于IoC容器;
Answer2 应用程序需要IoC容器来提供对象需要的外部资源;
Answer3 IoC容器注入应用程序某个对象,应用程序依赖的对象;
Answer4 注入某个对象所需要的外部资源(包括对象、资源、常量数据);
核心点:从容器中获得应用程序所需要的实例,并且给应用程序中的成员变量做赋值
Spring的优点
- 方便解耦,简化开发(高内聚低耦合)
- AOP编程的支持
- 声明式 事务的支持
- 方便程序的测试
- 方便集成各种优秀框架
- 降低JavaEE API的使用难度
核心技术
依赖注入、事件、资源、i18n国际化、校验、数据绑定、类型转换、Spring Expression Language、AOP
public static void main(String[] args) { // data binding BaseParam baseParam = new BaseParam(); baseParam.setPage(1); baseParam.setLimit(10); baseParam.setSort("add_time"); baseParam.setOrder("desc"); // type conversion String pageStr = "5"; Integer page = Integer.parseInt(pageStr); // 使用转换器 Integer pageInteger = new StringToIntegerConverter().convert(pageStr);}hello = 你好
hello = hello
hello = 萨瓦迪卡
思考
Spring和我们之前开发的项目的关联
入门案例
思考
如果给你提供一个类的信息,你能否管理对应的实例
比如,提供一个properties配置文件
classlist=com.cskaoyan.demo1.service.UserServiceImpl,com.cskaoyan.demo1.service.GoodServiceImpl,com.cskaoyan.demo1.service.AdminServiceImplstep1. List<String> classList;
step2. 遍历 单个值 是不是class的全限定类名 →
Class clazz = Class.forName("com.cskaoyan.demo1.service.UserServiceImpl")step3. 可以通过反射获得实例
Object instance = clazz.newInstance();step4. 放入到map中
// Map map = new ConcurrentHashMap<>();map.put("userServiceImpl",instance);结论:Spring框架其实就是通过反射来创建的实例
入门案例1
引入依赖
引入依赖 beans、context、aop、expression、core、jcl 5+1
<dependencies> <!--引入依赖 beans、context、aop、expression、core、jcl 5+1--> <!--spring-context--> <dependency> <groupId>org.springframework</groupId> <artifactId>spring-context</artifactId> <version>5.2.5.RELEASE</version> </dependency> <dependency> <groupId>junit</groupId> <artifactId>junit</artifactId> <version>4.12</version> <scope>test</scope> </dependency></dependencies>提供接口和实现类
public class UserServiceImpl implements UserService{ @Override public void sayHello(String name) { System.out.println("hello " + name); }}原先使用实例的时候,是通过构造方法生成的;后续要变更为来源Spring容器
Spring配置文件(匆匆过客)
配置文件为Xml格式的文件,需要引入对应的
<?xml version="1.0" encoding="UTF-8"?><beans xmlns="http://www.springframework.org/schema/beans" xmlns:xsi="http://www.w3.org/2001/XMLSchema-instance" xmlns:context="http://www.springframework.org/schema/context" xsi:schemaLocation=" http://www.springframework.org/schema/beans https://www.springframework.org/schema/beans/spring-beans.xsd http://www.springframework.org/schema/context https://www.springframework.org/schema/context/spring-context.xsd">
<!-- bean definitions here -->
</beans>在配置文件中注册组件
<!--spring配置文件的名称通常叫application(-xxx).xml--><!-- bean definitions here --><!--控制反转--><!--id属性 👉 组件在容器中的唯一标识--><!--name属性 👉 名称 👉 通常省略不写--><!--class 全类名 👉 实现类的全类名--><!--组件 注册 👉 将实例交给spring管理的过程我们称之为注册--><bean id="userService" class="com.cskaoyan.demo1.service.UserServiceImpl"/>从容器中取出组件,执行方法
注意:取出组件的3种方式!
/** * 向容器中注册组件,从容器中取出组件 */@Testpublic void testCase1() { // Spring容器 // 初始化容器,并且注册组件 ApplicationContext applicationContext = new ClassPathXmlApplicationContext("application.xml"); // 从容器中取出组件 // 按照组件的id(name)取出组件 UserService userService1 = (UserService) applicationContext.getBean("userService"); userService1.sayHello("spring"); // 可以写接口的class,也可以写实现类的class,建议写接口 // 如果容器中某个类型的组件只有一个,可以按照类型取出 UserService userService2 = applicationContext.getBean(UserService.class); // id + 类型 UserService userService3 = applicationContext.getBean("userService", UserService.class);}入门案例2
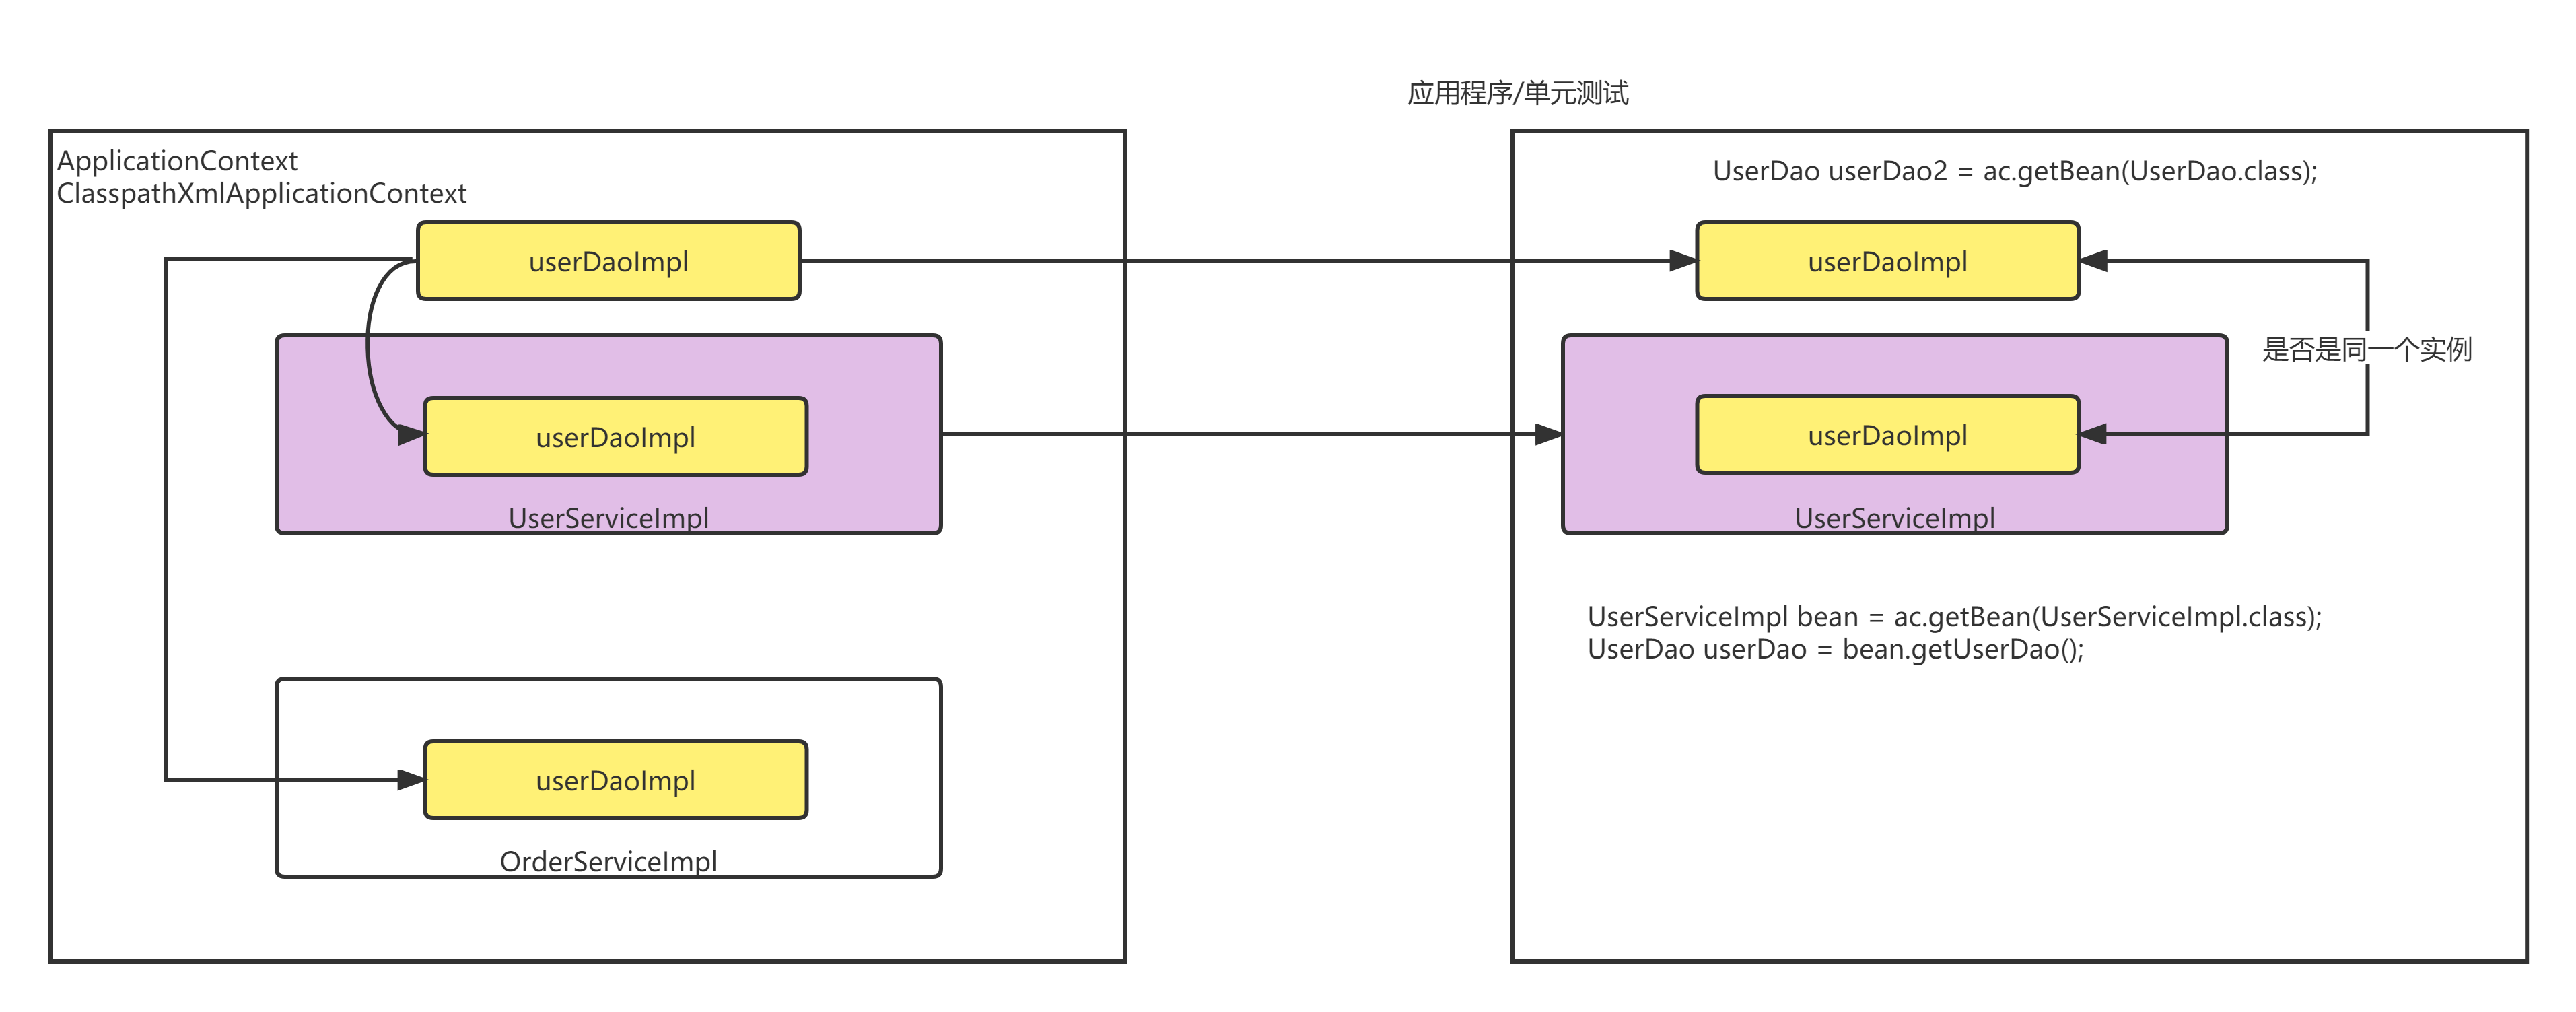
维护组件之间的依赖关系,在容器中注册dao层和service层组件,并且service层的组件依赖于dao层组件(谁需要谁就是谁依赖谁)
service类和dao类
通过在service类中增加dao类成员变量维护依赖关系
public class UserServiceImpl implements UserService{ //主动 → 控制 //UserDao userDao = new UserDaoImpl(); UserDao userDao;
public void setUserDao(UserDao userDao) { this.userDao = userDao; }
@Override public void serviceSayHello() { System.out.println("service层的sayHello"); userDao.sayHello(); }}public class UserDaoImpl implements UserDao{ @Override public void sayHello() { System.out.println("hello xiaowu"); }}维护组件之间依赖关系
通过property标签的ref属性维护组件之间的依赖关系
<bean id="userService" class="com.cskaoyan.demo1.service.UserServiceImpl"> <!--注册UserServiceImpl这个类型的组件的时候,实例化的过程会执行set方法(setUserDao) 这个set方法的形参是UserDao类型的实例,通过id从容器中取出作为形参 this.userDao = userDao; 给userServiceImpl这个组件的userDao成员变量做了赋值 → 依赖注入 --> <property name="userDao" ref="userDao"/></bean><bean id="userDao" class="com.cskaoyan.demo1.dao.UserDaoImpl"/>单元测试
直接从容器中取出service组件,执行对应的方法
@Testpublic void testCase2() { ApplicationContext applicationContext = new ClassPathXmlApplicationContext("application.xml"); UserDao userDao = applicationContext.getBean(UserDao.class); UserService userService = applicationContext.getBean(UserService.class); // 直接从容器中取出的userDao实例和从容器中取出的userService实例中的userDao成员变量是否是同一个 /*UserServiceImpl userService = applicationContext.getBean(UserServiceImpl.class);
userService.setUserDao(userDao);*/}注意:一定是从容器中取出对应的组件
思考:右侧应用程序中的userDaoImpl的实例是否是同一个
★ 注解
在使用Spring注解的时候,我们按照功能来进行划分
配置类
配置类,承担做通用配置的功能,同时在配置类中可以组件注册
- 我们在类定义上增加一些功能性的注解,增加一些通用性的配置
- 我们在类中的方法里注册组件
比如我们定义一个配置类,需要在类上增加一个@Configuration注解
// 这里增加功能性的注解@Configurationpublic class SpringConfiguration { // 类中的方法做组件的注册}组件注册功能(IOC)
类直接注册
组件注册功能首先要打开扫描开关
// 这里增加功能性的注解@Configuration@ComponentScan("com.cskaoyan.demo1")public class SpringConfiguration { // 类中的方法做组件的注册}组件注册功能的注解@Component
除了**@Component**注解,还有什么类似的注解
@Target(ElementType.TYPE)// 该注解写在类上@Retention(RetentionPolicy.RUNTIME)public @interface Component {
/** * The value may indicate a suggestion for a logical component name, * to be turned into a Spring bean in case of an autodetected component. * @return the suggested component name, if any (or empty String otherwise) */ String value() default "";
}- @Service → 通常是Service层的组件使用的注解,Service层组件也能使用@Component
- @Repository → 通常是Dao层的组件使用@Repository注解,dao层组件也能使用@Component
- @Configuration → 配置类组件
- @Controller(SpringMVC阶段)
- 等
@Service、@Repository、@Controller、@Configuration,这些注解的ElementType都是TYPE,也就是这些注解都是要写在类定义上。
组件id默认为类名的首字母小写,另外也可以使用注解的value属性来指定组件id
//@Component//@Repository("userDao") //组件id为userDao@Repository //组件id为userDaoImplpublic class UserDaoImpl implements UserDao{}/** * 增加其value属性,value属性值就是id * 如果没有增加value属性,id默认值是类名的首字母小写 * @author stone * @date 2023/04/11 15:11 *///@Component // 组件id的默认值是goodsServiceImpl@Component("goodsService") // 使用value属性值指定了组件id为goodsServicepublic class GoodServiceImpl implements GoodsService{}思考:为什么我们提供一个扫描包目录(@ComponentScan(“包目录”)),然后在包目录下的类中使用注解就可以注册组件?
它是按照什么思路来做的?
- 提供包目录,能否获得这个包以及这个包的子包下的所有的类的全限定类名
- 通过全限定类名,通过反射的方式获得对应的class → Class.forName()
- List<Class> classList = 通过上面的过程获得
- 遍历获得其中的单个class呢
- class.isAnnotationPresent(注解的class) → 判断这个类上是否有注解
@SneakyThrows@Testpublic void testIsAnnotationPresent() { Map<String,Object> map = new ConcurrentHashMap<>(); List<Class<?>> classList = Arrays.asList(UserServiceImpl.class, GoodServiceImpl.class, UserServiceImpl.class); for (Class<?> singleClass : classList) { if (singleClass.isAnnotationPresent(Component.class)) { Object instance = singleClass.newInstance(); String key = singleClass.getName(); map.put(key, instance); } } System.out.println(map);}配置类注册(JavaConfig)
@Configuration@ComponentScan("com.cskaoyan.demo2")public class ApplicationConfiguration {
// 在配置类中注册AdminServiceImpl组件 // 在配置类中写的是方法 → 提供一个返回值为AdminServiceImpl类型的实例 // 应用程序启动的时候 → 加载配置类 → 执行配置类中的方法(@Bean) → 方法的返回值注册为容器中的组件 @Bean("wdAdminService") public AdminService adminService() { AdminService adminService = new AdminServiceImpl(); System.out.println(adminService); return adminService; }
// 容器中userService类型的组件有几个 // 组件id默认值是方法名;可以使用@Bean的value属性指定 // @Bean对应的方法的形参,默认是按照类型从容器中取出组件 // 如果形参这个类型的组件在容器中不止一个,可以使用@Qualifier指定组件 @Bean public UserService userService(@Qualifier("userDaoImpl") UserDao userDao) { UserServiceImpl userService = new UserServiceImpl(); // 可否在组件注册过程中,从容器中取出UserDao的实例,给这个组件的成员变量赋值呢 userService.setUserDao(userDao); return userService; }}在配置类中完成对应的组件注册以及相关配置,配置类的核心就是提供对应的信息
JavaConfig的目标是干掉配置文件,JavaConfig也是SpringBoot推荐使用的配置方式,SpringBoot中不再使用Spring的xml配置文件
在配置类中,使用注册功能的注解@Bean 以及方法来完成组件注册
@Target({ElementType.METHOD, ElementType.ANNOTATION_TYPE})@Retention(RetentionPolicy.RUNTIME)@Documentedpublic @interface Bean {}该注解增加在方法上,并且可以和其他注解共存
这个方法的返回值注册为容器中的组件
/** * 要通过这个方法注册一个DruidDataSource组件 * @return 应该返回的是一个DruidDataSource的实例,这个返回值会注册为容器中的组件 * 返回值的定义:可以写实现类,也可以写接口;提供组件的类型信息给到容器中;建议写接口 * SE的代码风格来提供属性值就可以 * 通过这种方式注册的组件id:1、默认值是方法名;2、@Bean注解的value属性可以指定组件id */....................................................@Beanpublic DataSource dataSource(){ DruidDataSource dataSource = new DruidDataSource(); dataSource.setDriverClassName("com.mysql.jdbc.Driver"); dataSource.setUrl("jdbc:mysql://localhost:3306/cskaoyan_db?useUnicode=true&characterEncoding=utf-8"); dataSource.setUsername("root"); dataSource.setPassword("123456"); return dataSource;}想要通过@Bean注册Component1这个组件
public class Component1 {
DataSource dataSource;
public DataSource getDataSource() { return dataSource; }
public void setDataSource(DataSource dataSource) { this.dataSource = dataSource; }}/** * Component1这个类中有一个成员变量 叫dataSource需要的是一个DataSource类型的组件 * 设置的这个DataSource想要从容器中来获得 * 形参:默认是按照类型从容器中取出组件的 ac.getBean(Class) * @return */@Beanpublic Component1 component1(DataSource dataSource) { Component1 component1 = new Component1(); component1.setDataSource(dataSource); return component1;}额外增加一个DataSource组件的话,容器中DataSource类型的组件不止一个,通过形参从容器中取出组件需要指定组件id
@Beanpublic DataSource dataSource2(){ DruidDataSource dataSource = new DruidDataSource(); dataSource.setDriverClassName("com.mysql.jdbc.Driver"); dataSource.setUrl("jdbc:mysql://localhost:3306/cskaoyan_db2?useUnicode=true&characterEncoding=utf-8"); dataSource.setUsername("root"); dataSource.setPassword("123456"); return dataSource;}
/** * Component1这个类中有一个成员变量 叫dataSource需要的是一个DataSource类型的组件 * 设置的这个DataSource想要从容器中来获得 * 形参:默认是按照类型从容器中取出组件的 ac.getBean(Class) * 如果形参所需的组件在容器中不止一个,需要额外指定组件id的信息 → @Qualifier 的value属性指定组件id * 形参的名称也可以作为组件的id,但是我们更建议使用@Qualifier ,更直观一些 * @return */@Beanpublic Component1 component1(@Qualifier("dataSource2") DataSource dataSource) { Component1 component1 = new Component1(); component1.setDataSource(dataSource); return component1;}@Bean
返回值类型、方法名、形参、返回值、@Bean注解的value属性 各自的含义大家需要关注
组件注入功能(DI)
注意:要求是容器中的组件,才能够使用注入功能的注解
JavaConfig的@Bean
方法的形参,就是从容器中取出的组件
构造器注入
如果类中没有无参构造方法的话,如果这个类上有组件注册功能的注解,它会使用有参构造方法来完成实例化。
有参构造方法的形参会从容器中取出组件
@Componentpublic class Component2 { DataSource dataSource;
public Component2(DataSource dataSource) { this.dataSource = dataSource; }}Component2中没有无参构造方法,就会使用有参构造方法来完成实例化
-
默认是按照类型从容器中取出组件
-
如果这个类型的组件在容器中不止一个,可以使用**@Qualifier指定组件id**(
形参名称也可以但不建议)-
NoUniqueBeanDefinitionException:
-
使用@Qualifier指定组件id
-
@Componentpublic class Component2 {DataSource dataSource;public Component2(@Qualifier("dataSource1") DataSource dataSource) {this.dataSource = dataSource;}}
-
-
其中的常量值可以通过@Value注解来提供
-
public UserServiceImpl(UserDao userDao,@Value("zhangsan") String name) {this.userDao = userDao;this.name = name;}
-
-
如果有多个有参构造方法,需要指定构造方法
-
@Servicepublic class UserServiceImpl implements UserService{UserDao userDao;String name;public UserServiceImpl(UserDao userDao,@Value("zhangsan") String name) {this.userDao = userDao;this.name = name;}@Autowiredpublic UserServiceImpl(UserDao userDao) {this.userDao = userDao;}}
-
方法注入
可以是组件中的任意方法,但是通常这样的方法我们用的是set方法,在方法上增加@Autowired注解
@Componentpublic class Component3 { DataSource dataSource;
// 默认这个方法并不会自动执行 // 如果我们在上面增加了@Autowired 注解的话,在生命周期设置属性值的过程中会自动执行 // 形参默认按照类型从容器中取出;如果要指定组件id,还是@Qualifier @Autowired public void setDataSource(@Qualifier("dataSource2") DataSource dataSource) { this.dataSource = dataSource; }}(set)方法这种形式是Spring框架建议使用的方式,但其实绝大部分程序员用的都不是这种方式
成员变量注入
注入功能的注解使用这三组:
- @Autowired
- @Autowired + @Qualifier
- @Resource
容器中注册了这些类型的组件,OrderDao类型的组件(orderDaoImpl)、UserDao类型的组件userDaoImpl1和userDaoImpl2
@Repository+public class OrderDaoImpl implements OrderDao{}@Repositorypublic class UserDaoImpl1 implements UserDao{}@Repositorypublic class UserDaoImpl2 implements UserDao{}从容器中取出的对应的组件,执行注入,要注意,要求是在容器中的组件里注入
/** * 要使用注入功能注解,一定要保证当前类是容器中的组件 */@Servicepublic class UserServiceImpl implements UserService{ @Autowired //容器中该类型的组件只有一个 OrderDao orderDao; @Autowired //使用@Qualifier注解指定组件id @Qualifier("userDaoImpl1") UserDao userDao1; @Resource(name = "userDaoImpl2") //默认是按照组件的类型去注入,使用name属性指定组件id UserDao userDao2;}注意事项
- 开发业务代码过程中,最常用的方式只使用一个@Autowired :绝大部分组件在容器中这个类型的组件只有一个
- 要在容器中的组件中使用这些注解,使用注解的话,所处的类上要有组件注册功能的注解,且处于扫描包目录
Spring的单元测试
引入spring-test依赖
<dependency> <groupId>org.springframework</groupId> <artifactId>spring-test</artifactId> <version>5.2.5.RELEASE</version> <scope>test</scope></dependency>使用@Runwith和@ContextConfiguration注解,在单元测试类中可以使用注入功能的注解
@RunWith(SpringJUnit4ClassRunner.class)@ContextConfiguration("classpath:application.xml")public class MyTest2 {
@Autowired UserService userService; @Autowired OrderDao orderDao; @Autowired @Qualifier("userDaoImpl1") UserDao userDao1; /** * 从容器中取出UserService组件 * 查看userService组件中的成员变量是否取出容器中的组件 */ @Test public void mytest1(){
}}Bean的准备
Bean的实例化
无参构造方法(默认方式)
这也是最常用的一种方式
@Servicepublic class CategoryServiceImpl implements CategoryService{ @Autowired UserDao userDao;
public CategoryServiceImpl() { System.out.println("CategoryServiceImpl的无参构造方法"); }}有参构造方法
@Componentpublic class AdminServiceImpl implements AdminService{ UserDao userDao; String username; // 如果你有无参构造方法,默认使用无参构造方法; // 如果你没有无参构造方法,实例化时会使用有参构造方法 // 形参,默认是按照类型从容器中取出组件 // 如果形参这个类型的组件在容器中不止一个,可以使用@Qualifier指定组件 // 如果存在多个构造器,可以指定使用你标记构造器 //@Autowired public AdminServiceImpl(UserDao userDao) { this.userDao = userDao; } @Autowired public AdminServiceImpl(UserDao userDao,@Value("zhangsan") String username) { this.userDao = userDao; this.username = username; }}工厂
工厂提供实例,而实例交给Spring容器来进行管理
工厂(略)
通过配置类中的方法,方法上增加@Bean注解,该方法的返回值注册为容器中的组件
@Configuration@ComponentScan("com.cskaoyan")public class AppConfiguration {
//这就是一种工厂 @Bean public UserService serviceProxy(UserService userService) { return ProxyUtil.getServiceProxy(userService); }}FactoryBean
实现FactoryBean接口,组件类型和FactoryBean接口中的getObject方法的类型相同
public interface FactoryBean<T> { String OBJECT_TYPE_ATTRIBUTE = "factoryBeanObjectType";
@Nullable T getObject() throws Exception;
@Nullable Class<?> getObjectType();
default boolean isSingleton() { return true; }}比如要注册一个User类型的组件,可以通过User对应的FactoryBean来注册组件。
/** * 直接注册为容器中的组件 * FactoryBean 👉 XXXFactoryBean * 👉 组件类型和FactoryBean接口中的getObject方法相关 * BeanFactory和factoryBean: * BeanFactory:生产的是容器中的所有的组件 * FactoryBean:生产的是特定的组件 */@Componentpublic class UserFactoryBean implements FactoryBean<User> {
/** * 完成组件的实例化 * @return 组件类型和返回值相关 * @throws Exception */ @Override public User getObject() throws Exception { User user = new User(); return user; }
@Override public Class<?> getObjectType() { return User.class; }}@Componentpublic class UserServiceFactoryBean implements FactoryBean<UserService> { @Autowired UserService instance; @Override public UserService getObject() throws Exception { UserService proxy = (UserService) Proxy.newProxyInstance(UserServiceFactoryBean.class.getClassLoader(), UserServiceImpl.class.getInterfaces(), new InvocationHandler() { @Override public Object invoke(Object proxy, Method method, Object[] args) throws Throwable { System.out.println("开启事务"); Object invoke = method.invoke(instance, args); System.out.println("提交并关闭事务"); return invoke; } }); return proxy; }
@Override public Class<?> getObjectType() { return UserService.class; }}面试题:BeanFactory和FactoryBean之间的区别
BeanFactory是ApplicationContext的父接口,它就是容器 → 注册并管理所有的组件(去获得容器中的组件最终都是通过getBean方法获得)
FactoryBean注册的是特定的组件 → getObject方法返回的是什么实例,注册的就是什么组件
思考1
我们 在什么情况下使用的工厂的方式?
难道我们不是直接用构造方法更方便么,为啥还要使用工厂?
确实,使用构造方法是很方便,但是有些情况用不了构造方法。比如动态代理 ProxyFactoryBean
使用构造器要提供大量的参数,而提供大量的参数过程又比较繁琐,也就是通常在使用一些框架的时候,会给你提供一些对应的工厂
一些框架已经写好了一些代码,要在此基础上增加对Spring框架的支持,要将框架中的一些核心的对象交给Spring容器来管理,通常就会提供一个框架的拓展包,拓展包中提供对应的工厂,使用工厂可以直接将这个框架需要的核心对象注册为容器中的组件 SqlSessionFactoryBean
工厂:主要就是对已有的代码做些拓展
思考2
BeanFactory和FactoryBean之间的联系和区别
联系:通过他两都可以向容器中注册组件
区别:BeanFactory是容器,所有的组件注册都是通过BeanFactory;而FactoryBean注册的特定的单个组件
作用域 Scope
Singleton:单例,每一次取出组件都是同一个组件
Prototype:原型,每一次取出组件都是全新的组件
默认值是singleton,我们通常省略不写
@Scope 使用value属性指定作用域
@Component@Scope("singleton")public class SingletonBean {}@Component@Scope("prototype")public class PrototypeBean {}@Componentpublic class DefaultBean {}注册3个组件,分别给到不同的scope,然后从容器中取出组件多次,查看是否是同一个组件(查看内存地址)
@Testpublic void mytest1(){ ApplicationContext applicationContext = new AnnotationConfigApplicationContext(SpringConfiguration.class); SingletonBean bean1 = applicationContext.getBean(SingletonBean.class); SingletonBean bean2 = applicationContext.getBean(SingletonBean.class); SingletonBean bean3 = applicationContext.getBean(SingletonBean.class);}@Testpublic void mytest2(){ ApplicationContext applicationContext = new AnnotationConfigApplicationContext(SpringConfiguration.class); PrototypeBean bean1 = applicationContext.getBean(PrototypeBean.class); PrototypeBean bean2 = applicationContext.getBean(PrototypeBean.class); PrototypeBean bean3 = applicationContext.getBean(PrototypeBean.class);}@Testpublic void mytest3(){ ApplicationContext applicationContext = new AnnotationConfigApplicationContext(SpringConfiguration.class); DefaultBean bean1 = applicationContext.getBean(DefaultBean.class); DefaultBean bean2 = applicationContext.getBean(DefaultBean.class); DefaultBean bean3 = applicationContext.getBean(DefaultBean.class);}@RunWith(SpringJUnit4ClassRunner.class)@ContextConfiguration(classes = {AppConfiguration.class})public class ScopeTest { @Autowired SingletonBean singletonBean1; @Autowired SingletonBean singletonBean2; @Autowired SingletonBean singletonBean3;
@Autowired PrototypeBean prototypeBean1; @Autowired PrototypeBean prototypeBean2; @Autowired PrototypeBean prototypeBean3;
@Autowired DefaultBean defaultBean1; @Autowired DefaultBean defaultBean2; @Autowired DefaultBean defaultBean3; @Test public void testScope() { System.out.println(1); }}生命周期
概念
生命周期指组件在容器中要完成实例化,组件从实例化开始直至可用状态会执行到哪些过程。
学Servlet的时候学过生命周期,Servlet的生命周期:init、service、destroy
- 准备阶段
- 服务阶段
- 销毁阶段
对于Bean(容器中的组件),在容器中也会经历这样的一些阶段
- 容器初始化的时候,组件做准备性工作 → 放入到容器中之前,会执行哪一些方法来准备实例
- 组件可以从容器中取出,提供服务,比如从容器中取出userService实例,调用其sayHello方法
- 容器关闭,组件做销毁工作
在特定的时间执行一系列的方法
初始化阶段的方法
- Bean的实例化(有参构造方法、无参构造方法)
- 设置参数方法(方法注入、成员变量注入)
- BeanNameAware、BeanFactoryAware、ApplicationContextAware
- BeanPostProcessor(Bean的后处理器,这个后指的是实例化之后,其实还是在放入到容器中之前)的postProcessBeforeInitialization(后面有初始化方法)
- InitializingBean的afterPropertiesSet方法(通常是一些框架提供的类初始化的方式)
- 自定义的init方法(我们自己做开发的时候通常使用的方式)
- BeanPostProcessor的postProcessAfterInitialization
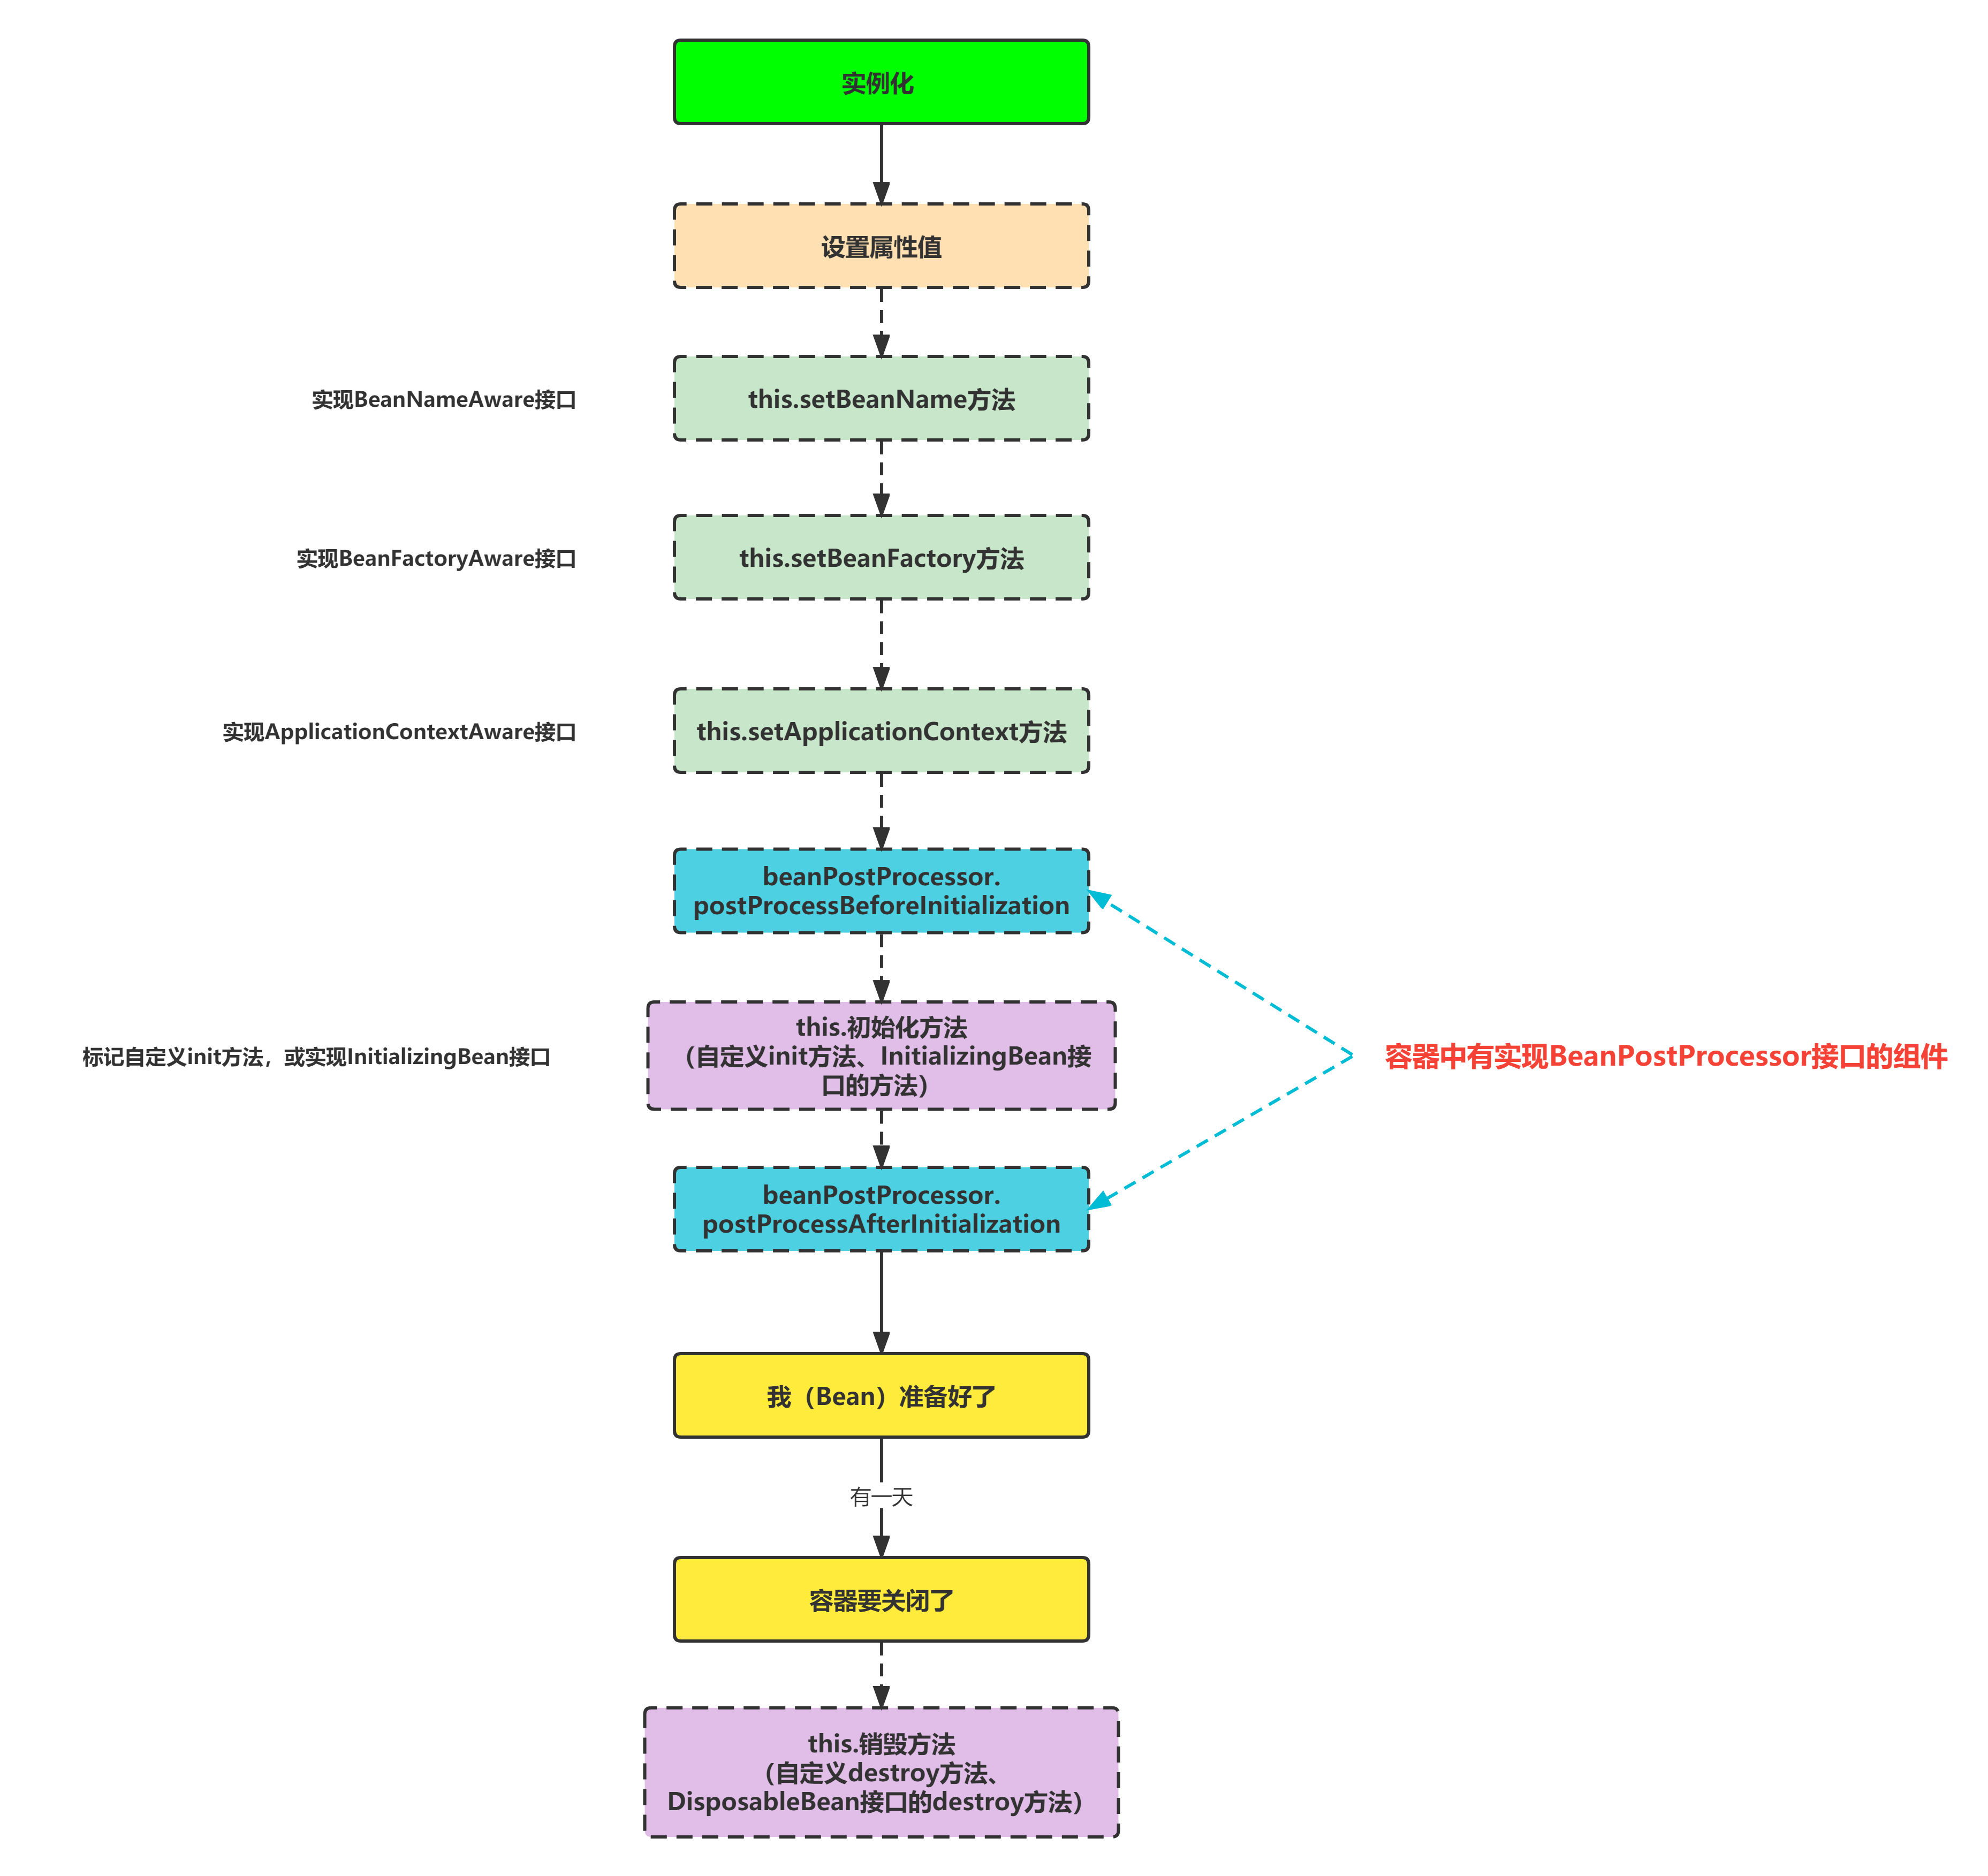
BeanPostProcessor和正在执行生命周期的组件并不是同一个,BeanPostProcessor是额外提供的,而额外提供的这个BeanPostProcessor组件 它的作用范围:除了BeanPostProcessor本身,其他的所有组件
组件是什么时候开始执行生命周期的:容器初始化的时候(单例组件)
prototype组件 → 从容器中取出组件的时候执行的生命周期,不取就不执行,取一次执行一次,取两次就执行两次
容器关闭阶段的方法
单例的组件才会执行到对应的方法
DisposableBean的destroy方法(通常是框架提供的类采用这种方式)
自定义的destroy方法(通常是自定义的)
代码
示例生命周期的组件
/** * 组件可以使用之前要经过这样的一些生命周期 * 组件可以使用之前: * singleton:容器初始化的时候 * prototype:从容器中取出组件的时候,getBean */@Componentpublic class LifeCycleBean implements BeanNameAware, BeanFactoryAware, ApplicationContextAware,InitializingBean, DisposableBean { //实例化 public LifeCycleBean(){ System.out.println("1、bean的实例化"); } //参数设置 String parameter; @Autowired public void setParameter(String parameter) { System.out.println("2、设置参数"); this.parameter = parameter; } //Aware:为组件中的成员变量提供参数 → BeanName、BeanFactory、ApplicationContext String beanName; BeanFactory beanFactory; ApplicationContext applicationContext; @Override public void setBeanName(String beanName) { System.out.println("3、BeanNameAware"); this.beanName = beanName; } @Override public void setBeanFactory(BeanFactory beanFactory) throws BeansException { System.out.println("3、BeanFactoryAware"); this.beanFactory = beanFactory; } @Override public void setApplicationContext(ApplicationContext applicationContext) throws BeansException { System.out.println("3、ApplicationContextAware"); this.applicationContext = applicationContext; }
@Override public void afterPropertiesSet() throws Exception { System.out.println("5、InitializingBean的afterPropertiesSet方法"); } @PostConstruct public void init(){ System.out.println("6、自定义的init方法"); }
@Override public void destroy() throws Exception { System.out.println("8、DisposableBean的destroy"); } @PreDestroy public void customDestroy(){ System.out.println("9、自定义的destroy"); }
}BeanPostProcessor
//该组件的before和after方法的作用范围:除了该组件本身之外,其他的所有组件@Componentpublic class CustomBeanPostProcessor implements BeanPostProcessor { @Override public Object postProcessBeforeInitialization(Object bean, String beanName) throws BeansException { System.out.println("4、BeanPostProcessor的before方法"); return bean; }
@Override public Object postProcessAfterInitialization(Object bean, String beanName) throws BeansException { System.out.println("7、BeanPostProcessor的after方法"); return bean; }}组件注册到容器中才会生效
注意
注意:生命周期的方法,不是都会执行到的,有些执行是需要条件的。另外要注意BeanPostProcessor的作用范围
文章分享
如果这篇文章对你有帮助,欢迎分享给更多人!