


Java Web 开发:项目二补充知识
HibernateValidation
jsr303
对请求参数做校验
if(username != null && username.length >= 6){}
if(username == null || username.length < 6){ return BaseRespVo.fail("参数不合法");}if(password == null || password.length < 6){ return BaseRespVo.fail("参数不合法");}if(desc == null || desc.length < 6){ return BaseRespVo.fail("参数不合法");}接收请求参数的时候,可以使用引用类型的对象来接收
请求参数 → 引用类型对象中的成员变量 → 对成员变量做校验 → 不同校验逻辑 → 注解
在成员变量上增加注解 → 我要给他做校验
spring-boot-starter-web
- 2.1.5.RELEASE不需要额外引入依赖
- 2.7.12 额外引入hibernate-validator依赖
<dependency> <groupId>org.hibernate.validator</groupId> <artifactId>hibernate-validator</artifactId></dependency>使用
在Handler方法的形参上增加注解 @Valid或@Validated注解
在引用类型中的成员变量上增加校验功能的注解
校验注解
常见的注解 (Bean Validation 中内置的 constraint)@Null 被注释的元素必须为 null@NotNull 被注释的元素必须不为 null@Size(max=, min=) 被注释的元素的大小必须在指定的范围内@AssertTrue 被注释的元素必须为 true@AssertFalse 被注释的元素必须为 false@Min(value) 被注释的元素必须是一个数字,其值必须大于等于指定的最小值@Max(value) 被注释的元素必须是一个数字,其值必须小于等于指定的最大值@DecimalMin(value) 被注释的元素必须是一个数字,其值必须大于等于指定的最小值@DecimalMax(value) 被注释的元素必须是一个数字,其值必须小于等于指定的最大值@Digits (integer, fraction) 被注释的元素必须是一个数字,其值必须在可接受的范围内@Past 被注释的元素必须是一个过去的日期 Date@Future 被注释的元素必须是一个将来的日期@Pattern(regex=,flag=) 被注释的元素必须符合指定的正则表达式Hibernate Validator 附加的 constraint@NotBlank(message =) 验证字符串非null,且长度必须大于0@Email 被注释的元素必须是电子邮箱地址@Length(min=,max=) 被注释的字符串的大小必须在指定的范围内@NotEmpty 被注释的字符串的必须非空@Range(min=,max=,message=) 被注释的元素必须在合适的范围内一个成员变量上能否增加多个注解 → 可以
处理校验结果
在形参中增加BindingResult,通过BindingResult获得处理结果
通常放在形参最前面
//是否有校验错误//BindingResult提供的方法boolean hasFieldErrors();
//获得成员变量错误@NullableFieldError getFieldError();FieldError提供的方法
//拿到错误的参数的值@Nullablepublic Object getRejectedValue() { return this.rejectedValue;}//拿到错误的参数名public String getField() { return this.field;}//默认的消息@Nullablepublic String getDefaultMessage() { return this.defaultMessage;}// localhost:8083/admin/user/list@RequestMapping("list")//public BaseRespVo list(String username, Integer page, Integer limit, String sort, String order) {public BaseRespVo list(String username, @Validated BasePageInfo info, BindingResult bindingResult) { if (bindingResult.hasFieldErrors()) { FieldError fieldError = bindingResult.getFieldError(); String field = fieldError.getField();//请求参数名 Object rejectedValue = fieldError.getRejectedValue();//错误的值 String defaultMessage = fieldError.getDefaultMessage(); //错误的消息 String msg = "请求参数" + field + "没有通过校验:值为" + rejectedValue + ";" + defaultMessage; return BaseRespVo.invalidParameter(msg); }
CommonData<User> data = userService.query(username,info); return BaseRespVo.ok(data);}也可以通过SpringMVC的异常处理来处理参数校验异常
参数校验错误的情况下,会抛出MethodArgumentNotValidException,可以对这个异常进行处理,在参数中传入这个异常对象
然后获取其中的相关错误信息
@RestControllerAdvicepublic class ValidationControllerAdvice {
@ExceptionHandler(MethodArgumentNotValidException.class) public BaseRespVo baseRespVo(MethodArgumentNotValidException e) { e.printStackTrace(); FieldError fieldError = e.getFieldError(); //拿到校验失败的信息 String field = fieldError.getField(); // 校验失败的成员变量名 → 请求参数 Object rejectedValue = fieldError.getRejectedValue(); // 校验失败的值 → 请求参数的值 String message = fieldError.getDefaultMessage(); // 校验消息 → 注解中的message return BaseRespVo.badArgument(field,message); }
}阿里云API
对象存储服务(OSS)
对象存储服务,我们使用阿里云的对象存储服务为例
引入依赖
<!-- https://mvnrepository.com/artifact/com.aliyun.oss/aliyun-sdk-oss --><dependency> <groupId>com.aliyun.oss</groupId> <artifactId>aliyun-sdk-oss</artifactId> <version>3.15.2</version></dependency>使用demo
这里阿里云产品文档中Java代码实现的demo
import com.aliyun.oss.ClientException;import com.aliyun.oss.OSS;import com.aliyun.oss.OSSClientBuilder;import com.aliyun.oss.OSSException;import java.io.ByteArrayInputStream;
public class OssDemo {
public static void main(String[] args) throws Exception { // Endpoint以华东1(杭州)为例,其它Region请按实际情况填写。 String endpoint = "https://oss-cn-hangzhou.aliyuncs.com"; // 阿里云账号AccessKey拥有所有API的访问权限,风险很高。强烈建议您创建并使用RAM用户进行API访问或日常运维,请登录RAM控制台创建RAM用户。 String accessKeyId = "yourAccessKeyId"; String accessKeySecret = "yourAccessKeySecret"; // 填写Bucket名称,例如examplebucket。 String bucketName = "examplebucket"; // 填写Object完整路径,例如exampledir/exampleobject.txt。Object完整路径中不能包含Bucket名称。 String objectName = "exampledir/exampleobject.txt";
// 创建OSSClient实例。 OSS ossClient = new OSSClientBuilder().build(endpoint, accessKeyId, accessKeySecret);
try { String content = "Hello OSS"; ossClient.putObject(bucketName, objectName, new ByteArrayInputStream(content.getBytes())); } catch (OSSException oe) { System.out.println("Caught an OSSException, which means your request made it to OSS, " + "but was rejected with an error response for some reason."); System.out.println("Error Message:" + oe.getErrorMessage()); System.out.println("Error Code:" + oe.getErrorCode()); System.out.println("Request ID:" + oe.getRequestId()); System.out.println("Host ID:" + oe.getHostId()); } catch (ClientException ce) { System.out.println("Caught an ClientException, which means the client encountered " + "a serious internal problem while trying to communicate with OSS, " + "such as not being able to access the network."); System.out.println("Error Message:" + ce.getMessage()); } finally { if (ossClient != null) { ossClient.shutdown(); } } }}个性化的信息
这里使用上面的Demo需要大家已经开通OSS服务,也可以使用我的OSS服务,
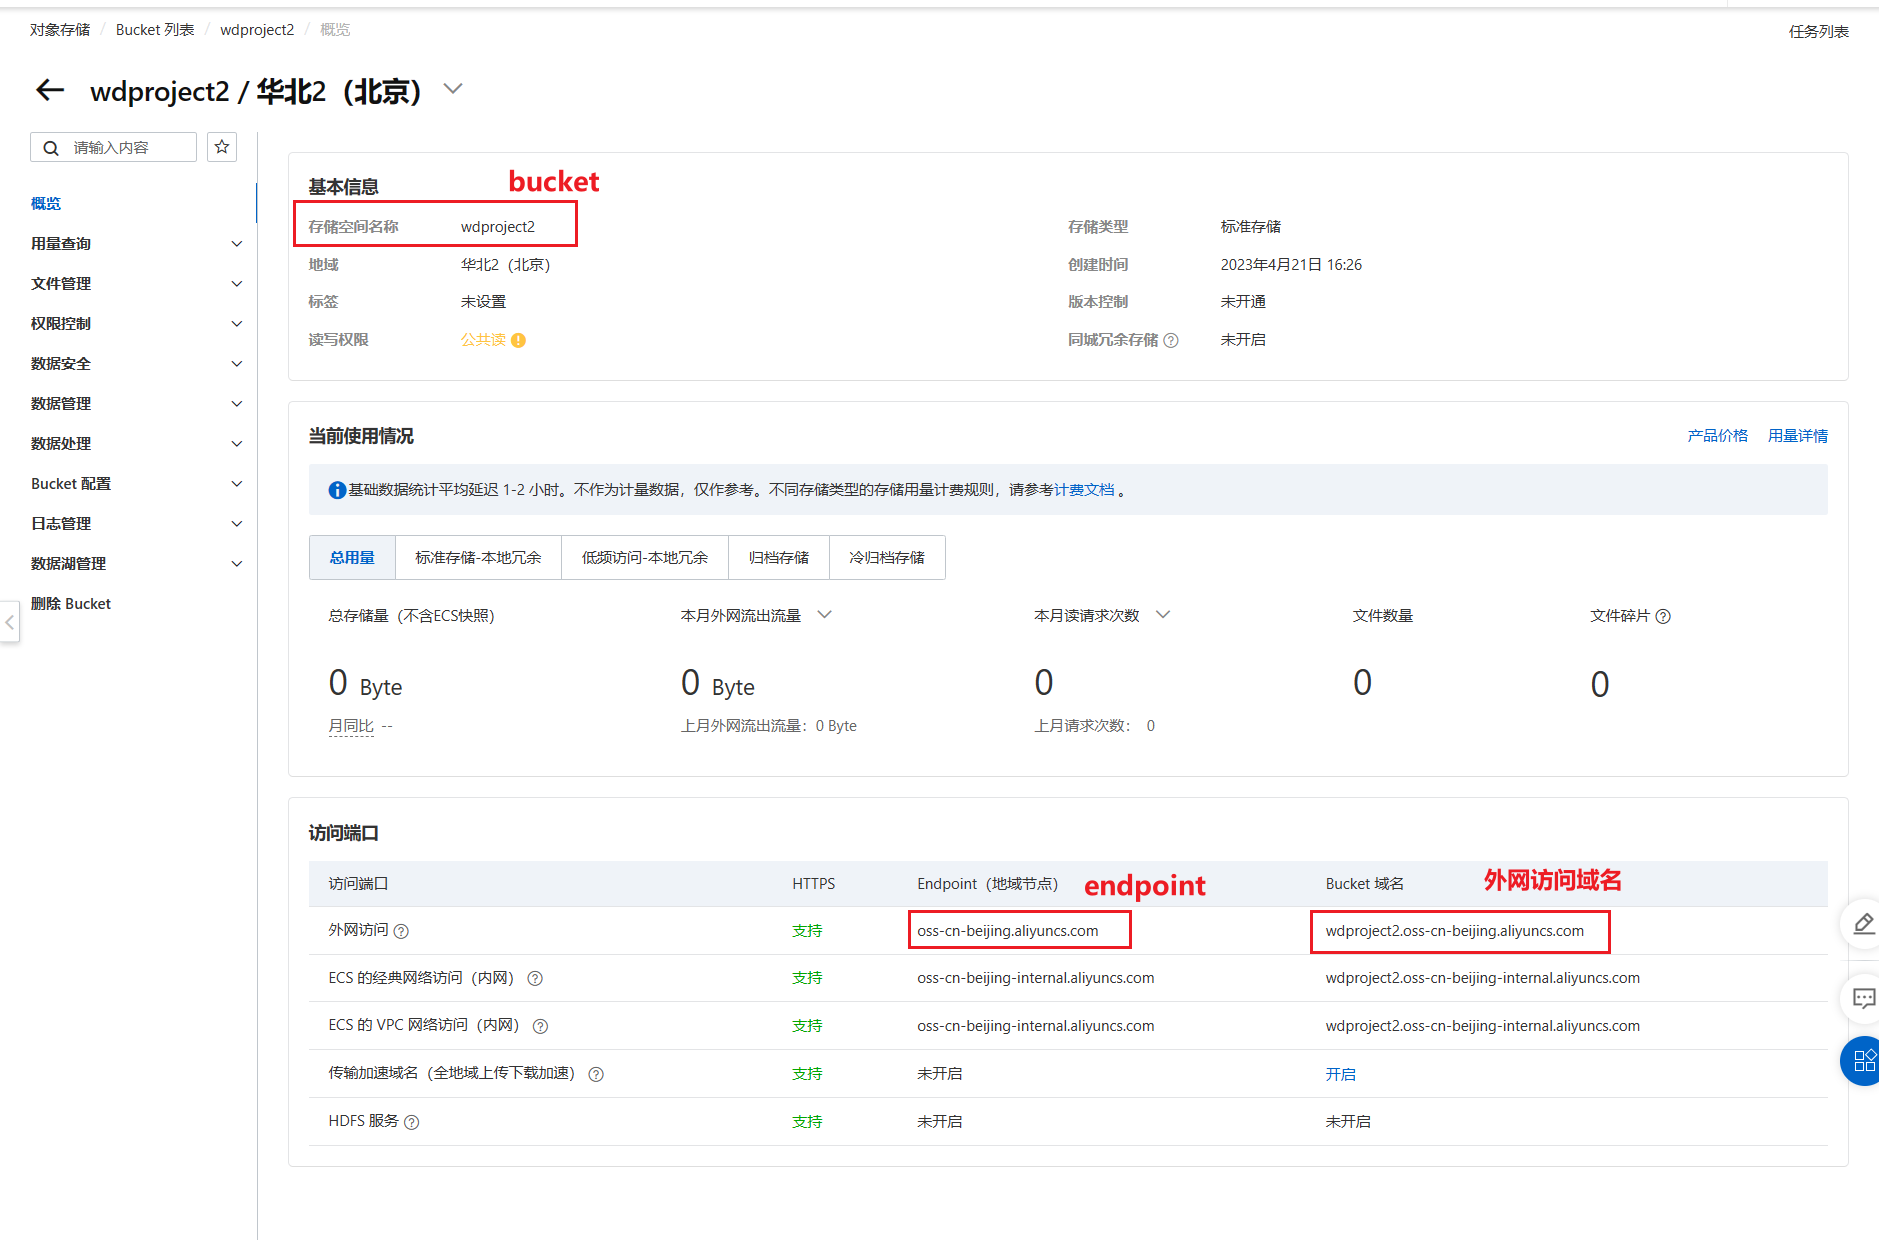
其中有这样的几项信息
endpoint=oss-cn-beijing.aliyuncs.combucket=wdproject2# 另外要访问OSS还需要AccessKey和AccessSecret,这个请保管好,不要泄露出去accessKey=LTAI5t8gpxPTCR6W58RnZq4uaccessSecret=mVPbpbxia0JQotb7HyJAREV8QUuq8h接着我们利用这些值,上传一下d:/tmp/ikun.jpeg
import com.aliyun.oss.ClientException;import com.aliyun.oss.OSS;import com.aliyun.oss.OSSClientBuilder;import com.aliyun.oss.OSSException;import com.aliyun.oss.model.PutObjectResult;
import java.io.File;import java.io.FileInputStream;import java.util.UUID;
public class Demo {
public static void main(String[] args) throws Exception { // Endpoint以华东1(杭州)为例,其它Region请按实际情况填写。 String endpoint = "oss-cn-beijing.aliyuncs.com"; // 阿里云账号AccessKey拥有所有API的访问权限,风险很高。强烈建议您创建并使用RAM用户进行API访问或日常运维,请登录RAM控制台创建RAM用户。 String accessKeyId = "LTAI5t8gpxPTCR6W58RnZq4u"; String accessKeySecret = "mVPbpbxia0JQotb7HyJAREV8QUuq8h"; // 填写Bucket名称,例如examplebucket。 String bucketName = "wdproject2";
String path = "d:/tmp"; String fileName = "ikun.jpeg";
// 填写Object完整路径,例如exampledir/exampleobject.txt。Object完整路径中不能包含Bucket名称。 String suffix = fileName.substring(fileName.lastIndexOf("."));//ikun.jpeg suffix=.jpeg String objectName = UUID.randomUUID().toString() + suffix;
// 创建OSSClient实例。 OSS ossClient = new OSSClientBuilder().build(endpoint, accessKeyId, accessKeySecret); FileInputStream inputStream = null; try { inputStream = new FileInputStream(new File(path, fileName)); // 保存在哪个bucket、保存的文件名、输入流 PutObjectResult putObjectResult = ossClient.putObject(bucketName, objectName, inputStream); } catch (OSSException oe) { System.out.println("Caught an OSSException, which means your request made it to OSS, " + "but was rejected with an error response for some reason."); System.out.println("Error Message:" + oe.getErrorMessage()); System.out.println("Error Code:" + oe.getErrorCode()); System.out.println("Request ID:" + oe.getRequestId()); System.out.println("Host ID:" + oe.getHostId()); } catch (ClientException ce) { System.out.println("Caught an ClientException, which means the client encountered " + "a serious internal problem while trying to communicate with OSS, " + "such as not being able to access the network."); System.out.println("Error Message:" + ce.getMessage()); } finally { if (ossClient != null) { ossClient.shutdown(); } if (inputStream != null) { inputStream.close(); } } }}那么我们后面方便使用可以封装为方法
封装
上传file,我们使用SpringMVC的Handler接收为MultipartFile,然后获得inputStream来完成上传,该方法的返回值为上传结果和访问的URL,当然大家也可以自己封装
@Servicepublic class OssServiceImpl implements OssService{
@Override public OssPutResult save(MultipartFile file) { String endpoint = "oss-cn-beijing.aliyuncs.com"; String accessKeyId = "LTAI5t8gpxPTCR6W58RnZq4u"; String accessKeySecret = "mVPbpbxia0JQotb7HyJAREV8QUuq8h"; String bucketName = "wdproject2"; String urlPrefix = "https://" + bucketName + "." + endpoint;
String fileName = file.getOriginalFilename();
String suffix = fileName.substring(fileName.lastIndexOf(".")); String objectName = UUID.randomUUID().toString() + suffix;
// 创建OSSClient实例。 OSS ossClient = new OSSClientBuilder().build(endpoint, accessKeyId, accessKeySecret); InputStream inputStream = null; PutObjectResult putObjectResult = null; try { inputStream = file.getInputStream(); // 保存在哪个bucket、保存的文件名、输入流 putObjectResult = ossClient.putObject(bucketName, objectName, inputStream); } catch (OSSException oe) { System.out.println("Caught an OSSException, which means your request made it to OSS, " + "but was rejected with an error response for some reason."); System.out.println("Error Message:" + oe.getErrorMessage()); System.out.println("Error Code:" + oe.getErrorCode()); System.out.println("Request ID:" + oe.getRequestId()); System.out.println("Host ID:" + oe.getHostId()); } catch (ClientException ce) { System.out.println("Caught an ClientException, which means the client encountered " + "a serious internal problem while trying to communicate with OSS, " + "such as not being able to access the network."); System.out.println("Error Message:" + ce.getMessage()); } catch (IOException e) { e.printStackTrace(); } finally { if (ossClient != null) { ossClient.shutdown(); } if (inputStream != null) { try { inputStream.close(); } catch (IOException e) { e.printStackTrace(); } } } String accessUrl = urlPrefix + "/" + objectName; return new OssPutResult(putObjectResult, accessUrl); }}封装的OssPutResult大家可以按需封装自己需要的值
@Data@AllArgsConstructor@NoArgsConstructorpublic class OssPutResult { PutObjectResult result; String url;}短信服务(SMS)
通过阿里云提供的短信服务可以发送验证码
SendSms_短信服务_API调试-阿里云OpenAPI开发者门户 (aliyun.com)
【阿里云】尊敬的139310186@qq.com,截止至2023-04-20...引入依赖
<dependency> <groupId>com.aliyun</groupId> <artifactId>alibabacloud-dysmsapi20170525</artifactId> <version>2.0.23</version></dependency>使用Demo
import com.aliyun.auth.credentials.Credential;import com.aliyun.auth.credentials.provider.StaticCredentialProvider;import com.aliyun.core.http.HttpClient;import com.aliyun.core.http.HttpMethod;import com.aliyun.core.http.ProxyOptions;import com.aliyun.httpcomponent.httpclient.ApacheAsyncHttpClientBuilder;import com.aliyun.sdk.service.dysmsapi20170525.models.*;import com.aliyun.sdk.service.dysmsapi20170525.*;import com.google.gson.Gson;import darabonba.core.RequestConfiguration;import darabonba.core.client.ClientOverrideConfiguration;import darabonba.core.utils.CommonUtil;import darabonba.core.TeaPair;
//import javax.net.ssl.KeyManager;//import javax.net.ssl.X509TrustManager;import java.net.InetSocketAddress;import java.time.Duration;import java.util.*;import java.util.concurrent.CompletableFuture;
public class SmsDemo {
public static void main(String[] args) throws Exception {
// Configure Credentials authentication information, including ak, secret, token StaticCredentialProvider provider = StaticCredentialProvider.create(Credential.builder() .accessKeyId("LTAI5t8gpxPTCR6W58RnZq4u") .accessKeySecret("mVPbpbxia0JQotb7HyJAREV8QUuq8h") //.securityToken("<your-token>") // use STS token .build());
// Configure the Client AsyncClient client = AsyncClient.builder() .region("cn-qingdao") // Region ID //.httpClient(httpClient) // Use the configured HttpClient, otherwise use the default HttpClient (Apache HttpClient) .credentialsProvider(provider) //.serviceConfiguration(Configuration.create()) // Service-level configuration // Client-level configuration rewrite, can set Endpoint, Http request parameters, etc. .overrideConfiguration( ClientOverrideConfiguration.create() .setEndpointOverride("dysmsapi.aliyuncs.com") //.setConnectTimeout(Duration.ofSeconds(30)) ) .build();
// Parameter settings for API request SendSmsRequest sendSmsRequest = SendSmsRequest.builder() .phoneNumbers("18675730267") .signName("王道训练营") .templateCode("SMS_173765187") .templateParam("{\"code\":\"1234\"}") // Request-level configuration rewrite, can set Http request parameters, etc. // .requestConfiguration(RequestConfiguration.create().setHttpHeaders(new HttpHeaders())) .build();
// Asynchronously get the return value of the API request CompletableFuture<SendSmsResponse> response = client.sendSms(sendSmsRequest); // Synchronously get the return value of the API request SendSmsResponse resp = response.get(); System.out.println(new Gson().toJson(resp)); // Asynchronous processing of return values /*response.thenAccept(resp -> { System.out.println(new Gson().toJson(resp)); }).exceptionally(throwable -> { // Handling exceptions System.out.println(throwable.getMessage()); return null; });*/
// Finally, close the client client.close(); }}192.168.5.127:8080/validation/code?mobile=xxx
个性化的信息
这里使用上面的Demo需要大家已经开通短信服务,也可以使用我的短信服务
# signName或使用stone4jsignName=王道训练营templateCode = SMS_173765187# 另外要访问短信服务还需要AccessKey和AccessSecret,这个请保管好,不要泄露出去accessKey=LTAI5t8gpxPTCR6W58RnZq4uaccessSecret=mVPbpbxia0JQotb7HyJAREV8QUuq8h封装
发送验证码,可以生成验证码之后发送;也可以让其方法自动生成验证码,然后返回值返回验证码信息
@Servicepublic class SmsServiceImpl implements SmsService{ @Override public String send(String mobile, String code) { String accessKeyId = "LTAI5t8gpxPTCR6W58RnZq4u"; String accessKeySecret = "mVPbpbxia0JQotb7HyJAREV8QUuq8h"; String signName = "王道训练营"; String templateCode = "SMS_173765187"; StaticCredentialProvider provider = StaticCredentialProvider.create(Credential.builder() .accessKeyId(accessKeyId) .accessKeySecret(accessKeySecret) .build());
AsyncClient client = AsyncClient.builder() .region("cn-qingdao") // Region ID .credentialsProvider(provider) .overrideConfiguration( ClientOverrideConfiguration.create() .setEndpointOverride("dysmsapi.aliyuncs.com") ) .build();
String templateParam = "{\"code\":\"" + code + "\"}"; SendSmsRequest sendSmsRequest = SendSmsRequest.builder() .phoneNumbers(mobile) .signName(signName) .templateCode(templateCode) .templateParam(templateParam) .build();
CompletableFuture<SendSmsResponse> response = client.sendSms(sendSmsRequest); SendSmsResponse resp = null; try { resp = response.get(); } catch (InterruptedException e) { e.printStackTrace(); } catch (ExecutionException e) { e.printStackTrace(); } String jsonResult = new Gson().toJson(resp); System.out.println(jsonResult); client.close(); return jsonResult; }
@Override public SmsSendResult sendValidationCode(String mobile) { // 生成验证码 SecureRandom random = new SecureRandom(); String code = String.valueOf(random.nextInt(899999) + 100000); String jsonResult = this.send(mobile, code); return new SmsSendResult(jsonResult,code); }}整合
在前面的OssService中和SmsService中我们分别使用了一些值
- 其中有两个部分都包含的AccessKeyId和AccessKeySecret
- 也有两部分个性化的内容
- OSS中的bucket和endPoint、urlPrefix
- SMS中的signName和templateCode
而我们是在方法中写的是常量值
public OssPutResult save(MultipartFile file) { String endpoint = "oss-cn-beijing.aliyuncs.com"; String accessKeyId = "LTAI5t8gpxPTCR6W58RnZq4u"; String accessKeySecret = "mVPbpbxia0JQotb7HyJAREV8QUuq8h"; String bucketName = "wdproject2"; String urlPrefix = "https://" + bucketName + "." + endpoint;}public String send(String mobile, String code) { String accessKeyId = "LTAI5t8gpxPTCR6W58RnZq4u"; String accessKeySecret = "mVPbpbxia0JQotb7HyJAREV8QUuq8h"; String signName = "王道训练营"; String templateCode = "SMS_173765187";}既然我们使用的是SpringBoot那么我们其实是可以使用配置文件来管理这些值的
比如我们创建一个application-aliyun.yml我们在其中提供对应的值,提供的值我们直接给容器中的组件使用,我们可以考虑使用Properties组件来接收这些值
@Component@ConfigurationProperties("wd.aliyun")@Datapublic class WdAliyunProperties { String accessKeyId;//wd.aliyun.access-key-id String accessKeySecret;//wd.aliyun.access-key-secret Oss oss; Sms sms;
@Data public static class Oss { String bucket; //wd.aliyun.oss.bucket String endPoint; String urlPrefix; }
@Data public static class Sms { String signName; String templateCode; }}我们就可以在配置文件中提供值
wd: aliyun: access-key-id: LTAI5t8gpxPTCR6W58RnZq4u access-key-secret: mVPbpbxia0JQotb7HyJAREV8QUuq8h oss: bucket: wdproject2 end-point: oss-cn-beijing.aliyuncs.com url-prefix: https://${wd.aliyun.oss.bucket}.${wd.aliyun.oss.end-point} sms: sign-name: 王道训练营 template-code: SMS_173765187那么我们在容器中的其他组件中就可以引入对应的值
@Servicepublic class OssServiceImpl implements OssService{ @Autowired WdAliyunProperties aliyunProperties; @Override public OssPutResult save(MultipartFile file) { String accessKeyId = aliyunProperties.getAccessKeyId(); String accessKeySecret = aliyunProperties.getAccessKeySecret(); String endpoint = aliyunProperties.getOss().getEndPoint(); String bucketName = aliyunProperties.getOss().getBucket(); String urlPrefix = aliyunProperties.getOss().getUrlPrefix(); }}Encrypt/Decrypt
常用加密算法
常见的加密算法可以分成三类,对称加密算法,非对称加密算法和Hash算法
1、任何密码、密文都是可以被破解的; 2、密码和密文只需要证明是计算上安全即可,即满足破解密文的花费远远大于所加密信息的价值,且破解密文所花费的时间远远多于信息的有效时间; 3、任何密码系统都要假设敌人已经知道你的加密算法;
介绍
对称加密
指加密和解密使用相同密钥的加密算法。 对称加密算法的优点在于加解密的高速度和使用长密钥时的难破解性。对称加密算法的安全性取决于加密密钥的保存情况,但要求企业中每一个持有密钥的人都保守秘密是不可能的,他们通常会有意无意的把密钥泄漏出去——如果一个用户使用的密钥被入侵者所获得,入侵者便可以读取该用户密钥加密的所有文档,如果整个企业共用一个加密密钥,那整个企业文档的保密性便无从谈起。 常见的对称加密算法:DES、3DES、DESX、Blowfish、IDEA、RC4、RC5、RC6和AES
非对称加密
指加密和解密使用不同密钥的加密算法,也称为公私钥加密。 假设两个用户要加密交换数据,双方交换公钥,使用时一方用对方的公钥加密,另一方即可用自己的私钥解密。非对称加密的缺点是加解密速度要远远慢于对称加密,在某些极端情况下,甚至能比对称加密慢上1000倍。 常见的非对称加密算法:RSA、ECC(移动设备用)、Diffie-Hellman、El Gamal、DSA(数字签名用)
Hash算法
Hash算法特别的地方在于它是一种单向算法,用户可以通过Hash算法对目标信息生成一段特定长度的唯一的Hash值,却不能通过这个Hash值重新获得目标信息。因此Hash算法常用在不可还原的密码存储、信息完整性校验等。 散列是信息的提炼,通常其长度要比信息小得多,且为一个固定长度。加密性强的散列一定是不可逆的,这就意味着通过散列结果,无法推出任何部分的原始信息。**任何输入信息的变化,哪怕仅一位,都将导致散列结果的明显变化,这称之为雪崩效应。**散列还应该是防冲突的,即找不出具有相同散列结果的两条信息。具有这些特性的散列结果就可以用于验证信息是否被修改。 常见的Hash算法:MD2、MD4、MD5、HAVAL、SHA、SHA-1、HMAC、HMAC-MD5、HMAC-SHA1
具体算法
MD5
Message Digest Algorithm 5
(中文名为消息摘要算法第五版)为计算机安全领域广泛使用的一种散列函数,用以提供消息的完整性保护。该算法的文件号为RFC 1321(R.Rivest,MIT Laboratory for Computer Science and RSA Data Security Inc. April 1992)
Hash算法,过程不可逆
1、抗修改性:对原数据进行任何改动,哪怕只修改1个字节,所得到的MD5值都有很大区别。 2、强抗碰撞:已知原数据和其MD5值,想找到一个具有相同MD5值的数据(即伪造数据)是非常困难的。(不可逆) 3、压缩性:任意长度的数据,算出的MD5值长度都是固定的。128bit 4、容易计算:从原数据计算出MD5值很容易。
MD5的作用是让大容量信息在用数字签名软件签署私人密钥前被”压缩”成一种保密的格式(就是把一个任意长度的字节串变换成一定长的十六进制数字串)。 MD5的典型应用是对一段信息(Message)产生信息摘要(Message-Digest),以防止被篡改。
举例百度网盘
MD5工具的使用
public static String getMd5(String content){ //先获得正文的字节 byte[] bytes = content.getBytes(); try { MessageDigest md5 = MessageDigest.getInstance("md5"); //将正文的字节转换成md5的字节 StringBuffer sb = new StringBuffer(); byte[] digestBytes = md5.digest(bytes); for (byte digestByte : digestBytes) { int i = digestByte & 0xff;
String s = Integer.toHexString(i); if (s.length() == 1){ sb.append(0); } sb.append(s); } return sb.toString();
} catch (NoSuchAlgorithmException e) { e.printStackTrace(); }
return "";}// 也可以处理文件public static String getFileMd5(File file){ try { FileInputStream fileInputStream = new FileInputStream(file); byte[] bytes = new byte[1024]; int length = 0; MessageDigest md5 = MessageDigest.getInstance("md5");
while ((length = fileInputStream.read(bytes,0,1024)) > 0){ md5.update(bytes,0,length); } byte[] digestBytes = md5.digest();
StringBuffer sb = new StringBuffer(); for (byte digestByte : digestBytes) { int i = digestByte & 0xff;
String s = Integer.toHexString(i); if (s.length() == 1){ sb.append(0); } sb.append(s); } return sb.toString();
} catch (FileNotFoundException e) { e.printStackTrace(); } catch (IOException e) { e.printStackTrace(); } catch (NoSuchAlgorithmException e) { e.printStackTrace(); } return "";}是否有破解问题? 加盐
//sault盐public static String getMd5(String content,String sault){ //实现了加盐 content = content + "{!"+ sault + "abc"; byte[] bytes = content.getBytes(); try { MessageDigest md5 = MessageDigest.getInstance("md5"); //将正文的字节转换成md5的字节 StringBuffer sb = new StringBuffer(); byte[] digestBytes = md5.digest(bytes); for (byte digestByte : digestBytes) { int i = digestByte & 0xff;
String s = Integer.toHexString(i); if (s.length() == 1){ sb.append(0); } sb.append(s); } return sb.toString();
} catch (NoSuchAlgorithmException e) { e.printStackTrace(); }
return "";}AES
Advanced Encryption Standard 在密码学中又称Rijndael加密法,是美国联邦政府采用的一种区块加密标准。这个标准用来替代原先的DES,已经被多方分析且广为全世界所使用。 2006年,高级加密标准已然成为对称密钥加密中最流行的算法之一。 AES是一个迭代、对称的分组密码,它的密匙长度分为3种:128位,192位和256位,可以对128位的数据块进行加密和解密。
使用加密和解密使用同一个密码
public class AESUtil { private static final String KEY_ALGORITHM = "AES"; //密码模式(算法/模式/填充) private static final String DEFAULT_CIPHER_ALGORITHM = "AES/ECB/PKCS5Padding";//默认的加密算法
/** * AES 加密操作 * * @param content 待加密内容 * @param password 加密密码 * @return 返回Base64转码后的加密数据 */ public static String encrypt(String content, String password) { try { Cipher cipher = Cipher.getInstance(DEFAULT_CIPHER_ALGORITHM);// 创建密码器 cipher.init(Cipher.ENCRYPT_MODE, getSecretKey(password));// 初始化为加密模式的密码器 //byte[] byteContent = content.getBytes(); byte[] byteContent = content.getBytes("utf-8");
byte[] result = cipher.doFinal(byteContent);// 加密 //String encode = new BASE64Encoder().encode(result); //String encode = Base64Util.encode(result); String encode = Base64.encodeBase64String(result); return encode;//通过Base64转码返回 } catch (Exception ex) { Logger.getLogger(AESUtil.class.getName()).log(Level.SEVERE, null, ex); }
return null; }
/** * AES 解密操作 * * @param content 密文 * @param password 秘钥 * @return */ public static String decrypt(String content, String password) {
try { //实例化 Cipher cipher = Cipher.getInstance(DEFAULT_CIPHER_ALGORITHM);
//使用密钥初始化,设置为解密模式 cipher.init(Cipher.DECRYPT_MODE, getSecretKey(password));
//执行操作 byte[] bytes = Base64.decodeBase64(content); //byte[] bytes = Base64Util.decode(content); //byte[] bytes = new BASE64Decoder().decodeBuffer(content); System.err.println("bytes 数组长度:" + bytes.length); byte[] result = cipher.doFinal(bytes);
return new String(result, "utf-8"); } catch (Exception ex) { Logger.getLogger(AESUtil.class.getName()).log(Level.SEVERE, null, ex); }
return null; }
/** * 生成加密秘钥 * * @return */ private static SecretKeySpec getSecretKey(final String password) { //返回生成指定算法密钥生成器的 KeyGenerator 对象 KeyGenerator kg = null;
try { kg = KeyGenerator.getInstance(KEY_ALGORITHM);
//AES 要求密钥长度为 128 kg.init(128, new SecureRandom(password.getBytes()));
//生成一个密钥 SecretKey secretKey = kg.generateKey();
return new SecretKeySpec(secretKey.getEncoded(), KEY_ALGORITHM);// 转换为AES专用密钥 } catch (NoSuchAlgorithmException ex) { Logger.getLogger(AESUtil.class.getName()).log(Level.SEVERE, null, ex); }
return null; }
}RSA
RSA加密算法是一种非对称加密算法。在公开密钥加密和电子商业中RSA被广泛使用。RSA是1977年由罗纳德·李维斯特(Ron Rivest)、阿迪·萨莫尔(Adi Shamir)和伦纳德·阿德曼(Leonard Adleman)一起提出的。当时他们三人都在麻省理工学院工作。RSA就是他们三人姓氏开头字母拼在一起组成的。
总结:公钥和私钥是成对的,它们互相解密。 公钥加密,私钥解密。 私钥数字签名,公钥验证。
质数1、质数2、乘积
public class RSAUtil { /** * 加密算法RSA */ public static final String KEY_ALGORITHM = "RSA";
/** * 签名算法 */ public static final String SIGNATURE_ALGORITHM = "MD5withRSA";
/** * 获取公钥的key */ private static final String PUBLIC_KEY = "RSAPublicKey";
/** * 获取私钥的key */ private static final String PRIVATE_KEY = "RSAPrivateKey";
/** * RSA最大加密明文大小 */ private static final int MAX_ENCRYPT_BLOCK = 117;
/** * RSA最大解密密文大小 */ private static final int MAX_DECRYPT_BLOCK = 128;
/** * <p> * 生成密钥对(公钥和私钥) * </p> * * @return * @throws Exception */ public static Map<String, Object> genKeyPair() throws Exception { KeyPairGenerator keyPairGen = KeyPairGenerator.getInstance(KEY_ALGORITHM); keyPairGen.initialize(1024); KeyPair keyPair = keyPairGen.generateKeyPair(); RSAPublicKey publicKey = (RSAPublicKey) keyPair.getPublic(); RSAPrivateKey privateKey = (RSAPrivateKey) keyPair.getPrivate(); Map<String, Object> keyMap = new HashMap<String, Object>(2); keyMap.put(PUBLIC_KEY, publicKey); keyMap.put(PRIVATE_KEY, privateKey); return keyMap; }
/** * <p> * 用私钥对信息生成数字签名 * </p> * * @param data 已加密数据 * @param privateKey 私钥(BASE64编码) * * @return * @throws Exception */ public static String sign(byte[] data, String privateKey) throws Exception { byte[] keyBytes = Base64Util.decode(privateKey); PKCS8EncodedKeySpec pkcs8KeySpec = new PKCS8EncodedKeySpec(keyBytes); KeyFactory keyFactory = KeyFactory.getInstance(KEY_ALGORITHM); PrivateKey privateK = keyFactory.generatePrivate(pkcs8KeySpec); Signature signature = Signature.getInstance(SIGNATURE_ALGORITHM); signature.initSign(privateK); signature.update(data); return Base64Util.encode(signature.sign()); }
/** * <p> * 校验数字签名 * </p> * * @param data 已加密数据 * @param publicKey 公钥(BASE64编码) * @param sign 数字签名 * * @return * @throws Exception * */ public static boolean verify(byte[] data, String publicKey, String sign) throws Exception { byte[] keyBytes = Base64Util.decode(publicKey); X509EncodedKeySpec keySpec = new X509EncodedKeySpec(keyBytes); KeyFactory keyFactory = KeyFactory.getInstance(KEY_ALGORITHM); PublicKey publicK = keyFactory.generatePublic(keySpec); Signature signature = Signature.getInstance(SIGNATURE_ALGORITHM); signature.initVerify(publicK); signature.update(data); return signature.verify(Base64Util.decode(sign)); }
/** * <P> * 私钥解密 * </p> * * @param encryptedData 已加密数据 * @param privateKey 私钥(BASE64编码) * @return * @throws Exception */ public static byte[] decryptByPrivateKey(byte[] encryptedData, String privateKey) throws Exception { byte[] keyBytes = Base64Util.decode(privateKey); PKCS8EncodedKeySpec pkcs8KeySpec = new PKCS8EncodedKeySpec(keyBytes); KeyFactory keyFactory = KeyFactory.getInstance(KEY_ALGORITHM); Key privateK = keyFactory.generatePrivate(pkcs8KeySpec); Cipher cipher = Cipher.getInstance(keyFactory.getAlgorithm()); cipher.init(Cipher.DECRYPT_MODE, privateK); int inputLen = encryptedData.length; ByteArrayOutputStream out = new ByteArrayOutputStream(); int offSet = 0; byte[] cache; int i = 0; // 对数据分段解密 while (inputLen - offSet > 0) { if (inputLen - offSet > MAX_DECRYPT_BLOCK) { cache = cipher.doFinal(encryptedData, offSet, MAX_DECRYPT_BLOCK); } else { cache = cipher.doFinal(encryptedData, offSet, inputLen - offSet); } out.write(cache, 0, cache.length); i++; offSet = i * MAX_DECRYPT_BLOCK; } byte[] decryptedData = out.toByteArray(); out.close(); return decryptedData; }
/** * <p> * 公钥解密 * </p> * * @param encryptedData 已加密数据 * @param publicKey 公钥(BASE64编码) * @return * @throws Exception */ public static byte[] decryptByPublicKey(byte[] encryptedData, String publicKey) throws Exception { byte[] keyBytes = Base64Util.decode(publicKey); X509EncodedKeySpec x509KeySpec = new X509EncodedKeySpec(keyBytes); KeyFactory keyFactory = KeyFactory.getInstance(KEY_ALGORITHM); Key publicK = keyFactory.generatePublic(x509KeySpec); Cipher cipher = Cipher.getInstance(keyFactory.getAlgorithm()); cipher.init(Cipher.DECRYPT_MODE, publicK); int inputLen = encryptedData.length; ByteArrayOutputStream out = new ByteArrayOutputStream(); int offSet = 0; byte[] cache; int i = 0; // 对数据分段解密 while (inputLen - offSet > 0) { if (inputLen - offSet > MAX_DECRYPT_BLOCK) { cache = cipher.doFinal(encryptedData, offSet, MAX_DECRYPT_BLOCK); } else { cache = cipher.doFinal(encryptedData, offSet, inputLen - offSet); } out.write(cache, 0, cache.length); i++; offSet = i * MAX_DECRYPT_BLOCK; } byte[] decryptedData = out.toByteArray(); out.close(); return decryptedData; }
/** * <p> * 公钥加密 * </p> * * @param data 源数据 * @param publicKey 公钥(BASE64编码) * @return * @throws Exception */ public static byte[] encryptByPublicKey(byte[] data, String publicKey) throws Exception { byte[] keyBytes = Base64Util.decode(publicKey); X509EncodedKeySpec x509KeySpec = new X509EncodedKeySpec(keyBytes); KeyFactory keyFactory = KeyFactory.getInstance(KEY_ALGORITHM); Key publicK = keyFactory.generatePublic(x509KeySpec); // 对数据加密 Cipher cipher = Cipher.getInstance(keyFactory.getAlgorithm()); cipher.init(Cipher.ENCRYPT_MODE, publicK); int inputLen = data.length; ByteArrayOutputStream out = new ByteArrayOutputStream(); int offSet = 0; byte[] cache; int i = 0; // 对数据分段加密 while (inputLen - offSet > 0) { if (inputLen - offSet > MAX_ENCRYPT_BLOCK) { cache = cipher.doFinal(data, offSet, MAX_ENCRYPT_BLOCK); } else { cache = cipher.doFinal(data, offSet, inputLen - offSet); } out.write(cache, 0, cache.length); i++; offSet = i * MAX_ENCRYPT_BLOCK; } byte[] encryptedData = out.toByteArray(); out.close(); return encryptedData; }
/** * <p> * 私钥加密 * </p> * * @param data 源数据 * @param privateKey 私钥(BASE64编码) * @return * @throws Exception */ public static byte[] encryptByPrivateKey(byte[] data, String privateKey) throws Exception { byte[] keyBytes = Base64Util.decode(privateKey); PKCS8EncodedKeySpec pkcs8KeySpec = new PKCS8EncodedKeySpec(keyBytes); KeyFactory keyFactory = KeyFactory.getInstance(KEY_ALGORITHM); Key privateK = keyFactory.generatePrivate(pkcs8KeySpec); Cipher cipher = Cipher.getInstance(keyFactory.getAlgorithm()); cipher.init(Cipher.ENCRYPT_MODE, privateK); int inputLen = data.length; ByteArrayOutputStream out = new ByteArrayOutputStream(); int offSet = 0; byte[] cache; int i = 0; // 对数据分段加密 while (inputLen - offSet > 0) { if (inputLen - offSet > MAX_ENCRYPT_BLOCK) { cache = cipher.doFinal(data, offSet, MAX_ENCRYPT_BLOCK); } else { cache = cipher.doFinal(data, offSet, inputLen - offSet); } out.write(cache, 0, cache.length); i++; offSet = i * MAX_ENCRYPT_BLOCK; } byte[] encryptedData = out.toByteArray(); out.close(); return encryptedData; }
/** * <p> * 获取私钥 * </p> * * @param keyMap 密钥对 * @return * @throws Exception */ public static String getPrivateKey(Map<String, Object> keyMap) throws Exception { Key key = (Key) keyMap.get(PRIVATE_KEY); return Base64Util.encode(key.getEncoded()); }
/** * <p> * 获取公钥 * </p> * * @param keyMap 密钥对 * @return * @throws Exception */ public static String getPublicKey(Map<String, Object> keyMap) throws Exception { Key key = (Key) keyMap.get(PUBLIC_KEY); return Base64Util.encode(key.getEncoded()); }}文章分享
如果这篇文章对你有帮助,欢迎分享给更多人!